Switch
414 archivos
-

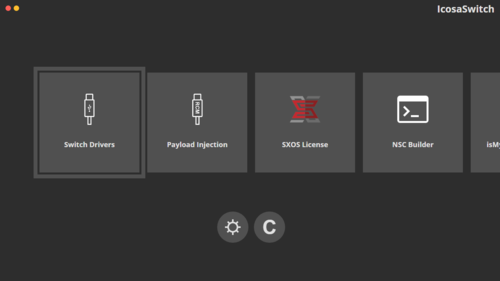
IcosaSwitch
IcosaSwitch es una interfaz gráfica para automatizar varias funciones de algunas de las herramientas más populares de la scene de Switch.
Aplicación creada por Pharuxtan.
-
In-Home-Switching
This is a homebrew that enables streaming of PC games to the Nintendo Switch.
Have you ever been told by your parents that spending hours sitting in front of a PC was bad for you (like I was)? Well, now you can play your games portably anywhere in your house!
This project is fairly new, so please do not consider it totally stable. If you encounter issues, feel free to submit them.
Features:
Stream PC screen to a Nintendo Switch in your local network 720p (full Switch-Tablet display resolution) 40-60 FPS (if not see Troubleshooting) Low delay (again, see Troubleshooting) Capture controller input on Nintendo Switch Emulate an Xbox controller on the PC PC app offers picture quality adjustments How to Use
There you can find an Archive with the App for the Switch as well as the corresponding PC companion app. For the PC App, just execute In-Home-Switching.exe in the Windows directory after unzipping.
On PC, Scp drivers must also be installed (just unzip and execute Driver Installer/ScpDriverInstaller.exe). Otherwise the program will crash silently.
Also please set your PC resolution to 1280x720p in Windows for getting much better performance of screen capturing while running the app.
On the Switch, find out its IP address (in the Internet settings) and start the app with your Switch CFW. Then type in the Switch's IP address on the PC app and hit the Connect button.
Current Limitations
Only works with Windows 8 (64-bit) and newer No audio support atm No support for Switch CFW other than Atmosphère or Kosmos Known issues
So far Switch crashes when put to sleep with app running (please close app beforehand, we have not fixed this issue yet) App breaks when Switch changes from docked to handheld mode or vice-versa. Please quit the app before doing so. Further notices
This app uses core overclocking to 1785 MHz on the Nintendo Switch. We use this measure in order to decode the incoming videos efficiently. As far as we know, there have been no reported cases of this damaging any devices. In other words, it is considered safe. Still we do not warrant for any potential device damage caused by this homebrew.
Scheduled for Future Releases
Stream PC audio to Switch Option to disable Switch Overclocking MacOS and Linux Support Showing Switch IP in-app Multi-controller support Mouse emulation More efficient threading GPU encoding on PC Build instructions
Use the PKGBUILD from here for ffmpeg on Switch with more protocols enabled.
Everything else will follow here in short time (ask jakibaki on AtlasNX discord if necessary).
Troubleshooting
Nice videos, but sadly that delay makes it unplayable
If you are experiencing delays greater than 0.1 seconds, either your PC is just too slow for your chosen quality options (try worsening image quality) or your local network is bad. Basically we need instant data transfer in your network to work properly (this has nothing to do with throughput, just latency).
Some WiFi-routers unfortunately just aren't up to the task.
These framedrops hurt my eyes!
Your PC is probably too slow for encoding with the games/applications on. Try other applications, lower image quality and, if you haven't already, set your PC screen resolution to 1280x720p (saves scaling).
No drops, but my framerate is just very low
Well, in our tests we had 60 FPS on Windows 10 with low image quality... I guess you can try the same strategies as for fixing framedrops, I hope that helps.
License
This code is licensed GPLv3 and this has a reason: We do not want to see (or read about) any parts of this project in non-open-source software (everything that is not GPLv3 licensed). Please share the notion of free code for everyone.
Credits to
ffmpeg for being such a powerful media tool that we use on PC and Switch. SwitchBrew for libNX and its ffmpeg inclusion Atmosphère for being such a great Switch CFW Captura for showing us how to capture frame input with Windows Duplication API simontime for his switch-usb-screen-stream-sharp project for Windows ScpDriverInterface for the Xbox drivers on Windows by Jakibaki.
-
Incognito
Wipes some personal information from your Nintendo Switch by removing it from PRODINFO.
Purpose
It enables your switch can go online while worrying slightly less about a ban. It prevents malicious homebrew applications from stealing your personal certificate. Disclaimers
This application does not remove all personal information from your Switch, and should not be treated as a true preventative measure against getting banned.
Always have a NAND backup. I am not responsible for any bricks or bans. Use at your own risk, as this is an experimental program.
This application backs up your PRODINFO to the SD root. You should keep this backup in a more secure location, and not leave it on the SD card where malicious applications can read it.
by Blawar.
-
Incognito_RCM
Incognito_RCM is a bare metal Nintendo Switch payload that derives encryption keys for de- and encrypting PRODINFO partition (sysnand and emummc) and wiping personal information from your Nintendo Switch as to go online while worrying slightly less about a ban. It has a builtin backup and restore functionality.
It is heavily based on Lockpick_RCM and takes inspiration from incognito.
Massive Thanks to CTCaer, shchmue and blawar!
This project is in early stage, so have a nand backup!!
Usage
Launch Incoginito_RCM.bin using your favorite payload injector Use menu to make a backup! (Will be written to sd:/prodinfo_sysnand.bin and sd:/prodinfo_emunand.bin respectively) Choose either Incognito (sysNAND) or Incognito (emuMMC) to wipe personal information If you ever want to revert, choose restore menu points Known Issues
Chainloading from SX will hang immediately due to quirks in their hwinit code, please launch payload directly Disclaimers
This application does not remove all personal information from your Switch, and should not be treated as a true preventative measure against getting banned. ALWAYS have a NAND backup. I am not responsible for any bricks or bans. Use at your own risk, as this is an experimental program. This application backs up your PRODINFO to the SD card. You should keep this backup in a more secure location, and not leave it on the SD card where it could be subject to corruption or be read by malicious applications. by jimzrt.
-
IPS Patch Creator
IPS Patch Creator es una aplicación para Windows que nos permite crear nuestros propios parches IPS para Switch.
La aplicación ha sido creada por mrdude 2478.
-
Iris - All in One
Iris is an all-in-one software for the Nintendo Switch that will make your hack management easier. Iris will indeed be responsible for consolidating all the links of all Nintendo Switch updates.
Iris is also accompanied by a tutorial to install them.
Also has the best software that is integrated:
Tinfoil USB Switch backup manager Xlinkay Theme injector Tegrarcmgui NRO to NSP
-
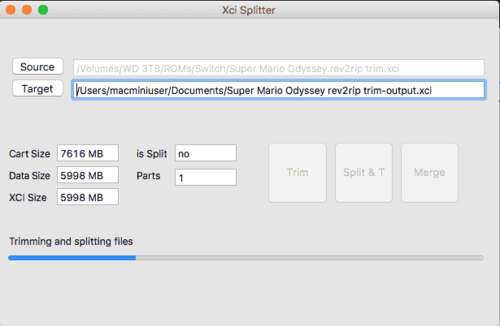
Java XCI Splitter
Java tool to split and trim nintendo switch xci files. Windows, macOS and Linux versions.
Features
splitting and trimming of files (XCI and NSP) trimming of files (XCI) merging of files with padding (also should pad a not split trimmed file) small gui Know limitations:
no cli version only sanity tested on linux and macos, but should work How to use:
have 64 bit java in version 1.8 (or higher) installed (Oracle or OpenJDK) double click the correct jar file (Most likely only Windows and Linux) execute on the command line (examples below) java -jar xci-splitter-win64-1.4.0.jar java -jar xci-splitter-linux64-1.4.0.jar java -jar xci-splitter-osx-1.4.0-capsule.jar by choss.
-
JKSV
JKSV es una aplicación multipropósito para Nintendo Switch.
Cosas que se puede hacer actualmente con JKSV:
Volcar y restaurar datos guardados. Esto incluye la capacidad de volcar y restaurar a / desde cualquier ubicación en SD presionando menos y usando el modo avanzado. Los datos guardados se pueden descargar y restaurar directamente desde y hacia archivos ZIP habilitando Exportar a ZIP en los menús de opciones. Las carpetas seguirán siendo detectadas y utilizables incluso con esta opción habilitada. Sistema de volcado de datos guardados El volcado de estos datos siempre está habilitado, pero la escritura debe estar habilitada desde el menú de opciones. Escribir a esto puede ser muy peligroso. Abrir y explorar las particiones de almacenamiento bis a través del menú Extras BIS Storage se abre dentro de un navegador de archivos básico. La lista de la partición está a la izquierda. Tu SD está a la derecha. Solo la copia a SD y las propiedades de archivo funcionan en particiones BIS. La escritura y la eliminación están deshabilitadas a menos que estén habilitadas, como los datos de guardado del sistema. Extras: Posibilidad de eliminar las actualizaciones de firmware descargadas de NAND. Esto se encuentra en el menú de extras (ZR en la selección de usuario) Terminación de procesos por ID. Permitiéndole volcar archivos del sistema que normalmente no se pueden abrir. Montar por ID de guardado del sistema. Normalmente se usa cuando el proceso terminado hace que JKSV no pueda volver a escanear títulos sin que el Switch se bloquee. Monte y abra RomFS del proceso, el menú de homebrew se hace cargo (si se inicia como NRO). Mantén presionada la tecla R mientras abres un juego o subprograma con Atmosphere para que se cargue el menú de homebrew. Abra JKSV y presione menos y seleccione Montar proceso RomFS. Las romfs de la aplicación deberían aparecer en el navegador junto con su SD a la derecha. Guía rápida de uso de JKSV:
Se puede definir una ruta personalizada creando "sdmc: /switch/jksv_dir.txt" y escribiendo la ruta que desea utilizar. Por ejemplo, sdmc: / switch / JKSV / forzará a JKSV a crear su carpeta en la carpeta switch homebrew.
Se pueden configurar "títulos seguros" personalizados creando un archivo llamado titleDefs.txt en su directorio JKSV. Estas son las carpetas de la SD en las que se almacenan las partidas guardadas. Por ejemplo, si crea este archivo y agrega la línea 0100BFE00E9CA000 = "The Witcher 3 CE", The Witcher 3 usará el directorio [ruta] / JKSV / The Witcher 3 CE / en lugar de su ID de título. Estos deben ser ASCII o no funcionarán.
Selección de usuario A abre los archivos guardados del usuario seleccionado. Y Vuelca todos los datos guardados de todos los usuarios, los datos guardados del dispositivo y los datos guardados de BCAT. Los datos de guardado del sistema no están incluidos en esto. X Cambia el modo de interfaz de usuario a uno basado en menú de texto para las personas que prefieren los menús de texto de estilo 3DS JKSM. Menos Abre el menú Opciones. ZR abre un pequeño menú de extras. Seleccionar título A Abre el título para realizar copias de seguridad y restaurar. L y R cambian el usuario actual. Y Vuelca todo lo guardado para el usuario seleccionado actualmente. X agrega el título seleccionado a una lista de favoritos que se colocan en la parte superior de la lista de títulos / íconos. Menos agrega el título seleccionado a una lista de títulos ignorados. ZR BORRADOS El título seleccionado se guarda del sistema. Esto es lo mismo que ir a la configuración y eliminar a través de la gestión de datos. ESTO NO BORRA LAS CARPETAS DE GUARDAR DE JKSV. Menú Copia de seguridad / Carpeta Menos abre el modo de archivo. El modo de archivo es un explorador de archivos básico para mover archivos y carpetas individuales. Esto también agrega la capacidad de restaurar guardados desde cualquier ubicación en su tarjeta SD. Si mantiene presionada la tecla L o R mientras selecciona nuevo con A, automáticamente le asignará un nombre a la copia de seguridad sin abrir el teclado. A crea una nueva copia de seguridad JKSV agrega algunas sugerencias al diccionario del teclado, tales como: cadenas de fecha, el nombre del usuario actual si es seguro y el título actual o una abreviatura generada. Y Restaura los datos guardados de la carpeta seleccionada. X Elimina la carpeta seleccionada. ZR BORRA los datos guardados actuales para el título de su sistema, pero deja el archivo en NAND. Modo de archivo A abre directorios. B vuelve a subir una carpeta si es posible. X abre un pequeño menú de opciones para archivos y directorios: Copiar a [X]: copia el elemento seleccionado actualmente en la ubicación abierta en el otro panel. Seleccionando el primero. utilizará el directorio abierto como raíz para copiar. Eliminar elimina el elemento seleccionado actualmente. Renombrar cambia el nombre del elemento seleccionado actualmente. Make Dir crea una carpeta. Propiedades obtiene el tamaño del archivo y el tamaño del directorio. ZL o ZR Cambia el menú controlado. Extras SD To SD Browser abre el navegador de archivos con su SD abierta en ambos paneles BIS: [X] abre la partición [X] en el navegador de archivos. Eliminar actualización elimina las actualizaciones del sistema descargadas de Nintendo y solicita reiniciar el sistema para deshacerse del problema de la actualización. Terminate Process solicita una identificación de título para finalizar. Mount System Save solicita el ID de guardado para montar. Esto es para cuando JKSV no puede volver a escanear con un proceso terminado. Volver a escanear títulos vuelve a cargar la información de los datos guardados. Esto se puede usar para recargar después de que se termina un proceso o cuando se cambian las opciones. Mount Process RomFS abre las romfs del título que se toman para iniciar el menú de homebrew. Esto solo funciona como NRO. El NSP solo abrirá el propio RomFS de JKSV. La carpeta Backup JKSV escribe la carpeta JKSV completa en un archivo ZIP y la coloca en su carpeta JKSV. Opciones Incluir Dev Sv agregará juegos de Device Save como Animal Crossing a los guardados de su cuenta de usuario para facilitar el acceso. AutoBackup creará una copia de seguridad de su guardado actual antes de restaurarlo por si acaso. Overclock sincronizará la CPU de su Switch a 1224MHz en el arranque. Mantener presionado [X] desactivará la necesidad de mantener presionado A para confirmar una acción. Forzar montaje solo permitirá que JKSV enumere los títulos que puede abrir. La desactivación dará una lista completa de todos los guardados en su sistema Account Sys. Los guardados le permitirán ver y abrir los guardados del sistema asociados con las cuentas de usuario. Escriba a Sys. Los guardados le permitirán escribir datos en los archivos guardados del sistema. Esto puede resultar peligroso. El modo de interfaz de usuario de texto permite una interfaz de usuario simplificada que solo usa menús de texto Direct FS Commands usa un contenedor simple en lugar del stdio de libnx. Omitir selección de usuario salta directamente al primer usuario encontrado en lugar de requerir que se seleccione un usuario. Exportar a ZIP utiliza minizip para comprimir los datos guardados en un archivo ZIP en lugar de en una carpeta llena de archivos. Esto ahorra espacio y hace que los ahorros en movimiento sean más convenientes. Ordenar cambia la forma en que se ordenan los títulos. Alfabéticamente, más tiempo reproducido o por último título reproducido. Aplicación creada por J-D-K.
-
Joy-Con Utility
Homebrew para Switch que nos permitevolcar, flashear el firmware de los Joy-Con y cambiar sus números de serie (SN).
Joy-Con Utility es una aplicación creada por Yoti.
-
Joycon ToolBox
A Switch homebrew for setting joycon colours.
Config file
The config file should be placed in sdmc:/config/JCTB.cfg
The structure of the config file is Colour set name Left joycon body colour Left joycon buttons colour Right joycon body colour Right joycon buttons colour
All colours should be in RGB hexadecimal format.
Controls
Up / Down on D-pad to select a colour set. A to apply the colours Credits
AtlasNX dev chat for help with this and other projects. skullkeeper94 for testing. Jaded from GBATemp for testing and helping with the config. hax4dayz#9645 from discord for testing. Daniel C#7205 from discord for testing. by CompSciOrBust.
-
JTegraNX
JTegraNX es otro inyector de payload RCM escrito en Java y C++.
Para ejecutar el programa necesitamos Java 8 o superior instalado en nuestro ordenador.
JTegraNX no funciona en Java 11 o superior porque JavaFX no está incluído. El que quiera usar JTegraNX desde Java 11 o superior necesitará crearla desde el código fuente.
JTetraNX es compatible con Windows, macOS y Linux.
Características principales de JTegraNX
Inyección de payload RCM Auto-inyección Indicador de estado RCM con imágenes transparentes Sistema de configuración (similar a los favoritos en TegraRCMGUI Payloads agrupados Icono de bandeja con funcionalidad Preparación de la SD Card Detección/Instalación del driver APX Modo portátil Como usar JTegraNX
Elige el payload o la configuración Inyectar Usando configuraciones
El sistema de configuración nos permite guardar que es lo que introducimos en el campo "Payload Path" y cargarlo otra vez en otra sesión.
Cargando una configuración:
Simplemente haz click en "Load Config" para mostrar la lista de configuración, posteriormente selecciona la configuración que quieres usar. Guardando una configuración:
Simplemente haz click en "Save Config", introduce un nombre para esa configuración y pulsa intro. Personalizando de los ajustes
Ahora puedes personalizar tus ajustes de JTegraNX como quieras:
Ahora puede alternar la verificación automática de actualizaciones de JTegraNX. Ahora puede alternar la verificación automática de actualizaciones de carga útil. Ahora puede elegir qué cargas útiles desea incluir con JTegraNX. Ahora puede activar o desactivar el icono de la bandeja. Preparación de la tarjeta SD
Esta nueva funcionalidad de JTegraNX descargará todo los requisitos básicos para preparar tu Switch para la instalación de un CFW y copiará todo en las rutas específicas.
Detección/Instalación del driver APX
JTegraNX puede detectar si el driver APX no está presente o es incorrecto, y si este es el caso, tienes la opción de instalarlo desde ahí mismo.
Modo portátil
El modo portátil llega al lugar donde se crean el directorio "Payloads" y el archivo de configuración principal en el directorio de trabajo donde se ejecuta el JAR. Puede cambiar entre el modo estándar y portátil a través del menú Configuración.
Bundled Payloads
Para cualquier payload empaquetado, JTegraNX los descargará automáticamente, los colocará en el directorio "Payloads" y, opcionalmente, buscará actualizaciones cada vez que se inicie el programa. Si las actualizaciones están habilitadas y se encuentra una actualización para un payload, se encargará de ello.
Payloads disponibles:
fusee-primary Hekate Lockpick_RCM Incognito_RCM TegraExplorer Agradecimientos
suchmememanyskill for TegraExplorer. rajkosto for memloader and TegraRcmSmash (No longer being used in v1.6+). shchmue for Lockpick_RCM. eliboa for the images from TegraRcmGUI. The creators of Atmosphère for fusee-primary. CTCaer for Hekate. jimzrt for Incognito_RCM Aplicación creada por dylwedma11748.
-
Julius Switch
Julius is an open source re-implementation of Caesar III.
The aim of this project is to create an open-source version of Caesar 3, with the same logic as the original, but with some UI enhancements, that is able to be played on multiple platforms. The same logic means that the saved games are 100% compatible, and any gameplay bugs present in the original Caesar 3 game will also be present in Julius.
UI enhancements include:
Support for widescreen resolutions Windowed mode support for 32-bit desktops Julius requires the original assets (graphics, sounds, etc) from Caesar 3 to run. Thanks
Thanks to my supporters on Patreon: Andyways, CountDuckula, Greg Gibson, Jesse Harlin, Özgür Karter, Matthew Machnee, and RadicalR. Thanks to the many developers of the game, such as Bianca van Schaik, crudelius, and all the others who were involved in creating this game. Thanks to @devnoname120 for porting the game to the Vita. Installation Instructions
Extract the contents of julius_switch.zip into the switch folder on your SD card, so that you have a folder switch/julius with julius.nro inside. Copy all the files from a Caesar 3 install into the switch/julius folder on you SD card, so that you have the file c3.eng and more in your folder, in addition to julius.nro. Caesar 3 can be purchased from gog.com for example. Switch-exclusive Features
USB mouse and keyboard support Left analog stick mouse control Right analog stick map scrolling Touchpad-style mouse controls with click gestures (short single tap for left click etc.) On-Screen keyboard via plus-key, useful to enter player name Controls
Left analog stick = move the mouse pointer Right analog stick or dpad up/down/left/right = Move the map. R / A = left mouse button L / B = right mouse button X = Simulate Pg. Up keypress Y = Simulate Pg. Down keypress Plus = Bring up on-screen keyboard, useful to enter player name etc. Touch controls
Note: for multi-touch gestures, the fingers have to be far enough apart from each other, so that the Vita will not erroneously recognize them as a single finger. Otherwise the pointer will jump around.
Single short tap = left mouse click Single short tap while holding a second finger down = right mouse click Single finger drag = move the mouse pointer, how far the pointer moves in response to finger motion depends on the Mouse Speed setting Dual finger drag = drag'n'drop (left mouse button is held down) Three finger drag = drag'n'drop (right mouse button is held down) by rsn8887.
-
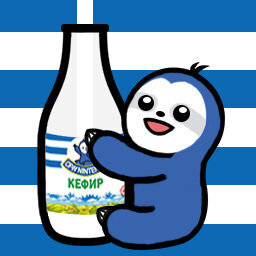
Kefir
Pack de CFW para Atmosphere para Nintendo Switch. Soporte tanto para modelos Erista como Mariko.
¿Qué incluye Kefir?
Kefirosphere, basado en Atmosphere Sigpatches. Gracias al sigpatch de Atmosphere, podemos ejecutar aplicaciones y juegos no firmados. hekate bootloader. Gracias a este bootloader podemos ejecutar un firmware y otros payloads a través de un mismo menú, crear y restaurar una copia de seguridad de la NAND, crear una EmuNAND, obtener información sobre el estado del sistema, montar una tarjeta de memoria al PC sin sacalar de la Switch o reparticionar la tarjeta de memoria para instalar otro sistema operativo, entre otras cosas. Payloads instalados: Lockpick_RCM - Payload para dumpear las keys de la consola. Incognito_RCM - Payload para eliminar la información prodinfo, que nos permite evitar un posible baneo de una forma más efectiva. Homebrew instalado: DBI - Programa que nos permite instalar juegos vía USB o desde una tarjeta de memoria. tinfoil - Programa que nos permite descargar juegos a la consola directamente desde internet. FreshHay - program for downloading and unpacking the recommended version of the system software directly on the console NX-Shell - file manager NX-Activity-Log - a program that allows you to track time spent in games JKSV - program for backup and restoration of saves Kefir Updater - program for updating kefir via the Internet pplay - video player Daybreak - program for safe update version of the system software of the STB NXThemes Installer - custom theme manager switch-cheats-updater - a program for downloading cheats for installed games. Linkalho - account linking program Installed modules. Modules are additional components that work inside Atmosphere and allow you to do various cool things, such as using xbox-compatible controllers, emulating amiibo, overclocking, and more. Unfortunately, SX OS modules do not support sys-con - a module that allows you to connect almost any gamepads to the console via USB Mission Control - a module that allows you to connect almost any gamepads to the console via bluetooth Tesla Overlay Menu - special overlay menu for interacting with the system ovlEdiZon.ovl - Module for using cheats ovlSysmodules.ovl - A module for enabling and disabling installed system modules (such as overclocking, emuuibo, etc.) nx-ovlloader{:target="_blank"} - Host process for loading Switch overlay OVLs (NROs)
Kefir installation instructions (auto, Windows only)
Download kefir.zip Unpack kefir.zip anywhere on your PC Insert into PC console's memory card Run install.bat from the folder where you unpacked kefir.zip and carefully read everything that is written on the screen Enter answers that are appropriate for your situation If you are using Caffeine remember to select it in the options of installer Wait for the end of copying Manual installation instructions (all OS)
Connecting the STB memory card to the PC:
Via DBI (Recommended for MacOS and other OS users too) Start DBI via HBL Connect your console to your PC using a USB cable In DBI select "Run MTP Responder" A new device is mounted on the PC - Switch, the folder "External SD card" and there is your memory card Remember, MTP can only transfer files manually. Automatic installation via MTP is not possible. By inserting a memory card into a PC (not recommended for macOS users) Reboot the set-top box through the menu called by holding the (POWER) button On the splash screen of kefir, press the volume down button to get into hekate Now you can remove the memory card from the PC and insert it into the switch. When you pull out the memory card in the hekate, you do not need to re-forward the payload to enter the firmware. It is enough to insert the card into the console and run the firmware via the Launch menu Removing old firmware files
Remove from the atmosphere/contents folder the folders with the following names (if any): 010000000000100D 0100000000000032 0100000000000034 0100000000000036 010000000000000D 420000000000000E 0100000000001000 0100000000000352 4200000000000010 010000000007E51A Delete all folders from the root of your memory card, except the folders emuMMC and Nintendo, if any. Installing Atmosphere
Copy the contents of ** the archive kefir.zip from the repository of kefir to the root of the memory card. Correct the attributes according to the instructions below Fix attributes
In hekate go to the Tools menu, switch to the Arch bit • RCM • Touch • Partitions tab (at the bottom of the screen), select Fix Archive Bit To get into hekate, if you are not in it, restart the STB by holding the power button for 5 seconds while in the custom firmware, then select Power Options -> Restart. When the kefir splash skin appears, press (VOL-) (volume down button) After finishing fixing the attributes, click Close in the upper right corner Select Home -> Launch -> Atmosphere to boot back into the firmware Important information!
Hekate reboots directly from the firmware, through the usual reboot menu. Just hold down (VOL-) during kefir splash screen You can access your memory card without removing it from the HOS via MTP (DBI -> Run MTP Responder) Installing and updating kefir is the same! by rashevskyv.
-
Kefir Updater
Kefir Updater is a homebrew for Nintendo switch, which can update Kefir or add linked Nintendo account by one-click!
Instruction for automatic update
Download KefirUpdater.nro Put it into sdmc://switch/kefirupdater Run Kefir Updater from hbmenu Press Check updates in menu Follow the prompts that appear on the screen. Instruction for add linked account
Run Kefir Updater from hbmenu Click "Add linked Account" Follow the prompts that appear on the screen. by Povstalez.
-
kEx
A full-system filebrowser for the Nintendo Switch, written in C++.
Usage
Copy the .nro to your Switch folder and load through the homebrew menu.
Use the A button to enter a partition/directory, B button to go back, and + to exit.
Press X to copy a file, and Y to paste the file either to the SD card, or the same partition (does not currently work across system partitions). There is currently no indicator during a copy, only after, so give large files some time to copy.
Press - to delete a file (press the A button to confirm deletion, any other button to cancel).
NOTE: This can be dangerous, use at your own risk!
TODO
*Majorly refactor codebase *Add the ability to view files (hex editor?) *Add other major filebrowser utilities *Add support for more partition types *Prettify! License
This project is licensed under the GNU GPLv3 license.
I am not liable for anything that may happen to your console through the use of this software.
-
Kezplez-nx
The "easiest" way to get all 80+ Nintendo Switch keys to use with hactool!
Usage
YOU MUST HAVE DUMPED YOUR FUSES AND TSEC_KEYS BEFORE USING THIS.
Launch CTCaer's hekate mod (v4.0+), and dump your fuses (not kfuses!) and tsec_keys by going through the menu For fuses, Console Info -> Print fuse info -> Press power button For tsec_keys, Console Info -> Print TSEC keys -> Press power button IF YOU ARE ON 1.0.0 - 2.3.0, ALSO DO THE FOLLOWING IN HEKATE:
Tools -> Backup -> Backup eMMC BOOT0/1 Tools -> Dump package1/2 Launch CFW so you can access homebrew Via FTPD, Appstore-nx, or some other method of getting files on your switch, put kezplez-nx.nro and kezplez-nx.nacp in "/switch/kezplez-nx" on your sd card.
Launch it, read the information presented, and press A to have the magic happen Keys will appear at "/prod.keys" on your sd card, you can then use them with hactool via
A) (Recommended) Place them at $HOME/.switch/prod.keys, this allows you to use hactool freely from anywhere without having to worry about where your keyfile is B) (Not Recommended) Place them in the same directory as hactool and use -k or --keyset. This is not recommended because you must directly specify where your keyfile is every time you wish to use hactool In the future, there may be features such as uploading keys to a site like pastebin.com for convenience or a payload version of this application so you can run it in RCM. by tesnos.
-
Killer Whale Cursor for Nintendo Switch
This is a recreation of the famous Killer Whale Cursor flash app for the Nintendo Switch, made using only Devkitpro and a couple of libraries.
Current features implemented:
Use of motion tracking in the right joy-con and touch input to make the Killer Whale follow the cursor Ability to reset cursor position by pressing Y Ability to toggle between a front and rear view of the whale (basically changing the draw order) by pressing X Toggle on-screen text for full usage of the screen by pressing B Customize motion sensitivity, whale movement speed, and "flexibility" (how fast the individual segments follow eachother) Customizable whale diffuse color, as well as background color Planned features:
Loading custom backdrop images from the microSD card Slightly more accurate motion tracking by Voxel9.
-
Kip Select
This is a WIP kip manager for atmosphere's fusée launcher, this homebrew will not work with Kosmos, or any other pack that boots from hekate, while it will run it wont do anything as hekate controls what kips load in those packs. This homebrew is intended only for use with 'vanilla' atmosphere, launched with fusée.
How To Use
This howmebrew enables and disables kips by moving them between the /atmosphere/kips/ folder and an added folder called /atmosphere/kips_disabled/. Since fusée only checks the kips folder on boot, anything in kips_disabled gets ignored. The homebrew automatically creates the required folders (/atmosphere/kips/ & /atmosphere/kips_disabled/) if they are missing, all you need to do is make sure your kips are in one of the two folders before launching. The .nro has no other special requirements and should be launchable from anywhere (although simply placing it in /switch/ is recommended).
This homebrew also now supports BCT.ini editing on atmosphere version 0.8.1+
Current changeable values are debugmode and debugmode_user, both required for using a cheat engine such as sys-netcheat.
Notes
This homebrew only supports a maximum of 32 kips, attempting to use more will result in a error and possibly even a console hard crash.
Try and name your kips something reasonable, the program should be able to work with any file name the sdcard fs supports but naming your kip with emoji's isn't going to help.
I have no idea how safe this is to use on exFat, it shouldn't corrupt anything as all file operations are correctly closed, but should isn't won't, please be careful.
-
KittyNXBuilder (ex RussellNX)
KittyNXBuilder, antes conocida como RussellNX, es una aplicación para crear juegos homebrew para Nintendo Switch usando el runtime de GameMaker Studio 2.
Este es el motivo de porque hay otros archivos o carpetas dentro del .zip más allá del RissellNX.exe:
build - es un prebuilt de GMS2.2.3 Switch Runner, que ejecutará tu juego. htmldir -es solo un directorio con un index.html dentro, diseñado para alojar las secciones de ayuda e información legal en NSP. hacbrewpack - ies una herramienta que crea NSP. license - es una carpeta que contiene los archivos de licencia de GMS2 para GMAssetCompiler, no la borres! Meow!
Créditos
Nik - making this tool YoYoGays (YoYoGames) - making GameMaker Studio 2 TheRadziu - beta testing on a real switch PlastoPyC - uwu-ing Nintendo - making NintendoSDK (not included here, sorry!) by nkrapivin.
-
Kosmos (SDFilesSwitch)
This handy All-in-One package includes everything you need to run Hekate / Atmosphere / ReiNX with some extra patches to enhance your experience.
Features
Up-to-date package Firmware launching and sleep mode for every firmware Starting games after launching the Homebrew Menu works Splash Screens and instant launch Game Mods A background FTP-Server Atmosphere ReiNX Signature Patches NSP Installation Automatic Updating through your console Launching the album by pressing R Full Atmosphere Completely modular Drag and drop Background audio-player Background netcheat system (like Cheat Engine) Discord Rich Presence integration Featured Homebrew How to use
Download Hekate or use the payload that comes with the package Download the latest release of your designated CFW and extract it to the root of your Switch SD card Start hekate or ReiNX through e.g. Fusée Gelée, TegraRcmSmash or WebCFWLoader ??? Profit! Featuring
Atmosphère Switch Homebrew Menu Switch Homebrew Loader AppstoreNX EdiZon SDFilesUpdater Sys-FTPD Tinfoil ReiNX SwitchPresence xor:play -
Kosmos Patches (ES & FS including ACID & nocmac)
Due to the latest changes on Hekate v5 & Tinfoil/Lithium, I decided to discontinue my custom fork.
Instead, this repo will only maintain FS patches for Hekate and ES patches for atmosphere from now on. (Mainly used for Kosmos)
Simply unpack the provided archive to the root of SDCard will be enough.
This archive includes following
ES patches for FW 2.0.0 - 8.1.0
ES patches credits:
2.0.0-6.2.0: Rajkosto 7.0.0-7.0.1: Prefers to be unknown 8.0.0-8.1.0: anon FS patches for FW 1.0.0 - 8.1.0
Added ACID patches to all FWs (1.0.0-8.1.0) major thanks to @rajkosto and @EliseZeroTwo Note : ACID patches are part of "nosigchk" patches, so no additional flag is needed to apply these patches. Added nocmac patches for all FWs up to 6.2.0 (This helps downgrading when you face infamous blackscreen issue or stuck at Nintendo logo after downgrading to 6.1.0 from 7.x and higher.) In order to use "nocmac patches", please add "kip1patch=nocmac" in hekate_ipl.ini.
by Joonie86.
-
Kosmos Reborn
A revival of the classic Kosmos with less bloat, and more features.
Featuring
Atmosphère - A customized firmware for the Nintendo Switch. Hekate - A custom graphical Nintendo Switch bootloader, firmware patcher, tools, and many more. Kosmos Reborn Setup - First time setup for Kosmos Reborn, downloads and installs only the homebrew & sysmodules you want. by TeamLibra.
-
Kosmos Updater
A homebrew application for the Nintendo Switch that will automatically update your CFW with the latest from Kosmos.
Credits
Thanks to vgmoose for examples on using minizip in appstorenx. Thanks to y4my4m and natinusala in the ReSwitched discord for their discussions around libcurl. by AtlasNX.
-
L4T Ubuntu for Switch
Port para Switch de la distribución Ubuntu 18.04 LTS de Linux.
How to install :
Download the image below and extract it. Copy it to your sdcard using a program such as Etcher. Start hekate and select L4T from the configs menu. Wait about 2 to 4 minutes during the initial loading. Go through the installation process - make sure you do not dock the console during this time. Once the initial installation is complete and you are on the login screen, it is recommended to restart Press and hold the on / off button for 10 seconds. Load again hekate and select L4T as payload. Log in and open the "Disks" app Select the second partition of your sdcard and click on the speed icon Choose Resize and change the size according to the available space. Enjoy, you now have complete Ubuntu on your Switch! Bugs:
The joycons do not work when they are connected to the console Dock docking while an ssh session is open may prevent the display from turning off properly. No sleep mode USB OTG - works well in dock mode although Vulkan is buggy in Dolphin by Team Switchroot.
-
LaiNES - Nintendo Switch Port
NES emulator for Switch.
Controls:
Direction -> DPad A -> A B -> B Select -> Minus Start -> Plus Menu -> R To Use:
Extract to sdcard:/switch/LaiNes Place ROMs in sdcard:/switch/LaiNes/game IMPORTANT: place the res folder on the root of your sdcard or it'll crash.


-
Recientemente actualizado
-
Novedades populares