Xbox 360
159 archivos
-

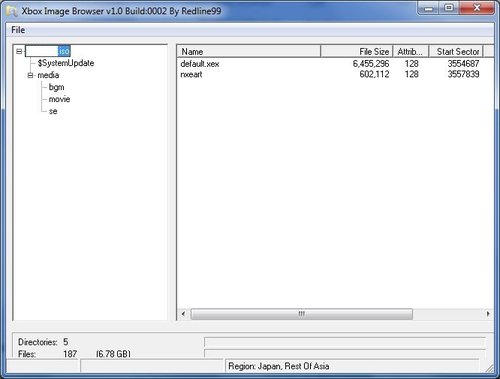
Xbox Image Browser
=============== Xbox Image Browser v2.9 Build:0350 by Redline99 Browse and Extract ISO files Added - Added folder preselection to Save As browse dialog Added - Command line parsing to open an iso from explorer (Open With command) NOTE: Xbox Image Browser is intended to only work with iso files. Reading directly from a dvd disc is supported by the Image Browser embedded in Xbox Backup Creator. =========================== Xbox Image Browser v2.9 Build:0345 by Redline99 Browse and Extract ISO files Added - XGD3 Support Changed - Some minor clean ups USAGE: Selecting the "su20076000_00000000" will display the version number. Selecting an "xex" file will display the region Right clicking on top level file name will extract the entire ISO. Right clicking on a folder will extract it and it's sub folders. Right clicking on a single will will allow you to extract that file. Right clicking on a single file will allow you to replace the file. (The file size must be the same or smaller.) This application is basically the same one embedded in Xbox Backup Creator. NOTE: If your getting an error in windows 7 (or other os) with mscomctl.ocx which is stopping backup creator from running then try this Get the mscomctl.ocx whether zip/rar form or whatever, extract to( C:\WINDOWS\SYSTEM directory. ) LEFT CLICK ON "Command Prompt" and choose "RUN AS ADMINISTRATOR" this is important, RUN AS ADMINISTRATOR ok got that good, then use "CD C:\Windows\system" NOT \system32 Then "regsvr32 mscomctl.ocx" Running XBC on 64-bit windows 7 its different again you need to put MSCOMCTL.OCX into C:\Windows\SysWOW64 folder. Run command prompt as Administrator and ether type or copy and paste this in >>> Regsvr32 c:\windows\SysWOW64\MSCOMCTL.OCX if anyone needs it > Here. http://www.majorgeeks.com/files/mscomctl.zip
-
Xbox Live DLC Sorter
Program which sorts your DLC's and Arcade Games into the appropriate folders.
-
Xbox Ripper
V1.0.5
* Xbox ISO image creation.
* Full writing engine to burn the ISO
* One click Rip, Build ISO and Burn
* Splash screen enhanced
* Terrabytes added to drive info
* Auto update working with no user interaction required
* Help file showing right click layout
* CD or DVD burning for any ISO size (including ones made with other programs)
* Readme Updates!:) (Help files are still out of date)
Missing: Languages. Sorry, its a little too much to do at the moment.
V1.0.4
* Macedonian Language Added (thanks to Emi xXx)
* Splash screen introduced - one time showing
* More enhancements to the writing engine but still not working... yet:)
* Visually Enhanced, slightly larger window
* Lots of minor modifications to the code, way too many to list!
V1.0.3
* Burn option added, not fully functioning (XBox doesn't recognize discs - Must have Nero 6 to use)
* Additional info added to the auto update
* Minor bug fixed choosing Drive F: on the first combo box.. due to the addition of languages.
* Added version information to the main title bar
* French language added (Many thanks to El Barto)
* Dutch language added (Many thanks to XBOX War3z)
* Macedonian language translation underway (Thanks to Emi {xXx})
* German language added
* Spanish language added
* Italian language added
* Minor cosmetic enhancements
* Selection box added to the PC Path field
* Options form added
* Get Disc Size is also underway, just got to get my head round the code!
V1.0.2
* Amended the help file, forgot to add into the first release
* Error thrown if no directory existed to place files, now shows a more informative message
* Updated tooltip info
* Now rips files from the drive C, D, E, F and G with optional path (Ability to back up H/D)
* Changed installer routine to work on a some problem Win 2000 machine
* Sorted out the tab order
* Smaller overall file size (2.43MB)
* Manually adjust the timeout setting for problem discs
* Check for updates feature, downloads updates, user installs.
* Sorted out a problem with large HDD's and showing space free. (Dimensioned as Integer, not a Long Integer)
* Provisional support for additional languages, code is there but no translation as yet.
* Disabled buttons and menus while busy, could have caused a crash.
V1.0.1
* Private version, checking timeout settings
V1.0.0
* First release
-
Xbox Save Editor
With this tool you can edit gamesaves that are not yours.
How to use :
1. Open the downloaded game save with the Xbox 360 Save Editor .
2. Open Xbox 360 Save Editor again with your game save from the same game .
3. Replace the Profile id & Device id from the downloaded game save with the Profile id & Device id from your game save .
4. After that check the Local sign box & press Resign Save .
5. Make a back-up of your own game save. Then replace your game save with the downloaded one on the usb flash drive.
6. Start up the game and it should read the downloaded game save . Enjoy .
-
Xbox1 Backwards Compatibility v5832 for Devkits
Xbox1 Backwards Compatibility v5832 for Devkits (hack/patch version 2019.12.09 EXPERIMENTAL 128MB version)
HACKED VERSION!! ?
:: Overview
* The 128MB version remains experimental, the 64MB version is however fully tested and working *
This is a devkit version of the retail xbox360 backwards compatibility that
was released April 2018.
The crossgame chat feature has finally been tested and it appears does not work and causes crashes on Live enabled profiles, it thus has been removed.
This build fixes the compatibility issue that occurs with Xbox Live connectivity disabled titles titles on retail consoles.
This issue did not occur on XDK units.
The affected Title IDs are the following:
[TitleId UsesLive EmulatorFilename GameName]
4D570018 0 xefu7 "RoadKill"
4D57001D 0 xefu7 "MLB SlugFest: Loaded"
4D57001D 0 xefu7 "MLB SlugFest: Loaded"
504C0002 0 xefu7 "Kingdom Under Fire: The Crusaders"
504C0004 0 xefu7 "Kingdom Under Fire: The Crusaders"
504C0005 0 xefu7 "Kingdom Under Fire"
53450017 0 xefu7 "NHL 2K3"
53450033 0 xefu7 "ESPN College Hoops 2K5"
Incidently it also enables xbox live features for the above titles.
This release contains 3 versions,
* One dubbed "Regular" inside the "Regular" folder which acts as the original emulator WITHOUT in-game menu support or cross/in game chat support,
* One dubbed "HUD" inside the "HUD" folder which supports the Xbox 360 in-game menu and in-game/cross game voice chat (which are new features of this hacked version),
this version has been left in, in case you may want HUD support but are loading an incompatible resources (such as a plugin using too much memory).
*One dubbed "HUD_plugins" inside the "HUD_plugins" folder which supports the Xbox 360 in-game menu and in-game/cross game voice chat AND allows external resources.
TROUBLESHOOTING:
If you are experiencing crashes using the "HUD_plugins" version, try disabling some Aurora plugins, alternatively you can use the xbox.xex_HUD front end (delete xbox.xex and rename xbox.xex_HUD to xbox.xex)
this will unload all external resources before loading those again when xefu gets loaded, this may likely fix any crashes/incompatibility you are experiencing while still allowing to use external resources on the emulator.
I originally did not plan on adding an ingame voice chat feature to this build as I do not endorse people using hacked console on Xbox Live, until someone pointed out how this could be used
legitimately with Kai; I am not one to lock down users so I ended up adding support for this.
Choose the one you prefer and follow the steps below:
To install this, copy the Compatibilty folder to your devkits Y drive.
You may want to remove any existing files, although this should overwrite
all files.
This version has been hacked to play unsupported games, however this doesn't
mean they will work.
This was tested on XDK Development kits, it should however run fine on RGH/JTAG systems.
:: Hacks
As per the previous versions (direct quote from the previous readme):
* Xbe signature checks removed (lets you run unsigned code)
* Xbe section hash checks removed (lets u run hacked xbes)
* Game region checks removed (region free baby!)
* Game media checks removed (play games from your hard drive)
* Debug/Devkit xbes supported (run your own xbox1 code)
* Attempt to play unsupported games (doesn't mean it will work hehe)
New feature since this release:
* NEW * Added in-game HUD support * NEW * (this will let you access the Xbox 360 in-game menu while playing your OG Xbox title!)
* NEW * External resources no longer get unloaded while running the XEFU emulator! This means features such as the Aurora/FSD HUD addons work within the emulator! * NEW *
* NEW * Allows to use Xbox Live on titles initially flagged as Xbox Live disabled in the xbox.xex Front End. * NEW *
* EXPERIMENTAL * The memory limitation has been lifted from 64MB to 128MB when usign the 128MB builds! * EXPERIMENTAL * (I have no idea if this actually works, please thouroughly test this)
Credits:
Original 2007 version of this hack: xorloser
128MB xb1krnl patch: Yoshihiro
Updated 2018 version of this hack: Mathieulh
-
XBOX360 HD-DVDRom UDF Reader
The Scoop:
The same day the XBOX360 HD-DVDROM Addon was released to the public in USA, we at blueprint figured out how to use it in windows, now as of this moment, officially, the movie that came with the hardware "King Kong" is currently a Dual Layer (30GB) disc so it would appear the studios are aiming for that size minimally for the majority of movies to start off with at least, this of course mean's you will not be directly copying any hd-dvd's as of yet. However, the most important thing is were now able to read the UDF (Universal Disc Filesystem) v2.5 which is currently used by the Toshiba Corp with there first generation HD-DVDRom drives. You can see the entire contents of the HD-DVD Media when in the drive. You can see the Label of the movie title next to the drive letter, you can copy the entire contents of the disc to your hdd, we have thus far only tested this in windows explorer, were anxious to hear about how folks take things from here, better methods of ripping the movies will come in the future, were also looking at the drives since there toshiba/samsung to possibly rip games in the future, of course thats not something were personally working on, but were pretty damn sure it will be possible. in any event, onto the direction's for installation/recongizing your drives contents in windows xp sp2.
The Install:
Right click on "thdudf.inf" and choose Install from the list of menu options. once this is complete, you should reboot your machine for a full installation of the new UDF 2.5 File system recognition. From here your drive should no longer just say CD-ROM when examining it in windows.
** Notes **
Again, these are litterally Toshiba Corp drivers for the file system used with HD-DVD. We did not create these drivers ourselves, so we cannot modify them, however there availability is limited to specific machines which were familiar with from our places of business, and we will continue to get the latest updates of these drivers and make them available to you as they're released to us.
If you would like to contact us about possibily contributing to the cause you can find us at pilgram@gmail.com please label the subject matter very specificly or your email will likely be over looked or even disreguarded due to the volume of questions we will recieve. we do not offer you any files via email. and you are on your own as far as getting these movies are concerned. Good luck to all of you who will take it from here and write some nice applications to use these methods more efficiently we anxiously await your mail.
This would be possible with our Mosb3rg and Watchy thanks very much guys your speed on cracking this was pretty amazing and also thanks for spending the money upfront so everyone else could enjoy there addon much more than if they just purchased before hand without this information.
by BluePrint.
-
xboxdumper
This program allows files on an xbox hard disk to be dumped out.
Two basic commands are supported:
xboxdumper list <partition number> <xbox image filename> This will dump the directory tree of the specified partition.
(e.g. "./xboxdumper.sh list 1 xboximage.bin" )
xboxdumper dump <xbox filename> <output filename> <partition number> <image filename> This will dump the file <xbox filename> into the file <output filename> from the specified partition number. The full directory path to the file using / or \ should be supplied.
(e.g. "./xboxdumper.sh dump /voice.afs voice.afs 1 xboximage.bin" )
<partition number> may be between 0 and 4 inclusively. Partition 0 is not confirmed yet.
I will not supply images of the xbox hard disk, so please don't bother asking.
by Andrew de Quincey.
-
XBReboot (XBR)
Who wrote this?
Talented members of XBH contributed in many ways. You know who they are. TeamXBR assembled the parts, coded the utilities, and glued it all together to make it work.
How does it work?
Both XBR and Freeboot use a "patch engine" to apply patches to the bootloaders as the console reboots. For Freeboot, this is "freeboot.bin" or "freeboot-manual.bin"; For XBR, its "xbrfw.bin" Both of these binaries are based on xell type start up code, and are launched by the exploit.
The code then applies patches contained at block 0x65+, and restarts the system.
What went wrong?
Earlier versions of XBR used the same CB/CD pair to start the 8955 kernel as the exploit. Freeboot, using a dual nand setup, used the older bootloaders to start the exploit, than used the newer bootloaders on the alternate flash to start the kernel.
The problems were not related to the patches used by XBR, but rather the use of the older bootloaders. Please try to control yourselve if problems arise, they can always be fixed. Dont do anything crazy like start conspiracy theories, buy a cygnos, wire up a dual nand or xd card, rip out a big nand to swap in a smaller one etc, etc. Have a little patience, have a little faith :P
So whats the fix?
1) Add a copy of the new bootloaders to flash.
2) Create patches to use the newer relocated bootloaders on reboot.
It was easier to re-use the freeboot.bin patch engine to accomplish this task.
The freeboot patches themselves are not used. XBR continues to use its own patches, however, the freeboot.bin patch engine will be used to apply them.
This also allows custom patches to be applied, in the format used by freeboot.
XENON_8955_3:
Uses 6750 as the alternate CB to allow easy support for all hardware versions.
No changes made to patches, exact same functionality as 8955_2.
XENON_8955_2:
Add a copy of the new bootloaders to flash.
Create patches to use the new relocated bootloaders on reboot.
Translated existing XBR patches to use the freeboot.bin patch engine.
Fixed build file to use CB/CD 1921 for all xenon.
Eliminate media binding path checks, run xex from all media without patching.
8955_1:
Add support for PIRS
Fixed Backup Xell
8955_0: Initial
Automatically detect correct key for dev or retail xex.
No specific secdata.bin or crl.bin requirements.
XBReboot Block Layout:
Ox00 - 0x2F Xell Boot firmware
0x30 - 0x3F Backup Xell
0x40 - 0x4F freeboot.bin or freeboot-manual.bin (patch engine core)
0x50 - 0x61 Alternate CG
0x62 - 0x64 Spare blocks
0x65 - 0x65 Patch.bin, patches for bootloaders and kernel
0x66 - 0x8F Alternate CB/CD/CE
0x90 - 0x?? Flash file system
HowTo:
1) Extract KV and Config blocks from orig.bin
nandpro orig.bin: -r16 rawkv.bin 1 1
nandpro orig.bin: -r16 rawconfig.bin 3de 2
2) Inject those blocks into XBR.bin
nandpro XBR.bin: -w16 rawkv.bin 1 1
nandpro XBR.bin: -w16 rawconfig.bin 3de 2
3) Flash result
nandpro lpt: -w16 XBR.bin
Notes:
There is no need to unpack and repack pirs files!
This is a limitation of freeboot. Not XBR.
Aside from that major difference, all functionality is the same.
Individual sections can be updated or extracted seperately using nandpro.
-
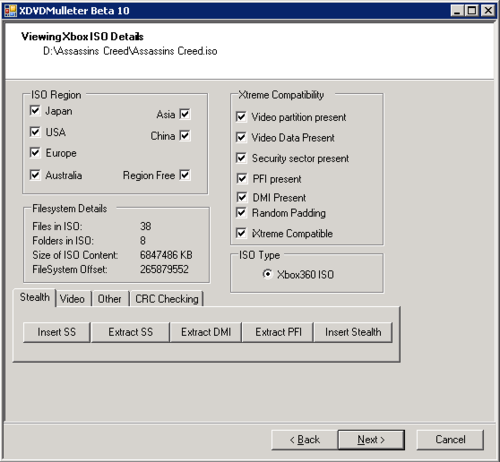
XDVDMulleter
Welcome to another exciting installment of XDVDMulleter!
XDVDMulleter Beta 10 - the 'I can't be bothered to implement the stuff I haven't done yet' edition
Done in 10.2:
Fixed CRC check for games not in database Done since XDVDMulleter Beta 9.7:
xbox 1 stuff works properly again ISO stealth checking stuff is cached for better performance and code cleanup Fixes video and pfi based on SS details More user friendly prompts and errors Half implemented debug output (yeah, i got bored and didnt finish it) New ss validation check for bad SS file (thanks to liquidsky) Offer to fix ss on games with known ss but no known ini for that SS Check ini file exists before crc check Rip inis to different folder than dled folder (to avoid weird confusions) Multiple database sources possible in case main site goes down. How to make your site host the XDVDMulleter database:
Database format is deliciously simple. Copy all Ini files, put them in folder. Whatever the web address is of that folder, that is the INI database url.. Copy all stealth files, put them in folder also (same or different, you decide). The address of that is the stealth URL. Any questions, #fw or #stealth360 on efnet
Probably more fixed, changed etc than I can remember. But its mostly the same, just nicer. Autofix is a lot lovelier now. Most of the stuff I really wanted to implement I lost motivation to finish, so it will most likely be in the next version. If someone wants to attempt a mono port before I get around to it (for linux/multi platform support) please contact me at the channels mentioned above, It should be pretty simple, but if possible id like to keep the codebase the same, which will require a whole load of #defines.
Thanks to all the people in the 360 scene, all the people in #mullets, and all the people testing, debugging and submitting bug reports for mulleter.
And now to name people by name so they dont complain at me like in the last release:
Thanks to: Gdogg, OEP, n8, brain, dcman, vinnyp, mrh, frito, ramp, finn, zylon, iceberg and jrx
Also thanks to: Man1fest, Tone, Schtrom, Redline99, Iriez and xbins, liquidsky, Devils360 and of course c4eva.
And a few more thanks to the people on xboxhacker doing the real hard work :)
-
xeBuild
Introduction:
=============
xeBuild is a command line system image builder for JTAG, glitch, and clean images.
Run the xeBuild program with no (or incorrect) arguments to see it's usage info.
Current Limitations:
====================
- STAY THE HELL OFF LIVE! Nuff said, we're not you're mum.
How To Use:
===========
- See individual folders for lists of files to provide
- if desired provide replacement cpu and 1bl keys in text files
- open a command window in the xeBuild directory
- on the command line type, for example:
example - if you provided keys in appropriate text files
xeBuild.exe -t glitch -c falcon -d myfalcon myfalconout.bin
-t glitch = build a glitch type image
-c falcon = use falcon bl and patch set
-d myfalcon = a folder is present called "myfalcon" with per machine files, this uses it
myfalconout.bin = the file that will be produced
- type 'xeBuild.exe -?', 'xebuild client -?' or 'xebuild update -?' for command line info
Update and Client modes:
========================
Both modes require the supported updsvr running on the xbox, full functionality may require
updating console patches with the included hv patches. Both the PC and the xbox need to be on
the same subnet/LAN router.
Client mode is a simple way to read, write and patch flash as well as few other simple commands
such as the patch updater. The patch updater will look in the folders beside the exe for
{version#}\bin\patches_{type}.bin
which are full patches for whichever console and hack type, it will load and strip the patches
if needed and send them to the console. Note that only xebuild images are truly supported for this.
Most of the client mode commands should be available on any console, even unhacked devkits. See output
from 'xebuild client -?' for more information on the options available.
Update mode attempts to retain as much data about the console as possible, without having to
provide any info on the command line aside from optional/addon patches if required. After you
copy the $SystemUpdate folder into (in this example) the folder 16203 it is capable of taking
a simple command line like:
xebuild update -f 16203 -a nohdmiwait
It will fetch all the info from the console, and use the updater to update both the system flash
and avatar data on the console (provided you have an 360 formatted HDD internally in the console.)
It has some more advanced options to allow one to build the update image as well as dump the data
from the console as it's acquired, while even leaving the console data untouched. See output
from 'xebuild update -?' for more information on the options available.
Neither update or client image writes are able to affect bad blocks, but are able to write new ones.
If this happens mistakenly, an erase block command has been provided in client that will attempt to
clear the bad block - use with caution though, blocks get marked as bad for good reasons and is a normal
occurrence on NAND when a block becomes unreliable.
With big block machines, the server will attempt to retain any NAND mu data in the system area, provided
there is no system data to write in the image being sent. It's not foolproof, but update mode should not
corrupt NAND mu.
Example:
========
-take original console dump, put it in mytrinity folder as nanddump.bin
-set CPU key and 1BL key in ini file, verify LDV from nanddump.bin matches console fuses
if not set cfldv in ini file
-build (xeBuild.exe -t glitch -d mytrinity -f 13599), flash and hopefully life is good
.ini files:
===========
Just a word on the format... the ini parser is not very robust, the files need
to be plain ASCII, everything after a ; on a line is ignored, and spaces are
not acceptable (they get removed).
Things like CPU key and 1BL key, if present in the per box ini file need not be
placed anywhere else.
Optional Patches:
=================
Various optional patches are included for use with the -a option, they are:
nofcrt - removes fcrt.bin requirement on some drives
nohdd - disables detection of internal SATA HDD
noSShdd - disables internal SATA HDD with valid retail security sector
nohdmiwait - HDMI consoles will no longer wait or EXX screen when video is not ready
nolan - disables wired LAN to prevent E75/76/77 on machines with a damaged PHY
nointmu - disables jasper nandmu, trinity 4G internal USB and corona 4G MMC memory units
nowifi - disables usb wifi adapters including the ones built into 360S/E
blmod.bin:
==========
Changing the patches to the BL that follows the BL that is executing during glitch attempts
has a direct effect on whether a machine will glitch. The provided patches are generic
and work well on most machines, but this per machine build addon can now be supplied without
modifying the base patches to CBB or CD via a file in the perbuild folder, they will simply be
tacked onto the end of CBB or CD, and the BL size adjusted to include this new data in the hash.
Keep in mind, it can take multiple attempts and re-flashing with different binary data to find
something that will boot at all, let alone be more effective for your console.
blmod is currently not supported by update mode.
Note:
=====
- DON'T USE THIS UNLESS YOU KNOW FOR SURE THAT YOU NEED IT! Using an incorrect
controller config can result in problems remapping bad blocks (even manually.)
If you have a 16M jasper, an additional build type has been added
'jaspersb', by default the image will be built for jasper with big block
controller (config 00023010), use this alternate switch to build for small
block controller (config 01198010.)
Multi build/options example:
============================
when you specify -f 13599 on the command line:
13599\filelist.ini
is parsed instead of data\filelist.ini
Also the bin directory is used from
13599\bin\
instead of
bin\
allowing anyone to create multiple builds without multiple instances or
rebuilds/hex edits/hacks of the main app.
The example provided is the last version of 13599 patch set from dash launch and
other files to build freeboot 13599
example use:
------------
xeBuild -f 13599 -d myfalcon x13599out.bin
-f 13599 : use .\13599\filelist.ini, and .\13599\ for firmware files, .\13599\bin\ for patches
-d myfalcon : use .\myfalcon for per build files (cpu key, keyvault, security files, ini etc.)
x13599out.bin: override auto generated name and produce .\x13599out.bin as the final NAND image
note, if -d ***** is not specified it will still use the original /data and /bin dirs
Devkit image building:
======================
This feature is currently considered Beta/Work In Progress.
A new image target type was added, "-t devkit" which builds 64M flash images for devkits. Currently untested,
building with a 00 filled CPU key will create a zeropaired devkit image that may allow one to boot a software
bricked devkit that one does not know the CPU key for and recover it to an operational state. By powering on
the console with such an image present, with a recovery DVD in the drive, the recovery software should be able
to create a new keyvault, re-pair the DVD drive to the new keyvault, and allow normal operation once complete.
Normal devkit image building when one does know their CPU key and thus has security files and keyvault should
work as expected.
Building devkit for glitch/jtag is also possible using the standard -t glitch/jtag methods. Sample ini
have been provided with this release, but will not work unless patches and files are supplied. Note that devkit
is not our focus, but was relatively easy and straight forward option to supply for those that wish to make
use of it.
jasperbigffs:
=============
Those who use large block NAND are now able to nearly double the size of the system file area
with this option with no apparent ill effects. Normally this option wouldn't be needed, but if one
wanted to experiment with more files in flash, or one was building a devkit image for a devkit with
a big block flash, this option is required.
[rawpatch]:
===========
It is now possible to force a raw patch of NAND image via files and offset both through the command line
and via the data directory ini files. This causes a file to be read and byte copied into the raw flash image
before spare ecd/ecc is calculated at the supplied offset in flash (without spare).
Note that both the ini entries and the command line will interpret the offset as decimal if not preceded by '0x'.
There will be no spare marks or file system entries created for such raw patches, it is user beware and up to
anyone who needs this to ensure the data is being placed somewhere safe.
No example is given in the supplied ini files, the segment can be placed anywhere above [flashfs] and would
look something like this:
[rawpatch]
somefile.ext,0x123456; this offset is interpreted as hexadecimal
somefile2.bin,123456; this offset is interpreted as decimal
Credits:
========
Without ikari this would not have been possible, thanks!
__ ____ ___ ___ _____
/ _|_ __ ___ ___| __ ) / _ \ / _ \_ _|
| |_| '__/ _ \/ _ \ _ \| | | | | | || |
| _| | | __/ __/ |_) | |_| | |_| || |
|_| |_| \___|\___|____/ \___/ \___/ |_|
[v0.10 - inspired by ikari]
R.I.P.
No this isn't freeboot, it is a clone and has always been since the last
release of ibuild.
Thanks and greetz to everyone who has contributed to hacking this
wonderful machine. Thanks to the engineers and countless others who made
the machine what it is... we only wish they had listened and RROD was
not a problem. If we were to list everyone here, there would be no time
left to play on the machine!
Thanks Team Xecuter for the Corona 4G! Thanks to JuggaHax, dayton360mods,
glitch360team and all other contributors for helping find a way to make Corona 4G golden!
Thanks to Free60, LibXenon.org, Redline99 and Tuxuser for providing xell builds <3
Thanks to Swizzy for making the official GUI front end for xeBuild, for always
adding the new stuff we shovel at him and never once complaining.
Big thanks to the folks at #freeboot on efnet for the tireless
hours of help you all give freely. Thanks to the testers who tirelessly
made sure stuff worked. Thanks to rgloader for doing the work yourselves,
there *is* no spoon, just a glitch in the matrix.
Don't believe what random people *cough* write on forums ..
-
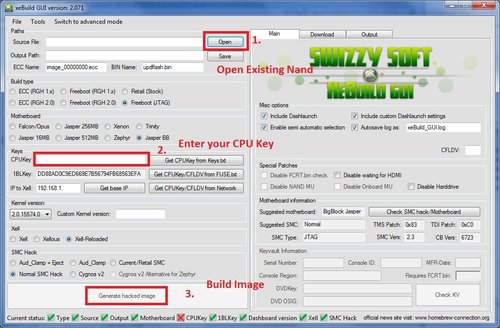
xeBuild GUI
NOTE: I did NOT create xeBuild! i merely made a frontend/GUI for it! NOTE: This is the official frontend/GUI for xeBuild, i have contacts with the team, but i cannot give you details about future features or how everything works. NOTE: I take NO responsibility for damage to your console/files caused by your use of my program! NOTE: If the program say something about "Unkown" when you check the nand this ussually means it is NOT supported! If you encounter a problem with a NAND that the GUI can't identify that's probably NOT a bug in the program, but rather unsupported versions... ======================================================================
Requirements - What you need to do have in order for this to work!
======================================================================
Microsoft .NET Framework 2.0 or later Your CPUKey or network connection with your console ;) (when creating images other then ECC) A dump of your nand OR donor files OR a motherboard and a device that can dump the nand using nandpro ======================================================================
Overview - What it does
======================================================================
This is a frontend/GUI for xeBuild, what it does is make it easy for you to select most options that you might need, such as Motherboard, SMC hack for freeboot, image type etc. etc. It is able to check what SMC hack you have previously used for JTAG it's also able to tell you what SMC version you have, and if it's a JTAG, Clean/Retail, Glitch or Cygnos patched SMC :) If you put any of these files next to the executable it'll use them automaticly: SMC.bin - Custom SMC of your choice; ONLY USE THIS IF YOU KNOW WHAT YOU ARE DOING!!!! kv.bin - donor keyvault; ONLY USE THIS IF YOU KNOW WHAT YOU ARE DOING!!!! smc_config.bin - donor smc_config; ONLY USE THIS IF YOU KNOW WHAT YOU ARE DOING!!!! Xell.bin - Custom Xell of your choice; ONLY USE THIS IF YOU KNOW WHAT YOU ARE DOING!!!! cpukey.txt - It'll read first line of this file, if it starts with "cpukey" it'll read the last 32 characters from that line (removing any extra spaces) otherwise it'll read the first 32 characters of that line (removing any extra spaces) FUSE.txt - It'll parse it as if it was saved from Xell using network... flashdmp.bin - It'll load this as source nand ;) Default.xml - It'll load any preset settings from this file ;) nandpro.xml - It'll load any nandpro settings from this file ;) options.ini - It'll load any custom settings from this (for xeBuild) launch.ini - Settings for Dashlaunch, if you choose to use this setting it'll include this file in the generated image ;) ======================================================================
Notes about build types/image types
======================================================================
First of all, there are 3 types of hacks, first one is called "JTAG" or "SMC-JTAG" it's the first version of the JTAG hack for Xbox 360 the requirements to use this type of hack is:
- Dashboard may NOT be higher then 2.0.7371.0 - The console may NOT be manufactured or have been to a repaircenter after 2009-06-xx~ there are some exceptions to this, but most of the consoles after this has new CB versions which have "fixed" the hack Valid CB versions for JTAG includes:
* Xenon: 1888, 1902, 1903, 1920, 1921 * Zephyr: 4558, 4571, 4580 * Falcon: 5761, 5766, 5770 * Jasper: 6712, 6723 Second hack is called "RGH" or "Reset Glitch Hack" it was made by GliGli and Tiros, This hack works for almost all versions of consoles, however phat consoles have had this "fixed" by getting split CB versions, the requirements here are quite simple:
- If you have a "phatt" console (non-slim) it may NOT have a dashboard above 2.0.14699.0 because after this it'll have the new CB versions and require the new RGH 2.0 hack Valid CB versions for RGH includes:
* Xenon: 1923, 1940, 7375 * Zephyr: 4578, 4579 * Falcon: 5771 * Jasper: 6750, 6751 * Trinity: 9188, 9230, 9231 Third and last hack is called "RGH 2.0", it was made by Team-Xecuter and stolen/leaked to Team Squirt360 and released, it works something similar to RGH but still a little different, this supports updated phatt consoles and will probably support any newer dashboard, this type will NOT work with a console updated to 15572 or above :(
since v 2.08 of xeBuild GUI files for Corona are also included and the info below has been updated...
Valid CB versions for RGH 2.0 includes:
* Zephyr: 4559, 4560, 4575, 4577, 4561, 4562, 4569, 4574 * Falcon: 5772, 5773, 5774 * Jasper: 6752, 6753, 6754 * Corona: 13121, 13180, 13181, 13182 ======================================================================
Notes about building retail/devkit images
======================================================================
Retail images can be built using this gui, it includes common retail SMC's i've extracted myself, i make no form of garantuee that these are safe to use for your console, some machines might not like the bootloaders etc. which are used by default...
If you want to create devkit images you will need to find the files for it on your own, and you will also need to select custom version because they're different from the normal dashboard. i've limited this type of images to advanced due to normal users not having a devkit in the first place, only devs should have one and devs should be advanced ;)
Please read the xeBuild readme for more details about devkit building...
======================================================================
Notes about LDV
======================================================================
There are 3 ways you can get your LDV value:
Use Xell and manually count the ammount of "f" on fusesets 07 and 08, the total here is your LDV value. Use Xell and a network connection, doing this the app can read fusesets for you and read cpukey aswell as check what ldv your Xbox 360 should have automaticly for you (this option also sets both) Use 360 Flash Dump Tool and check which value is the highest, this is the one you will want to be using Normally (if you have a good dump that does NOT include data from .ECC file created using RGH python script) xeBuild should be able to extract this value on it's own, if it can't just follow the instructions above... if you don't understand these instructions, ask google!
======================================================================
Notes about FCRT patches
======================================================================
This patch removes the need for FCRT.bin in nand, however, it will NOT work for everyone, it's been disabled in the default configuration, and should stay disabled if you are using a machine with a Liteon DG16-D5S FW: 1175, it's been confirmed by me that it doesn't work on these drives all others i've tested has worked just fine, however it can still be a problem for you to have this activated, disable it if games don't work from discs (if you use this feature!)
======================================================================
Other things you need to know about that don't fit in the changelog
======================================================================
**************
* KNOWN BUGS *
**************
- If you have a badblock @ block 1 the app will NOT be able to extract/check your KV if you want it to do this for you, you'll have to manually remap it to fix your nand i'll be adding support for doing this automatically when needed later on ;)
- Sometimes when you start a download for the first time the app may stand still for a while doing nothing... i have no idea why this is happening atm, only had it happen to a friend of mine but haven't been able to reproduce it myself and therefor i cannot find the reason for this to happen, i'm looking for what is causing it, if you experience this, let me know and tell me about your computer, what connection you have, what OS you have etc. all this will help me if it's because of connections i can't do anything about it ;)
*******************************
* Features beeing worked upon *
*******************************
- A Full Updater, i will be making a update program for xeBuild GUI which will be capable of checking for and downloading new files/versions for you, i had one in previous code base but decided not to include it here because it needs more work, and i've also considerd the possiblity of replacing current xebuild GUI version which would require the prog to NOT be running, thus an external updater would be required, i'll be working around that idea and hopefully release an updater soon :)
- Badblock management, i'll be working on detecting and dealing with badblocks which could cause a problem with
some features, such as dumping/decrypting KV to check various values in it
======================================================================
Credits - Thanks to:
======================================================================
- A HUGE thanks to: cOz and Razkar - Thanks for everything, without you guys i wouldn't have been able to make this app into what it is! i owe you bigtime! ;)
- Team Xecuter - Thanks for figuring out and releasing info about glitching Xenons and RGH 2.0!
- GliGli & Tiros - Thanks for figuring out and releasing RGH in the first place! :D
- BestPig - Thanks for releasing the source for your FCRT.bin extractor, it helped me out alot! ;)
- Blackaddr - Thanks for your SMC_Utility it's awesome! :D
- Tiros - Thanks for nandpro! :D
- nitram - Thanks for the updated build.py
- RF1911 - Thanks for your help with extracting smc_config :)
- LegendaryFire - NandApi : http://www.team-hq.com/index.php?title=NandApi Thanks for making this! it really helped me out with the keyvault stuff :)
- Jack Nepacha - Making my new icons and other graphical stuff thanks mate ;)
- Aioros - Making the latest Icon/Logo
- Anyone else that has helped me with anything such as tests, bug finding and such that is not mentioned above, THANK YOU! without testers this app would be pretty much useless compared to the other GUI versions out there ;)
by Swizzy.
-
Xecuter DemoN Firmware
This is the latest firmware v1.04 for the Xecuter DemoN.
Please use J-Runner or DemoN ToolBox to update.
Tons of bug fixes and new features such as Jasper BB 256/512 Support (Upgrade Kit Required) and the new "!DSWITCH" command that allows toggling of the NAND-flash. This new command is sent from software running on the Xbox 360 over serial interface to DemoN. (1 extra wire required - X8 needs to be soldered to 3V3 non-standy - wiring images can be found here)
The new J-Runner now also supports generating 16MB images from a 256MB or 512MB dump ?
The Xecuter DemoN now supports ALL non-MMC Xbox 360s !
NOTE: DemoN has a failsafe feature that can isolate firmware related problems with the following procedure:
- un-plug the Xbox 360 power supply
- press the DemoN push-button and keep it pressed all the time
- plug-in the power supply (while still keeping the push-button pressed)
Demon is now in forced bootloader mode. If it turns up in J-Runner or Toolbox now, you can downgrade to firmware version 1.02 and retry the latest update. Maybe there was some kind of data corruption, while the update was applied.
If you still cannot see Demon in either program, than it's definitely not firmware related.
This is pretty helpful in order to narrow down possible firmware related issues
-
Xecuter Demon Toolbox
Do not touch your soldering iron yet !
First connect DemoN via a MicroUSB cable to the onboard microUSB port (move switch to "PC"). (The ToolBox tabs will not work unless the DemoN is connected to USB and detected correctly - these are all safety measures)
Then install the toolbox and make sure the "Install USB Driver" is ticked (Toolbox will not run until DemoN has been connected and installed).
You can test full read/write before you install to your Xbox (so you know its working fine and you can blame your soldering if it isn't)
We also recommend you install the ext module with the miniUSB port via the shielded FFC ribbon cable and test nand switching too (the DemoN Toolbox will tell you which nand is selected and the LED will work also).
TIP
You do not need to switch the CoolRunner to PRG for programming with Demon - always leave it set to NOR. You will get errors otherwise. It was designed like this so that you can program both your Demon and CoolRunner through an external USB port without ever opening up your Xbox again!
These tests will help you determine that everything is working perfectly BEFORE you even get your soldering iron out ?
Warning
Remember to move the switch to XB when you install the DemoN to your Xbox. DO NOT have it switched to PC when your Xbox is powered on or even in standby as you may damage your DemoN.
Also when programming 360 NAND/Demon NAND/CoolRunner do NOT have the Xbox powered on - it must be plugged in but NOT powered on
Yes I know the GUI looks similar to the old Cygnos app, I didn't see any point in changing the way the interface layout so decided to keep it looking familiar - of course everything is different 'under the hood'.
Note: If for some reason you have issues running ToolBox in Windows 7 - set it to XP SP3 Compatibility mode.
-
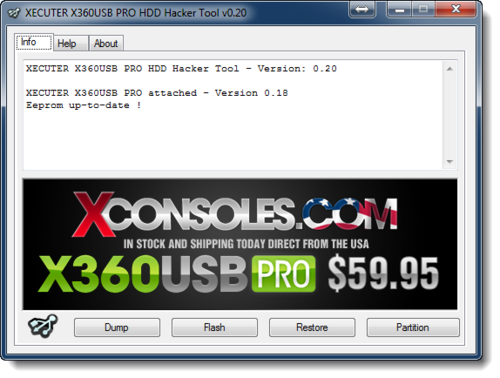
Xecuter X360USB Pro HDD Hacker Tool
The X360USB PRO is now able to communicate with Hard Drives and manipulate the data for the first time over USB using any Windows 32bit or 64bit operating system with just a few simple clicks so you can now convert any off-the-shelf 2.5" SATA Hard Drive and convert it to be 100% XBOX 360 Compatible, saving you a TON of money !
EXAMPLE:
- BRAND NEW WD 250GB SATA DRIVE $49.99
- ORIGINAL XBOX 360 250GB SATA DRIVE $99.99
The X360USB PRO HDD HACKER TOOL currently supports the entire range of Western Digital 2.5" SATA Hard Drives, however we will be able to add a range of other manufacturer's and models in future updates.
All you need is the HDSS.BIN file from any original XBOX360 Hard Drive (which can also easily extracted using the X360USB PRO) and use it to convert your WD SATA Drive.
Note: The size of the drive is limited to the size of your HDSS.BIN file (e.g. if you have a 250GB HDSS.BIN and you flash it to a 320Gb Hard Drive - then the drive will recognize in the Xbox 360 as a 250GB drive)
################### WARNING WARNING WARNING WARNING ###################
You MUST update to the latest X360USB Firmware before using this tool.
################### WARNING WARNING WARNING WARNING ###################
Features:
---------
- For the first time, a Windows app that can hack HDD's over USB !
- Convert a 2.5" SATA Hard Drive into an XBOX 360 Compatible Hard Drive - Save $$$$$
- A simple easy to use with - all you do its point and click - we do all the hard work for you.
- Multi Language - We currently have Greek, Italian & Spanish versions of the tool. Let us know if you can offer assistance in your own language.
- DUMP: Extract the HDSS.BIN from an original XBOX 360 Hard Drive
- FLASH: Flashes a HDSS.BIN to your 3rd party Hard Drive and saves a copy of the drives original sectors to UNDO.BIN
- RESTORE: Restores the Hard Drive's firmware and Max LBA to it's original state using the UNDO.BIN
- PARTITION: Partitions and formats the drive to XBOX 360 specifications - Includes a Quick Prepare Mode so you can do this in seconds !
For drive management we recommend you use the fantastic Party Buffalo Drive Explorer.
It is an awesome app and is updated regularly.
Tested & Confirmed Western Digital 2.5" SATA Drives:
----------------------------------------------------
WD800BEVT - 80GB
WD1600BEVT - 160GB
WD2500BEVT - 250GB
WD3200BEVT - 320GB
WD1200BEVS - 120GB
WD2500BEVS - 250GB
WD1600BUDT - 160GB
WD2500BUDT - 250GB
WD3200BUDT - 320GB
WD1600BEKT - 160GB
WD2500BEKT - 250GB
WD3200BEKT - 320GB
WD1600BPVT - 160GB
WD2500BPVT - 250GB
WD3200BPVT - 320GB
WD1600BJKT - 160GB
WD10TPVT - 1TB
There are a few others (like WD1500BLFS and WD3000BLFS Raptor drives) which we haven't tested but our code is pretty solid so should work fine. Please report any other WD drives that work and are not listed here.
THANKS
------
Special credit for the ìHDDHackrî original concept goes to The Specialist. Extra thanks for their work on the original HDDHackr go to Loser, Team MODFREAKz & Schtrom.
-
XeLL-Reloaded
A Xenon Linux loader based on Xell by tmbinc(Felix Domke)
XeLL-Reloaded catches CPU threads, sets them up, loads an ELF file from either network (tftp), USB(fat/ext2fs), CDROM (ISO9660) or HDD(fat/ext2fs/xtaf), and launches it.
It's made to boot Linux, so it contains a flat device tree for Linux. However, it is able to load other ELF files as well, like applications based on LibXenon.
* Now based on LibXenon
* Supports the new Reset Glitch Hack - RGH. (xell-gggggg)
* XeLL-Reloaded is now divided in 2 stages:
- 1st Stage initializes most of the Hardware, uncompresses and executes 2nd Stage
- 2nd Stage (based on LibXenon) loads all required drivers and does the usual "XeLL tasks"
* XeLL can unzip & load gzipped files
* Support for HDMI, and properly switches NTSC/PAL on composite.
* All CPU Cores are active and ready to run at full speed.
* TinyEHCI is used, delivers full USB 2.0 speed when accessing mass storage media
* lwip network stack upgraded to v1.4 Final - It's faster and DHCP is improved.
* It can access the DVD-drive via DMA now: faster reading
* It's possible to reload into XeLL now when you are inside a LibXenon Application
* New HTTP web interface to retrieve nand dump.
* Improved hardware initialization now allows chain-loading.
* Supports upgrading with a 2-stage XeLL-Reloaded binary, named "updxell.bin"
* Infinite boot loop when looking for ELFs to execute.(no more rushing to get the live-cd in)
* Parses / decrypts keyvault
* Supports kboot.conf-type file
* Supports external initramfs
* Can pass a custom CMDLINE to linux kernel via kboot.conf
kboot.conf/initrd support - copyright (C) 2010-2011 Hector Martin "marcan" <hector@marcansoft.com>
* Shows a user controllable menu for the parsed bootentries
xell user prompt - by Georg Lukas "Ge0rg" <georg@op-co.de>
HOW TO USE
==============
XeLL Reloaded checks for ELF/UpdXeLL/Kboot-config or updflash.bin in the following order:
USB (FAT/EXT2FS)
DVD(ISO9660)
HDD(XTAF/FAT/EXT2FS): updxell.bin
kboot.conf
xenon.elf
xenon.z
vmlinux
updflash.bin
Network: updxell.bin
kboot.conf
xenon.elf
xenon.z
vmlinux
updflash.bin (It will find that file, but refuse to flash it!)
DHCP supplied bootfile-name
* XeLL takes bootserver from DHCP, if supplied. You can supply a static tftpserver ip via kboot.conf. If no tftpserver is found, it falls back to a static ip.
* no updflash support via tftp !
updflash.bin is a already remapped flashimage/nandimage. 16MB file for 16MB NAND and 64MB file for 64/256/512MB NAND.
updxell.bin is a renamed xell*.bin file. * Version depending on the used hack (JTAG XeLL: xell-1f (oldies) xell-2f (modern), RGH XeLL: xell-gggggg)
kboot.conf (modified for XeLL) is a configfile
General XeLL config: Set TFTP-Server, CPU-Speedup, videomode, NetConfig
Menu: Parses bootentries, shows a user controlable menu with XboxController/UART/IR Remote
It can parse bootarguments for linux kernels & can load initramfs/initrd
xenon.elf/xenon.z/vmlinux can be either gzipped or bare ELF32 binaries - LINUX or Homebrew
There's also a HTTP Server running while XeLL searches for executable binaries.
It can serve the CPUKey/DVDKey and the console's flashdump.
UPDATING XELL
=================
1. Rename the appropriate XeLL-binary to "updxell.bin".
2. Supply the updxell.bin file to XeLL via USB/DVD/HDD or TFTP
3. It should find the update and flash it
4. Reboot your Xbox and enjoy the fresh XeLL build
Troubleshooting:
updxell.bin doesn't get found / updxell process doesn't start:
--You have to rebuild your whole hackimage with a recent XeLL. From there on you can use the inbuilt update feature
updxell function reports that no XeLL binary was found in NAND:
--Either your XeLL in NAND is too old or it's not a XeLL Reloaded binary - You have to rebuild your whole hackimage with a recent XeLL.
FLASHING NAND
=================
1. Rename the new (already remapped) flashimage to "updflash.bin"
2. Supply the updflash.bin file to XeLL via USB/DVD/HDD
3. It should find the update and flash it
4. Reboot your Xbox and enjoy the new image
Troubleshooting:
XBox does not boot properly after flashing the NAND:
--Either your image wasn't properly remapped or you made something wrong while building the image
USING KBOOT.CONF
===================
1. Read and understand the kboot.conf.sample which is part of every XeLL release with kboot-support
2. Modify the file to your needs
3. Supply it, named as "kboot.conf, via USB/DVD/HDD or TFTP
4. Boot XeLL and wait till it loads the file and shows the menu
5. Navigate to the desired bootentry. You can do this in the following ways:
UART:
UP/DOWN to go up and down in the menu
ENTER to confirm your choice
C to cancel the menu
X360 Controller (1st):
DPAD-UP/DPAD-DOWN to go up and down in the menu
A to confirm your choice
B to cancel the menu
X360 Media Remote:
UP/DOWN to go up and down in the menu
OK to confirm your choice
Press the NUMBER of the desired bootentry to directly load it
B to cancel the menu
6. Let the bootentry load. Enjoy :)
Troubleshooting:
kboot.conf gets found but it doesn't show bootentries or autoloads a bootentry:
--Make sure timeout is set to something higher than 0
--Make sure you didn't forget the "" on the bootentry: label="kernelpath params"
--Also take care of using a texteditor which doesnt automatically break lines if they are too long (will break bootentries), also it shouldn't
modificate the encoding and lineendings of the config!
-
XexDash
XexDash is a custom dashboard for Xbox360(XDK/XTK/JTAGGED Console only).
XexDash support Folder/TitleName in Chinese and Japanese charactor.Korean and other Multi-byte charactor file system will be supported in future dev.
Manual:
Installation:
XexDash for XShell:
Extract XexDash_Xex.zip and copy folder "XexDash" to Devkit:\.
Rename its excutable to any name you want.
Launch it from xshell of XDK/XTK.
XexDash for Dashboard:
Extract XexDash_Dashboard.zip and copy folder "C0DE0003" to
Hdd:\Content\0000000000000000.
Launch it from [Dashboard -> Game Library -> Demo].
Game Launcher:
Copy game content from disc to a folder,resign it with xextool.Keep the
game executable file in its original name "default.xex" and place this
folder in "hidden" folder of any device(e.g."Devkit:\hidden","Hdd:\hidden",
"Usb0:\hidden","Cdrom0:\hidden").The folder name will be displayed in
XexDash.If you need a custom title cover.Name it as default.png and place
it in the game folder.
FTP Server:
The system IP is displayed at right-bottom of screen.Port is 21.
User: xbox
Password: xbox
Controlling:
UP£∫ Move cursor up
DOWN£∫ Move cursor down
LT/LB£∫ Pageup
RT/RB£∫ Pagedown
A£∫ Enter/Confirm
Y£∫ Menu
X£∫ Sort by name
B£∫ Readme
BACK£∫ Return to Dashboard
Development:
JS-TEAM(ºº ¶–°∂”):
< EME >
< GooHome(…ÒπÌ‘¢—‘)>
< SONIC3D >
< tedawo>
Special Thanks:
xorloser: for device mounting sample.
Contact Us:
Homepage: http://xexdash.betalog.com/
Main forum: http://xbox.2dcast.com/
::Update History::
===============================
2010.04.02:
v0.03
+Download title cover and BG images via network(switchable between local/network images)
+Display GPU/CPU Temperature
+Fan speed control
+XBOX 1 excutable file support
*Ftp transferring speed is optimized to 10MB/s(MBCS support work in progress)
2010.01.31:
v0.02b
*Multi screen resolution support
+FTP server upload speed
2010.01.29:
v0.02
*Better User Interface
+Multi-lingle support
+Background picture/Title ID/Title icon/Title names display
+Custumize background picture
+Restore previous used device
+FTP server
2009.12.29:
v0.01a
*Fix bugs on listing games on usb devices
+Coded for supporting multi-encoding
2009.12.25:
v0.01
+Usb device support
+Chinese charactor support
+Auto scan game
*Modified key configuration
+Display game cover picture
+Refresh list and switchable sorting order
+Multi screen resolution support
-
XeXLoader
___ __ __ __ __ / __\ __ ___ ___\ \/ /___\ \/ / / _\| '__/ _ \/ _ \\ // _ \\ / / / | | | __/ __// \ __// \ \/ |_| \___|\___/_/\_\___/_/\_\ Presents: XeXLoader v0.26 ------------------------------------------------------------------------------- General Information ------------------------------------------------------------------------------- Type.................: LIVE/ISO/XEX Platform.............: Xbox 360 Part Size............: 8,139,566 bytes Number of Parts......: 1 Compression Format...: RAR ------------------------------------------------------------------------------- Post Information ------------------------------------------------------------------------------- Posted by............: FreeXeX Posted to............: XBINS Posted on............: 12/24/2009 Poster URL...........: http://freexex.xboxapps.org ------------------------------------------------------------------------------- Release Notes ------------------------------------------------------------------------------- + New, more friendly GUI. + Auto Discovery mode. All applications/games which are in the Games directory at the root of any device will be displayed in the first screen when you launch XeXLoader. For example, if "hdd1:\Games\MyGame" exists, and there is a default.xex in "MyGame", it will be shown in the first menu. + Enhanced File Manager (you can now Copy, Move, Paste, Delete and Create). You can display help with Back, change current device with X, open sub-menu with Y, and show only .xex with RB. + Overwriting is now available. + Progress bar when copying files/folders. You can cancel a copy with B. + Automatically displays selected game's theme when browsing directories * The default.xex auto-patch when copying DVDs is not included in this version. This function will be implemented for the next release. * Lot of bugs fixed. * Known bug: Some game previews could cause memory corruption (very few spotted), which can cause crashes and other weird behavior. If you encounter this, delete the files "nxeart" and "nxebg.dds" from the game directory. Note: if the list you get at startup is empty you can use left or right dpad to get the normal file listing ------------------------------------------------------------------------------- Install Notes ------------------------------------------------------------------------------- 1) Launch old version of XeXLoader. Use the file browser to copy the directory "C0DE9999" to the 360 HDD at: Hdd1://Content/0000000000000000/ 2) Burn CD/DVD using XeXLoader.iso, and run from disc. Use the file browser to copy the directory "C0DE9999" to the 360 HDD at: Hdd1://Content/0000000000000000/ 3) Use the 360 HDD transfer cable. Use appropriate software to copy the directory "C0DE9999" to 360 HDD at: Partition3\Content\0000000000000000\ With this release, Team FreeXeX organized a contest! Find the Easter Egg and take a picture of it with a piece of paper saying FreeXeX. E-mail submissions to: Contest@vgcrepairs.biz Prizes are as follows: For the first 2 US winners: 1 x Cygnos360 V2 or 1 x IntensaFire (first winner can choose) For the first 3 EU winners: 1 x Cygnos360 V2 ------------------------------------------------------------------------------- Special Thanks ------------------------------------------------------------------------------- FreeXeX would like to thank GX-Mod, and all the other people who donated. Your contributions are appreciated. ------------------------------------------------------------------------------- IRC: #freexex @ EFNet -------------------------------------------------------------------------------
-
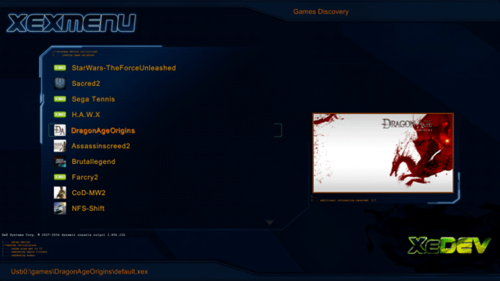
XeXMenu
XEXMenu is a file manager / FTP server / dashboard for the Xbox 360, it can launch for XEX Homebrew, Games, Apps and Emulators from a USB drive, Internal hard drive or even a DVD.
XEXMenu has two different versions, which can be incredibly useful for different situations.
The ISO version of XEX Menu is useful for people with new Jtag or RGH Xbox 360 consoles. You can burn the ISO of XEX Menu to a CD or DVD and place it in the Xbox 360. You can then load XEX Menu directly from the dashboard, giving you FTP access to the Jtag or RGH hacked Xbox 360. In addition you also have access to install content from a FAT32 formatted USB hard drive.
XEX Menu allows you to copy content to a USB hard drive using a computer and then load that content on the Xbox 360, this is an advantage for people who dont wish to use special tools to gain access to the Xbox 360's unique FATX file system.
The ISO of XEX Menu is also handy in helping newbies to the Xbox Scene in launching the installers for Dashlaunch after updating your console, allowing you to quickly restore the Xbox 360's ability to boot in to a replacement dashboard, such as FreeStyle Dashboard.
The Live version of XEX Menu can be injected in to an Xbox 360 formatted usb stick using tools such as Party Buffalo Drive Explorer or even copied across from a USB hard drive to the internal hard drive when used with the ISO version of XEX Menu, allowing XEX Menu to be used without a disc in the Xbox 360 console.
-
XexTool
This tool is for research purposes only. It must not be used for commercial/illegal/pirate uses.
THIS WILL NOT MAGICALLY ALLOW YOU PLAY COPIED GAMES.
:: Overview
This is a tool to extract information on an xex file. It will print out xex information to the console, alter xex attributes, extract executable code and other basefiles and create idc scripts files to help with disassembling the extracted executable code.
Note: Any altered or created retail xex files will not be correctly signed.
:: Install
If you wish to run xextool from anywhere, copy the xextool.exe file to a location in your path that is used for exe files. If you are not sure you can check the %PATH% environment variable (type "echo %PATH%" from the command line) or just copy it into your windows directory.
If you use the "Create IDC" feature of xex tool then you need to copy x360_imports.idc into your "IDA\idc" directory so that it will be found by any IDC script that you run.
:: Xex Format Basics
An xex file consists of a basefile that the xex is built around and headers which contain various attributes to be used with the basefile.
Usually the basefile is an executable file, however it can also be data file, as seen with ximedic.xex from the xbox360 flash. When the basefile is an executable file it is either an exe or dll, however it is not stored in its normal exe or dll format but instead as a binary file.
Some of the xex header attributes are required, and others are optional. Some of these attributes are things such as the regions the xex is made for and the media the xex is allowed to boot from.
The basefile can be optionally encrypted using aes encryption. All contents of the basefile are hashed and then rsa signed. Microsoft is the only one with access to the private key required to sign xexs in order to allow them to boot on a retail xbox360. A different key is used to sign xex files in order to allow them to boot on a development xbox360 (aka devkit).
:: Usage
-l = print extended info list about xex file
-p <xexp filename> = patch xex with xexp
-b <base filename> = dump basefile from xex
-i <idc filename> = dump basefile info to idc file
-d <res. dirname> = dump all resources to a dir (can be '.')
-o <xex filename> = output altered xex to a new file
-a <bounding path> = add bounding path to xex location
-u = fix patch updated xex to not require separate patch file
-s = do special xex specific patches (0/1/2/4/8/10/.../80000000)
bitflags are used to select one or more patches at a time
0 = list all patches for an xex
-1 = do all possible patches
1 = patch #1
2 = patch #2
4 = patch #3 (yes #3, not 4, because its a bitflag)
-r = remove xex limitations (a/m/r/b/d/i/y/v/k/l/c/z)
a = remove all limits (same as "mrbdiyvklcz")
m = remove media limits (all media)
r = remove region limits (all regions)
b = remove bounding pathname
d = remove bounding device id
i = remove console id restriction
y = remove dates restriction
v = remove keyvault privileges restriction
k = remove signed keyvault only limitation
l = remove minimum library version limitations
c = remove required revocation check
z = zero the media id
-m = force output xex machine format (d/r) (0=d, 1=r)
d = force output xex to be devkit
r = force output xex to be retail
-c = force output xex compression format (u/c/b) (0=u, 1=c)
u = force output xex to be uncompressed (no zeroed data)
c = force output xex to be compressed
b = force output xex to be binary (has zeroed data)
-e = force output xex encryption format (u/e) (0=u, 1=e)
u = force output xex to be uncrypted
e = force output xex to be encrypted
-x = xml output options (a/b/d/i/m/n/p/r/t/x)
a = extract everything
b = extract basefile type (ie dll, exe, patch, other)
d = extract media id
i = extract game icon
m = extract game supported medias
n = extract game name
p = extract bounding path
r = extract game supported regions
t = extract title id
x = extract xex machine format (retail or devkit xbox360)
If "-o" is not used, the original xex file will be altered.
Multiple options can be given at once, eg: "-m d -r mrl".
If no options are given, a shortened xex info list will be printed.
* Media limits limit what media the xex can be booted from. * Region limits limit what console regions an xex can be booted on. * Bounding pathname limits a xex to being executed from a specified path only. * Signed keyvault limits an xex to running from an xbox360 which has a signed keyvault. * Minimum library versions require system dlls to be of a specified version of higher. The usual imports are from xboxkrnl.exe and xam.exe. * Required revocation check requires the xex to be checked against a list of revocated xexs before allowing it to boot. * A media id can be used to block an xex from running if it matches known "banned" media ids. This is the case for xexs from the famous "kiosk disc". * Xml output enables usage of XexTool inside other programs
:: Usage Examples
* Print basic info about an xex file to console: xextool default.xex * Print extended info about an xex file to console: xextool -l default.xex * Extract the executable basefile from default.xex into default.exe: xextool -b default.exe default.xex * Extract the executable file and create an idc script file from default.xex: xextool -b default.exe -i default.idc default.xex * Convert a retail xex into a development xex: xextool -m d default.xex * Convert a retail xex into a seperate development xex: xextool -m d -o devkit.xex retail.xex * Remove all region and media limits from an xex: xextool -r mr default.xex * Remove all limits and convert a retail xex into a devkit xex: xextool -r a -m d default.xex * Convert an xex into an unencrypted binary format: xextool -e u -c b -o default-binary.xex default.xex * Convert unencrypted binary xex back into an encrypted compressed xex: xextool -e e -c c -o default.xex default-binary.xex
:: Specifics
This tool enables you to do many things with an xex file if you understand how to do so. Some usage examples are given above, but here is some more detailed information on a few specific cases.
How to make a retail xexs work on a development xbox360
This is quite easy with this tool, just do the following: xextool -r a -m d default.xex
Not only will the xex work on a devkit, it will also now work from any media and run region independently.
How to patch an xex file with an xexp patch file.
Updates to games and system files are provided over xbox live in the form of patch files. These updates are stored inside package files in the Cache folder on you hard drive. A system update usually has "SU" as part of the filename, and a title update (game update) usually has a "TU" as part of the filename.
Note: As of around November 2010 it seems that games are storing their updates on the internal hdd in the folder "Content\0000000000000000\xxxxxxxx\000B0000\".
A patch file will only work when used with an untouched version of the original xex file it was created for. When you have the original xex file and the patch file you want to use with it, do the following to create the updated xex: xextool -u -p patch.xexp -o output.xex input.xex
Note: A retail xex requires a retail patch file, a devkit xex requires a devkit patch file. If an xex has been converted from a retail to a devkit xex, you need to use the retail patch file with the original retail xex, then convert the resultant xex file into a devkit xex file.
How to reverse engineer and alter the code in an xex file.
Note: While the following still works, it has been superceeded by the separate Xex IDA Loader which will load the xex file directly into IDA.
First extract the executable base file and idc script file as follows: xextool -b default.exe -i default.idc default.xex
Xextool will tell you how to load the file into ida. If you don't have ida, then load it into the disassembler you are using with the same parameters.
An example of the load info xextool gives you is as follows:
Load basefile into IDA with the following details DO NOT load as a PE or EXE file as the format is not valid File Type: Binary file Processor Type: PowerPC: ppc Load Address: 0x92000000 Entry Point: 0x9201DD38 Note: even though this file seems to be a normal exe or dll file it is not! You MUST load this file as a binary file, not a pe, exe or dll.
Once the file has been loaded into ida, run the idc script file. It will expect the "x360_imports.idc" file included with xextool to be in your
"ida/idc" directory.
Once you have found any areas you want to change or patch, make these changes to the exe basefile you extracted above (default.exe).
Now you need to insert the basefile (default.exe) back into your xex file. So do the following to get a fully decrypted and decompressed xex: xextool -e u -c b -o default-hack.xex default.xex
Now open default-hack.xex in a hex editor and find where the basefile starts.
You can search for the "MZ" present in the exe header to find this. (Often its around the 0x2000 byte offset mark.)
Now copy the contents of default.exe into default-hack.xex over the top of
the basefile that is inside default.xex. It should exactly fill the rest of
the default-hack.xex file from where you start inserting default.exe.
Now do:
xextool -o default-done.xex default-hack
The default-done.xex file will now be resigned and ready to use, unless its retail in which case it won't get resigned correctly. When creating the default-done.xex file you can also specify encryption and compression options for the output file if you wish.
by xorloser.
-
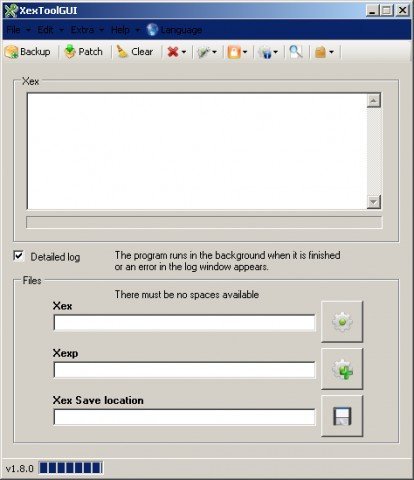
XexTool GUI
XeXGUI for xorloser's latest XeXTool. Thank you for your program and your Hard work.
I've created this little tool so you do not always have default.xex edit, with the command line tool.
Build and Tested on Windows 7 64Bit with .NetFramework 4.0.
To do list:
special xex specific patches new in XexTool v6.3
XexToolGUI.exe
--------------
CRC: 70FA7E20
MD5: 871FE4A15E64FBE95C5C75C8CE4898C1
SHA1: D32719411D83A757D10DE678D64E48AB884CEF70
==============================================================
XexTool GUI uses the Multilanguage system from Mottzi
Special Thanks to:
Razkar for French Translation
x8-bitx for German Translation
Included:
- XexTool v6.3 - XexToolGUI v1.8 IDA Plugins:
- XexLoader v6.1 - PPCAltivec Plugin v1.8 + = added
- = remove
* = fixed
# = updated
:: History
v1.8
--------------------------------------------------------------
+ added .lex file support (Xbox360 System Files)
+ added create binary for IDA
+ added binary 2 xex option
* fixed Incorrect ending by binary files
+ added language option
* fixed ml_xexgui.lng file
* fixed Multilanguage system
v1.7
--------------------------------------------------------------
+ added better Dumb folder create function
* fixed backup bug no xex file selected and reload the GUI
(I hate this bug I hope that was the last time)
# updated GUI for multilanguage
+ added multilanguage support
+ added xex bounding path option
+ added more remove options
remove bounding device id
remove console id restriction
remove dates restriction
remove keyvault privileges restriction
v1.6 Beta
--------------------------------------------------------------
+ added xex compression
+ added xex uncrypt and encrypt function
+ added idc create funktion for IDA
+ added xex dump function
* fixed TitleUpdate search bug
+ added TitleUpdate search function
JQE360 and XBUC webside
* fixed a bug in the about window
+ added better xex patch function
( xex, xexp files no longer needs to be in the same folder )
+ added new backup function
+ added xex information
- remove many source code
+ added cmd control for xextool.exe
+ added create xex machine format
devkit and retail
+ added complete new ui
+ added more remove options
remove bounding pathname
remove keyvault privileges restriction
remove required revocation check
remove Zero media ID
remove Ap2.5 (Beta)
v1.5
--------------------------------------------------------------
+ added better backup Function
+ added Remove and Rename Funktion
+ added xextool check
* fixed little UI Bug
* fixed Remove Rename Check Bug
* fixed Backup check Bug
+ update UI
v1.1
--------------------------------------------------------------
+ update UI
+ added default_mp.xex Backup
+ added default_mp.xex Patch
v1.0
--------------------------------------------------------------
= Basic UI
= Create Backup from default.xex
= Remove Region Limits
NTSC/U, NTSC/J (Excluded China), PAL and make a
Region Free default.xex
= Remove Media Limits
= Remove Dash Limits
= Removes the Dash Version check good for old Dash versions.
= xex Patch with xexp
Patch the latest version for your game
v0.9
--------------------------------------------------------------
by mLoaD
-
XFlasher 360
In the past there have been many users who have had problems when it comes to flashing their drive under Windows (Drive-bricking, Windows freezes, etc.) so I have decided to program a DOS-based tool that automatically does the following:
- Copying of the DVD-Drive Firmware - Spoofing/patching of the Firmware - Flashing the DVD-Drive with iXtreme The Tool: XFlasher completes the entire Flash-Procedure. For this the original firmware as well as the the files iXtreme.bin, org.bin, key.bin, identify.bin, inquiry.bin or dummy.bin are placed in separate folders.
Note: Not all of the files mentioned above are created for every drive model. DVD drives from Lite-On, BenQ, and Samsung/Toshiba are supported. It is not possible to flash Hi-tachi drives under DOS at the moment, if this should change in the future then newer versions of Xflasher will most probably be released with the added support.
Essential Hardware
------------------
1) A PC with SATA and COM Ports (a COM port is only necessary for Lite-On 74850C drives).
A PCI-SATA card also does the trick. Boards with VIA or INTEL chipsets are recommended
2) A USB-Boot-Stick with DOS and the content from the XFlasher 360 file
3) iXtreme firmware for Lite-On 74850C (ixLitV1.bin), Lite-On 83850c (ixLitV2.bin), BenQ- (ixBenQ.bin) and
Samsung/Toshiba (ixSam.bin) drives (gets copied to the firmware folder)
4) A RS232 converter for the Lite-On 74850C drive (i.e. 360 Xtractor Tool)
INSTALLATION:
-------------
Warning: This will completely format your USB-drive!!!
1) Open the files "Install and format USB.bat" and select the drive letter of your USB-drive.
All required files will be copied to your USB-drive, this will make it bootable.
2) Boot your PC from the USB-drive.
History:
--------
ver 0.8
- Lite-On Lite-On 83850c support added
- directory structure changed
- added free-dos instead ms-dos
- updated english and german
- removed french support
- using DosFlash v1.8 for flashing
- using Firmtool v1.4 and liteTool 0.2 for spoofing/key-changing
- added support for Floppy-Disk
(now you can copy 1. hacked firmware file on disk)
- firmware filenames can be changed in "settings.ini"
ver 0.78
- iXtreme 1.6 repack
- changed firmware filenames
ver 0.77
- Bug fixing
- Fix for read DVD-Key
- Fix for erase BenQ and Samsung DVD-Rom
- Updated english and german How 2
ver 0.75
- Added option for read the DVD-Key several times
- Fix for read Samsung/BenQ DVD-ROM
- Added USB-formatting tool with DOS
- Added language menu at 1st start
- Added english language
- Added english How to
- Added french language
- Added french How to
- Bug fixing
- Fix for show correct ANSI-Fonts (German: like ‰ and ¸) under Dos
ver 0.71
- Open beta release
- Bug fixing
- Added logfile
ver 0.5
- Bug fixing
- Added Menu
- Added Flashing routines
ver 0.1
- Initial release
Thanks goes to:
---------------
- c4eva for the iXtreme Firmware
- Geremia, Modfreakz and Kai Schtrom for DosFlash
- Caster420 for FirmTool
- Klutsh for liteTool
- hitman43, Arakon and MountieXXL for the translations and beta testing
And all i forgot
by Trancy.
-
XIC (Xplorer Image Convertor)
This tool will convert your Datel Xchange360 images (*.z36) to Xplorer360 format (*.bin).
Note: Xchange360 merely creates a full backup of your memory unit. The .z36 images are just that.
Once converted and the image opened within Xplorer360 you may extract the needed files from the image and place them to your device or simply restore the .bin to your memory unit.
by AngerWound & Roofus.
-
Xipper
It's a simple GUI for extract-xiso tool for Linux.
Through extract-xiso you'll can extract a XBOX360 ISO to get a rip folder compatible with JTAG e RGH. The program let you also to optimize an ISO for JTAG/RGH and also to create an ISO from a JTAG/RGH rip folder.
Changelog:
v1.0:
A complete GUI for extract-xiso Possibility to use all the main functions of extract-xiso, such as ISO extraction, optimization and creation. Possibility to choose additional parameters for the procedure Two languages available: English and Italian. Installation:
On Archlinux use the package on AUR. On Debian based distros (ex. Ubuntu and derivates) use the DEB package. About all other distros: Install the dependencies: gambas2-gb-form, gambas2-gb-gtk, gambas2-gb-qt Note: gambas2-gb-qt is optional, install it only if you need the QT support for KDE. Download the package containing the binaries (bin) Give the execution rights to the binary file: chmod +x xipper.gambas Run the binary file double-clicking on it or typing in a terminal: ./xipper.gambas Thanks
To extract-xiso creators To Tikilou for the v2.7 for Linux To Gambas authors To my girlfriend for her patience by RedSquirrel.
-
xk3y firmware
1. Open your Xbox 360 and extract the drive-key from your ODD. (dummy.bin for SLIM and firmware.bin for FAT)
2. Included with the xk3y is a MicroSD card, on this SD card there is two files "rootfs" & "uImage" (DO NOT FORMAT the MicroSD card!)
2.1 add the extracted drive-key file to the MicroSD card. (make sure you right click and eject your card from the PC, otherwise you may corrupt the files)
3. Place the MicroSD card in the MicroSD slot located on the xk3y Main Board.
4. Connect the xk3y main board between your Xbox360 main board and DVD drive (connecting to the DVD drive is not a requirement, but to use pass-through mode and play games from disc its a must)
Cable layout is as follow.
SATA: Original SATA cable from Xbox main board to (J3) on XK main board.
SATA: Included SATA cable from from Xbox DVD drive to (J2) XK main board.
POWER: Original Power cable from Xbox main board to (P2) on XK main board.
POWER: Included Power cable from Xbox DVD Drive to (P1) on XK main board.
USB: Connect MicroUSB cable from (J4) on XK main board to XK Remote.
Boot Modes
1. Drive Emulation: Start XB360 by pressing the Main Power Switch.
2. isoMenu mode: Start XB360 by pressing the Main Power Switch and the eject to load the isoMenu (read isoMenu.txt for more details)
3. Pass Through: Start XB360 by pressing the Eject button. This will make your XB360 start up in normal mode and let you play game from your original Disc Drive.
How to play games
1. Use any USB drive/hdd media device formatted in NTFS or other supported file formats.
3. Create a folder called "games" in the root of the HDD.
3.1 In the games folder create any folder structure you like.
For example, "games>sports" "games>action"
4. Take your favorite .ISO files and drop them in any folder inside the games folder structure.
5. Enjoy xk3y!
Its also possible to have several HDD devices connected via a powered USB HUB. xk3y will automatically detect all drives and you can then select from the xk3y remote which HDD to use.
IMPORTANT INFO for AP25/XGD3 protected games. (Requires xk3y firmware 1.02 or up)
For all XGD3 games (GoW3, Driver, WarHammer 40K, etc.) it is necessary to put the corresponding "dae.bin" file (that matches your dash board version) in the /games directory. This file can change whenever MS release a Dash update but there is no need to repatch/reburn games, just replace the dae.bin."
-
xk3y Gecko software & user manual
The xk3y gecko will enable you to make backups of your original 360 games using a stock firmware 360 drive. It will also let you extract the .bin file from the drive it is attached to for use with the xk3y.