Xbox One
13 archivos
-

Xbox One Windows and Linux Internal Hard Drive Partitioning Script
Creates a properly partitioned Xbox One hard drive. You'll want to source the
entire original drive files or use the latest OSU1 files.
Features:
Create a Standard Xbox One 500GB, 1TB, or 2TB internal hard drive Upgrade a Standard Xbox One drive to non-standard sizes including as small as 138GB, as large as 1947GB, and other non-standard sizes Set Standard Xbox One GUID values w/o formatting the drive Backup "System Update" to current directory System_Update and more Restore "System Update" from current directory System_Update and more Check all partitions for file system errors using chkdsk Wipe drive of all partitions and GUID values This script is a direct replacement to create_xbox_drive.sh for Linux and tested on Windows 7 and 10.
You'll need some sort of USB to SATA device or have the ability to connect a SATA drive directly to your PC. I recommend the USB3S2SAT3CB USB 3.0 to SATA adapter cable.
NOTE 1: You need to run this script from an Administrator Command Prompt using the "Run as administrator" feature.
NOTE 2: For this script to work on non-English Windows systems
C:\Windows\System32\en-US needs to be present.
Control Panel\All Control Panel Items\Language\Add languages
English (United States)
NOTE 3: Click "Cancel" or "X" on any "You need to format the disk in drive ?:
before you can use it." messages.
NOTE 4: diskmgmt.msc is your friend. Keep it open while running this script
to check progress and verify proper partitioning and formatting.
WARNING 1: Only have one Xbox One or future Xbox One drive connected when
running this script to ensure the right drive gets formatted and
avoid Offline signature collisions!
This means disconnecting the SOURCE drive after:
(b) Replace/Upgrade keeping original drive data
but before:
(c) Fix GUID values w/o formatting the drive
When redoing the entire process run this step on the TARGET with
the SOURCE disconnected:
(g) Wipe drive of all partitions and GUID values
WARNING 2: Always use "Safely Remove Hardware and Eject Media" and "Eject" the
newly created drive.
If you receive the message: "Windows can't stop your
'Generic volume' device because a program is still using it."
Either shutdown your system and remove the drive or use
diskmgmt.msc right click the disk, select "Offline", then "Online"
and then "Safely Remove Hardware and Eject Media" and "Eject".
Primary script functions explained:
(a) Replace/Upgrade w/o a working original drive (Standard Only) - used to fix systems when the original drive has failed
(b) Replace/Upgrade keeping original drive data (Standard and Non) - used to swap to a smaller or larger standard or non-standard drive
(c) Fix GUID values w/o formatting the drive (Standard and Non) - should be used after step (b) and after disconnecting the SOURCE drive
(d) Backup "System Update" to current directory (Standard and Non) - use before doing a Reset or Upgrade, better safe than sorry
(e) Restore "System Update" from current directory (Standard and Non) - use after doing a Reset or Upgrade, told you so
(f) Check all partitions for file system errors (Standard and Non) - optionally check for filesystem corruption or prepare for Clonezilla
(g) Wipe drive of all partitions and GUID values (Standard and Non) - used to blank a drive before rerunning step (b)
(h) CANCEL - skip making any drive modifications
Partition layout explained:
There are 5 partitions on an Xbox One drive. The 2nd partition 'User Content'
is what this selection refers to. The other 4 partitions are always the same
size regardless of the drive size.
All partitions are rounded to the nearest gibibyte (normally and not to be
confused with gigabyte). So options (d) through (g) will mostly do the right
thing. Options (a) through (c) are for wanting to force a particular size on
the target drive.
Most people should choose (a), (b), or (c). If you have a 256GB or 750GB you
should select (d). For 3TB, 4TB, or 5TB drives you should select (f).
(a) 500GB Standard (365GB) (779MB Unallocated)
(b) 1TB Standard (781GB) (50.51GB Unallocated)
(c) 2TB Standard (1662GB) (101.02GB Unallocated)
(d) Autosize Non-Standard w/ 500GB Disk GUID (1947GB MAX) - create an autosized 'User Content' resetting to 500GB
(e) Autosize Non-Standard w/ 1TB Disk GUID (1947GB MAX) - create an autosized 'User Content' resetting to 1TB
(f) Autosize Non-Standard w/ 2TB Disk GUID (1947GB MAX) - create an autosized 'User Content' resetting to 2TB
1. Unzip xboxonehdd-master-7.zip to the Desktop which will create an xboxonehdd-master directory
2. Open an Administrator Command Prompt:
Windows 7: Click "Start Menu -> All Programs -> Accessories" right click "Command Prompt" select "Run as administrator"
Windows 10 1607 and earlier: Right click "Start Menu" select "Command Prompt (Admin)"
Windows 10 1703 and later: Right click "Start Menu" select "Windows PowerShell (Admin)"
3. In the Command Prompt paste:
Command Prompt:
cd %USERPROFILE%\Desktop\xboxonehdd-master\win
Windows PowerShell:
cd $Env:USERPROFILE\Desktop\xboxonehdd-master\win
4. Then paste:
.\create_xbox_drive.bat
5. Follow all the prompts and be sure to select the appropriate drive. Example below:
**********************************************************************
* create_xbox_drive.bat: *
* This script creates a correctly formatted Xbox One HDD against the *
* drive YOU select. *
* USE AT YOUR OWN RISK *
* *
* Created 2016.06.30.2.0 *
* Last Updated 2018.05.10.7.0 *
* Language ID 0409 *
**********************************************************************
* Administrative permissions required. Detecting permissions... *
* Administrative permissions confirmed *
* English language availability required. Checking... *
* English language availability confirmed *
* Are required drive letters available? Checking... *
* H: is free
* I: is free
* J: is free
* K: is free
* L: is free
* Found U: - Local Fixed Disk Temp Content
* Found V: - Local Fixed Disk User Content
* Found W: - Local Fixed Disk System Support
* Found X: - Local Fixed Disk System Update
* Found Y: - Local Fixed Disk System Update 2
* WARNING: Any non-free drive letters above may interfere with this *
* script. Adjust the letters used in the "Changeable drive *
* letters" section near the top of this script. *
* If you have an Xbox One drive attached non-free drive *
* letters are expected. *
* This script will temporarily change the command line interface to *
* English and change it back when complete. *
Press any key to continue . . .
EnableLUA REG_DWORD 0x1
[ Englishize Cmd v1.7a ]
# This script changes command line interface to English.
# Designed for localized non-English Windows Vista or above. Any languages.
# Note 1. A few programs without a .mui aren't affected, e.g. xcopy
2. _files_to_process.txt can be customized to cover more/less commands
3. English MUI can be installed through Windows Update or Vistalizator
to support GUI programs such as Paint.
. . .
"This is a 64 Bit Operating System"
Select Xbox One drive creation type:
(a) Replace/Upgrade w/o a working original drive (Standard Only)
(b) Replace/Upgrade keeping original drive data (Standard and Non)
(c) Fix GUID values w/o formatting the drive (Standard and Non)
(d) Backup "System Update" to current directory (Standard and Non)
(e) Restore "System Update" from current directory (Standard and Non)
(f) Check all partitions for file system errors (Standard and Non)
(g) Wipe drive of all partitions and GUID values (Standard and Non)
(h) CANCEL
?a
* Scanning for connected USB/SATA drives . . . *
Microsoft DiskPart version 10.0.16299.15
Copyright (C) Microsoft Corporation.
On computer: XFIX-1
Disk ### Status Size Free Dyn Gpt
-------- ------------- ------- ------- --- ---
Disk 0 Online 447 GB 0 B
Disk 1 Online 3726 GB 0 B *
Disk 2 Online 3726 GB 0 B *
Disk 3 Online 1863 GB 101 GB *
* Select TARGET Xbox One Drive . . . *
Press 4 to CANCEL or use a Disk Number from the list above (default 4 in 30 seconds) [0,1,2,3,4]?3
* Does selected disk contain C: Checking... *
* Does not contain C: can continue *
GUID Dev Size Name
5B114955-4A1C-45C4-86DC-D95070008139
B3727DA5-A3AC-4B3D-9FD6-2EA54441011B U: 41 GB 'Temp Content'
869BB5E0-3356-4BE6-85F7-29323A675CC7 V: 1662 GB 'User Content'
C90D7A47-CCB9-4CBA-8C66-0459F6B85724 W: 40 GB 'System Support'
9A056AD7-32ED-4141-AEB1-AFB9BD5565DC X: 12 GB 'System Update'
24B2197C-9D01-45F9-A8E1-DBBCFA161EB2 Y: 7168 MB 'System Update 2'
WARNING: This will erase all data on this disk. Continue [Y,N]?Y
* Disk 3 will be formatted as an Xbox One . . . *
Select partition layout:
(a) 500GB Standard
(b) 1TB Standard
(c) 2TB Standard
(d) CANCEL
?c
* Removing existing partitions with gdisk64 . . . *
* Creating new partitions with gdisk64 . . . *
* Updating GUID values with gdisk64 . . . *
Giving USB/SATA devices time to settle, please wait . . .
Microsoft DiskPart version 10.0.16299.15
Copyright (C) Microsoft Corporation.
On computer: XFIX-1
Volume ### Ltr Label Fs Type Size Status Info
---------- --- ----------- ----- ---------- ------- --------- --------
Volume 0 D DVD-ROM 0 B No Media
Volume 1 E DVD-ROM 0 B No Media
Volume 2 System Rese NTFS Partition 100 MB Healthy System
Volume 3 C NTFS Partition 447 GB Healthy Boot
Volume 4 M WD4TB NTFS Partition 3725 GB Healthy
Volume 5 N WD4TB2 NTFS Partition 3725 GB Healthy
Volume 6 J Temp Conten NTFS Partition 41 GB Healthy
Volume 7 H User Conten NTFS Partition 1662 GB Healthy
Volume 8 I System Supp NTFS Partition 40 GB Healthy
Volume 9 F System Upda NTFS Partition 12 GB Healthy
Volume 10 G System Upda NTFS Partition 7168 MB Healthy
* Formatting new partitions with C:\WINDOWS\system32\format . . . *
* Formatting with C:\WINDOWS\system32\diskpart . . . *
* Assigning drive letters with C:\WINDOWS\system32\diskpart . . . *
Microsoft DiskPart version 10.0.16299.15
Copyright (C) Microsoft Corporation.
On computer: XFIX-1
Volume ### Ltr Label Fs Type Size Status Info
---------- --- ----------- ----- ---------- ------- --------- --------
Volume 0 D DVD-ROM 0 B No Media
Volume 1 E DVD-ROM 0 B No Media
Volume 2 System Rese NTFS Partition 100 MB Healthy System
Volume 3 C NTFS Partition 447 GB Healthy Boot
Volume 4 M WD4TB NTFS Partition 3725 GB Healthy
Volume 5 N WD4TB2 NTFS Partition 3725 GB Healthy
Volume 6 U Temp Conten NTFS Partition 41 GB Healthy
Volume 7 V User Conten NTFS Partition 1662 GB Healthy
Volume 8 W System Supp NTFS Partition 40 GB Healthy
Volume 9 X System Upda NTFS Partition 12 GB Healthy
Volume 10 Y System Upda NTFS Partition 7168 MB Healthy
GUID Dev Size Name
5B114955-4A1C-45C4-86DC-D95070008139 (2TB)
B3727DA5-A3AC-4B3D-9FD6-2EA54441011B U: 41 GB 'Temp Content'
869BB5E0-3356-4BE6-85F7-29323A675CC7 V: 1662 GB 'User Content'
C90D7A47-CCB9-4CBA-8C66-0459F6B85724 W: 40 GB 'System Support'
9A056AD7-32ED-4141-AEB1-AFB9BD5565DC X: 12 GB 'System Update'
24B2197C-9D01-45F9-A8E1-DBBCFA161EB2 Y: 7168 MB 'System Update 2'
* Found the X: drive. *
* Script execution complete. *
* This script will now change the command line interface back to the *
* default language. *
Press any key to continue . . .
EnableLUA REG_DWORD 0x1
[ Englishize Cmd v1.7a ]
# This script restores the command line interface back to original
. . .
# Completed.
6. The last bit of output should look like the following, except for the
first line depending on the drive size, if not run the script again:
A2344BDB-D6DE-4766-9EB5-4109A12228E5 (500GB)
25E8A1B2-0B2A-4474-93FA-35B847D97EE5 (1TB)
GUID Dev Size Name
5B114955-4A1C-45C4-86DC-D95070008139 (2TB)
B3727DA5-A3AC-4B3D-9FD6-2EA54441011B U: 41 GB 'Temp Content'
869BB5E0-3356-4BE6-85F7-29323A675CC7 V: 365 GB 'User Content'
C90D7A47-CCB9-4CBA-8C66-0459F6B85724 W: 40 GB 'System Support'
9A056AD7-32ED-4141-AEB1-AFB9BD5565DC X: 12 GB 'System Update'
24B2197C-9D01-45F9-A8E1-DBBCFA161EB2 Y: 7168 MB 'System Update 2'
7. To view the log file paste this:
Command Prompt:
notepad %TEMP%\create_xbox_drive.log
notepad %TEMP%\RoboCopy-Temp_Content.log
notepad %TEMP%\RoboCopy-User_Content.log
notepad %TEMP%\RoboCopy-System_Support.log
notepad %TEMP%\RoboCopy-System_Update.log
notepad %TEMP%\RoboCopy-System_Update_2.log
Windows PowerShell:
notepad $Env:TEMP\create_xbox_drive.log
notepad $Env:TEMP\RoboCopy-Temp_Content.log
notepad $Env:TEMP\RoboCopy-User_Content.log
notepad $Env:TEMP\RoboCopy-System_Support.log
notepad $Env:TEMP\RoboCopy-System_Update.log
notepad $Env:TEMP\RoboCopy-System_Update_2.log
8. OPTIONAL (skip if OSU1 doesn't match the last successful update):
Download the latest OSU1.zip which contains the files:
$SystemUpdate/host.xvd
$SystemUpdate/SettingsTemplate.xvd
$SystemUpdate/system.xvd
$SystemUpdate/systemaux.xvd
$SystemUpdate/systemmisc.xvd
$SystemUpdate/systemtools.xvd
$SystemUpdate/updater.xvd
Place them in the 'System Update' partition as:
A/host.xvd
A/SettingsTemplate.xvd
A/system.xvd
A/systemaux.xvd
A/systemmisc.xvd
A/systemtools.xvd
B/host.xvd
B/SettingsTemplate.xvd
B/system.xvd
B/systemaux.xvd
B/systemmisc.xvd
B/systemtools.xvd
updater.xvd
-
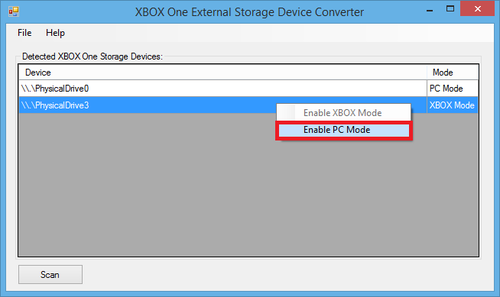
Xbox One External Storage Device Converter
This application will make a hard drive used for XBOX One External Storage (released in the June System Update); recognizable to a PC for read/write of the data.
It will also allow you the ability to create an XBOX One External Storage device right from the application. This allows people without the June Preview Update to utilize External Storage capabilities in the latest Public System Update.
Note:
This application requires Administrator privileges on execution otherwise it may state "No storage devices found".
Usage: (Enable read/write of XBOX One External Storage Device)
Plug in your XBOX One external storage device into your PC after it has been formatted for use on your console. Open the application and choose "SCAN". Your device should be listed. Right click and choose "Enable PC Mode". Choose scan again; and you should see that your device is now in PC Mode. Disconnect/Reconnect your drive and Windows should now mount the drive allowing you to read/write the files stored by the console. You could also do a refresh in Disk Management instead of disconnect/reconnect. When you are ready to return the device to your console:
Open the application and do a scan. Choose your device, right click and "Enable XBOX Mode". This needs to be done before your console will recognize the drive. If you forget to do this; your console will ask to reformat it (losing all your data). Usage: (Create a new XBOX One External Storage Device)
Plug in a USB 3.0 enabled Disk Drive into your PC. Format the drive so that it is visible to your PC in a logical drive format (NTFS, FAT, etc). Choose "Create XBOX Drive". Select the drive. Continue through the warnings. Drive should show up in the list. Plug your drive into your XBOX One console and enjoy External Storage capabilities. (Preview update or not!) Usage: (Create a new XBOX One External Storage Device With Multiple Partitions)
Plugin a USB 3.0 enabled Disk Drive into your PC. Using Disk Management in windows; create multiple NTFS partitions of varying sizes on the drive. Open the application and choose SCAN. Choose the drive you partitioned appropriately. Right click and "Enable XBOX Mode" Plug drive into XBOX One. The console will see multiple drives/partitions for use with storage. *WARNING*
This application scans and makes modifications to the MBR of the drive. I take no responsibility for any damage done to the device or loss of data caused by utilizing this application.
This has been tested on only a handful of drives; so there could be issues. Use at your own risk.
*NOTES*
If you do not have the June Preview Update you can still utilize external storage capabilities. Your console will recognize the device and use it for storage if you are out of space on your internal drive. However, you will not have the capabilities to transfer files from Internal -> External and vice versa that the June update provides until it is released to the public. USB 2.0 devices can also be utilized but will not be recognized straight away. In an odd workaround; if you plugin a USB 3.0 enabled XBOX One External Drive into your console; and then plugin a USB 2.0 enabled one - the console will utilize the USB 2.0 drive. by Angerwound & Lander.
-
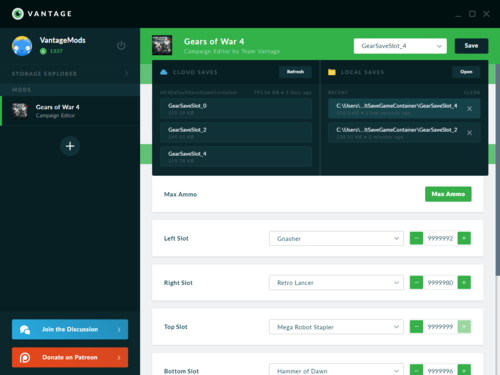
Vantage (Xbox One Mod Tool)
The first Xbox One game save modding tool is finally out.
Features
Access your saved game files without a flash drive! Download and upload all your saves with the Storage Explorer Mod Gears of War 4 campaign saves Create your own mods/editors and share them with the community Editors
Cuphead Fallout Shelter Gears of War 4 Resident Evil 7 Biohazard ARK: Survival Evolved -
PPSSPP - PSP Emulator For Xbox One
PPSSPP is a PSP emulator, this is a UWP port for the Xbox One, which can be installed on any Xbox One with Dev Mode Enabled.
-
XVDTool
xvdtool is a C# command-line utility for manipulating Xbox One XVD/XVC packages. It can print detailed info about package headers, resign, rehash, en/decrypt and verify data integrity of a package, it can also convert decrypted XVD files to VHD or extract the filesystem itself.
So far it's only been tested with dev-crypted packages (which use a different 256-bit Offline Distribution Key (ODK) to retail packages), as the retail key is still unknown. This currently makes the tool useless for 90% of people, but developers looking into how XVD files work will find a detailed mapping of the XVD structures and near-complete methods for manipulating them.
However no encryption keys are provided with this tool, you'll have to find them yourself. Hashes for the dev keys are provided below. If you have an Xbox One development kit or GamingServices framework (Windows10-exclusive) installed, you can use DurangoKeyExtractor to extract the keys from there.
Also included is a tool for extracting files from the XBFS (Xbox Boot File System) inside the Xbox One NAND, based on tuxuser's original NANDOne work with a few small additions. Thanks Kebob for providing OpenXvd.
Usage
Usage : xvdtool.exe [parameters] [filename] Parameters: -h (-help) - print xvdtool usage -i (-info) - print info about package -wi (-writeinfo) - write info about package to [filename].txt -o (-output) <output-path> - specify output filename -m (-mount) - mount package -um (-unmount) - unmount package -mp (-mountpoint) - Mount point for package (e.g. "X:") -lk (-listkeys) - List known keys including their hashes / availability -signfile <path-to-file> - Path to xvd sign key (RSA) -odkfile <path-to-file> - Path to Offline Distribution key -cikfile <path-to-file> - Path to Content Instance key -sk (-signkey) <key-name> - Name of xvd sign key to use -odk (-odkid) <id> - Id of Offline Distribution key to use (uint) -cik (-cikguid) <GUID> - Guid of Content Instance key to use -nd (-nodatahash) - disable data hash checking, speeds up -l and -f -ne (-noextract) - disable data (embedded XVD/user data) extraction, speeds up -l and -f -eu (-decrypt) - decrypt output xvd -ee (-encrypt) - encrypt output xvd XVDs will have a new CIK generated (if CIK in XVD header is empty), which will be encrypted with the ODK and stored in the XVD header -hd (-removehash) - remove hash tree/data integrity from package -he (-addhash) - add hash tree/data integrity to package -md (-removemdu) - remove mutable data (MDU) from package -r (-rehash) - fix data integrity hashes inside package -rs (-resign) - sign package using the private key from rsa3_key.bin -xe (-extractembedded) <output-file> - extract embedded XVD from package -xu (-extractuserdata) <output-file> - extract user data from package -xv (-extractvhd) <output-vhd> - extracts filesystem from XVD into a VHD file -xi (-extractimage) <output-file> - extract raw filesystem image -xf (-extractfiles) <output-folder> - extract files from XVD filesystem The next two commands will write info about each package found to [filename].txt also extracts embedded XVD and user data to [filename].exvd.bin / [filename].userdata.bin -l (-filelist) <path-to-file-list> - use each XVD specified in the list -f (-folder) <path-to-folder> - scan folder for XVD files To mount a package in Windows you'll have to decrypt it and remove the hash tables & mutable data first (-eu -hd -md) To decrypt non-XVC packages you'll need the correct ODK. The devkit ODK is "widely known" and a hashes are provided below, but as mentioned above the retail key is currently unknown.
Decrypting XVC packages is a different matter, XVC packages use a Content Instance Key (CIK) which appears to be stored somewhere outside the package, however where and how it's stored is currently unknown. If you have the correct deobfuscated CIK for a given package you should be able to use it to to decrypt the package.
Devkit/test-signed XVC packages use a static CIK which is also "widely known" (Hash provided below).
Required Files
To make full use of this tool you'll need the following files, which are not included. The tool will work fine without them, but some functions might not work.
You can use the included tool "DurangoKeyExtractor" to extract these keys from the Microsoft.GamingServices framework available on Windows 10. Just check some DLL / SYS / EXE files - you might find them.
33ec8436-5a0e-4f0d-b1ce-3f29c3955039.cik: CIK keys for XVC crypto. First entry should be the key used by SDK tools/devkits. Format: [16 byte encryption key GUID][32 byte CIK] MD5: C9E58F4E1DC611E110A849648DADCC9B SHA256: 855CCA97C85558AE8E5FF87D8EEDB44AE6B8510601EB71423178B80EF1A7FF7F RedOdk.odk: ODK key used by SDK tools/devkits Format: [32 byte ODK] MD5: A2BCFA87F6F83A560BD5739586A5D516 SHA256: CA37132DFB4B811506AE4DC45F45970FED8FE5E58C1BACB259F1B96145B0EBC6 RedXvdPrivateKey.rsa: Private RSA key used by SDK tools to verify/sign packages. Format: RSAFULLPRIVATEBLOB struct MD5: 2DC371F46B67E29FFCC514C5B134BF73 SHA256: 8E2B60377006D87EE850334C42FC200081386A838C65D96D1EA52032AA9628C5 For other known keys and their hashes use the -listkeys cmdline switch. To chose a specific key use the following cmdline switches:
-sk (-signkey) <key-name> - Name of xvd sign key to use -odk (-odkid) <id> - Id of Offline Distribution key to use (uint) -cik (-cikguid) <GUID> - Guid of Content Instance key to use Possible locations to store keys
XVDTool will create configuration/keys folders on first start - Global and local to the app.
Global configuration folder:
Windows: C:\Users\<username>\AppData\Local\xvdtool Linux: /home/<username>/.config/xvdtool Mac OS X: /Users/<username>/.config/xvdtool Local configuration folder is the current directory of the executable.
Inside these folders you can can store your keys to be autoloaded.
Xvd Signing keys: <config dir>/XvdSigningKey/ Content Instance keys: <config dir>/Cik/ Offline distribution keys: <config dir>/Odk/ Additionally, you can provide keys from arbitrary filesystem locations via the respective cmdline switches: -signfile, -odkfile, -cikfile
Naming the keys
For CIK it is not important how the keys are named if they have the binary structure of [16 byte encryption key GUID][32 byte CIK]. XVD signing keys should have a distinct identifier so you can refer to them via the -sk (-signkey) cmdline switch. ODK needs to be named either by OdkIndex (<index>.odk) or by its identifier: RedOdk.odk, StandardOdk.odk etc. For detailed up-to-date info refer to: LibXboxOne/Keys/
What are XVDs?
XVD packages are a secured file format used by the Xbox One to store data, an analogue to the Xbox 360's STFS packages. XVD files are usually used to store system images/data while XVCs (a slightly modified variant of XVDs) are used to store game data.
For a more detailed explanation of XVD files see xvd_info.md
Third party libraries used
BouncyCastle NDesk.Options DiscUtils by emoose.
-
RetriX
RetriX is an emulator front end for UWP, on all the hardware platforms it supports: it serves the same purpose as RetroArch but is built from the ground up to integrate as well as possible with Windows. It can run on desktop, tablet, phone and Xbox One (in dev mode). Holographic, Mixed Reality and Continuum on phone should work too but haven't beed tested.
ReriX supports any LibRetriX conformant cores.
Design goals
Full compliance with UWP sandboxing Having cores render to SwapChain panels, allowing XAML and DirectX interop and front ends to use native UWP controls for the UI Support Windows 10 on all platforms (Desktop, Mobile, Xbox, VR) and architectures (x86, x64, ARM) Project aim
Creating a UWP emulation front end for a better experience (proper DPI scaling, native look and feel, fullscreen as borderless window, integration with Windows's modern audio pipeline) Increasing safety by having emulation code run sandboxed Create a meaningful use case for UWP sideloading on Windows, since Microsoft has decided to ban emulators from the store by albertofustinoni.
-
Xbox One HDD Tools
Given any HDD over 500GB in size, you can format it for use with your Microsoft Xbox One console.
Instructions
All of this must be done as root! I HIGHLY suggest you do this on a livecd or usb booted system if you don't 'know linux' and would rather not wipe the wrong hard drive.
Connect your HDD and take note of what its called (ex: sda, sdb etc) Run the script with the device name as the first parameter It will bitch about missing partitions etc, but write a file with commands to create said missing partitions Run the created script Copy the correct files to the newly created partitions Unmount the newly created partitions Run the main script again Putting it back together
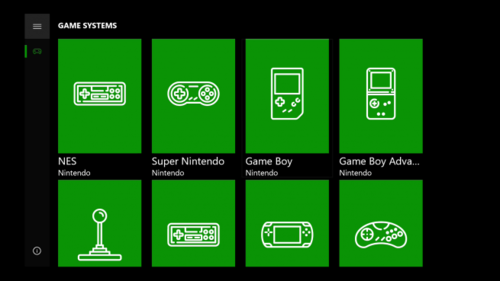
When you put the new HDD in your console for the first time and boot up, the console will go the the green "Xbox One" screen, pause for a second or two, then shut down. Boot the console again. This time it should pause at the green screen for a while longer, then go to a black screen for even longer. It can take several minutes before anything happens after this, the xbox is automatically creating temporary files during this time. If you copied everything correctly, it WILL go to the dashboard eventually, just be patient!
What is linux?
Wait for a windows version
Required Files
These can be gotten off your original HDD easily
└── [4.0K] System Update ├── [4.0K] A │ ├── [341M] deltas.xvd │ ├── [ 36M] SettingsTemplate.xvd │ ├── [ 24M] sosinit.xvd │ ├── [ 62M] sostmpl.xvd │ ├── [267M] systemaux.xvd │ └── [850M] system.xvd ├── [4.0K] B │ ├── [ 30M] SettingsTemplate.xvd │ ├── [ 23M] sosinit.xvd │ ├── [ 45M] sostmpl.xvd │ ├── [ 91M] systemaux.xvd │ └── [761M] system.xvd └── [ 44M] updater.xvd by Juvenal1.
-
VBA10 - GB, GBC and GBA Emulator For Xbox One
VBA10 is a GameBoy, GameBoy Colour and GameBoy Advance emulator, this is a UWP port for the Xbox One, which can be installed on any Xbox One with Dev Mode Enabled.
-
NANDOne (py durango tools)
Various python helper tools to deal with Xbox One.
Notes
Please use python3 for best compatibility. I didn't test with python2 at all. For easy usage -> Add python bin-directory to your PATH variable
Windows: https://docs.python.org/3/using/windows.html#excursus-setting-environment-variables
Alternative for windows: Tick the option "Add to PATH" while installing python package
Linux: It's usually done automatically on install
Use the following command to start the individual tools:
python3 -m module If you try to start the *.py file directly, most likely the imports wont be resolved.
Example
python3 -m gui.toolbox
Content
gui
gui.toolbox
hdd - Hard drive tools
hdd.external_storage_enum hdd.savegame_enum hdd.prepare_internal_hdd.xboxonehdd
nand - Nand / eMMC flash tools
nand.NANDOne
-
SystemOS Utilities
SUPERFUN
Requirement:
- USB
- xboxunattend script
Place a superfun.xboxunattend, or any *.xboxunattend script of your choice, on a USB and plug it into your console.
After you place it onto console, connect over SSH and navigate to where you extracted the utilities and then run superfun.
Note:
The script provided will start a fun little telnet session.
Enjoy :)
// B
-
RetroArch for Xbox One
RetroArch is a frontend for emulators, game engines and media players.
It enables you to run classic games on a wide range of computers and consoles through its slick graphical interface. Settings are also unified so configuration is done once and for all.
RetroArch has advanced features like shaders, netplay, rewinding, next-frame response times, and more!
Note: Warning, you must switch to your console mode to enjoy this RetroArch.
-
Xbox One Symbolic Link Exploit
Access restricted/encrypted volumes using the Xbox File Explorer.
Patched as of 5/5/2017: 10.0.15063.2022 (RS2_RELEASE_XBOX_1704.170501-1052). Thus in accordance with responsible disclosure. The Xbox One File Explorer does not check if a path is a symbolic link elsewhere, allowing an attacker to browse/read/write to mounted volumes which are normally restricted. This includes any encrypted virtual harddisk partitions (XVD files) which the console mounts for content such as gamesaves, etc. Prerequisites:
Download Windows Server 2003 Resource Kit Tools, from which you'll need the "linkd" utility, as the program relies on it to create links, since mklink does not link to paths that do not exists, and the paths we intend to link to are likely non-existent on your computer. Instructions:
Change the drive letter to your USB drive letter in Program.cs Run it Plug it into Xbox, use File Browser to browse through the symlinks, which will link to other parts of the system. by Xenomega.
-
XRF
XRF is a small utility written for the Xbox One System OS. It's written to allow the retrieval of console information, experimentation and to take advantage of Win32 functionality.
Prerequisites
CMake (3.8 or greater) Visual Studio 2015/2017 Windows 10 SDK (Preferably latest) Xbox One Devkit by xboxoneresearch.