Wii
58 archivos
-

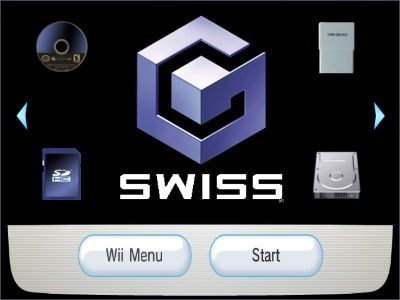
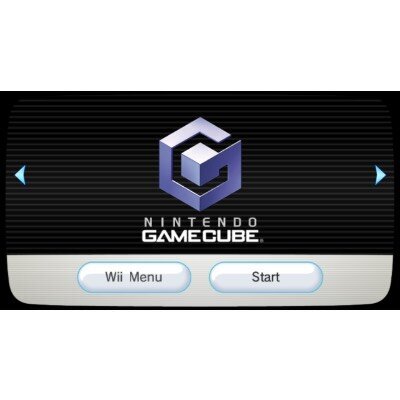
Swiss
Swiss es una aplicación que pretende ser una utilidad homebrew todo en uno para la GameCube de Nintendo, compatible con Wii.
Principales características
Puede explorar los siguientes dispositivos:
SD/SDHC/SDXC Card via SDGecko DVD (-/+R) via lector de discos Memoria flash Qoob Pro USB Gecko remote file storage SD/SDHC via Wasp/WKF Samba via BBA Wode Jukebox IDE-EXI Tarjetas de memoria Requirements
Wii o GameCube con un mando Una forma de ejecutar homebrew en la consola Uso
Descarga la última versión de Swiss desde esta misma página y descomprime el archivo. Copia el archivo comprimido Swiss DOL de la carpeta DON en el dispositivo o medio que utilizas para ejecutar homebrew. Ejecuta Swiss, busca tu dispositivo y ejecuta el DOL o GCM. Nota: Si tras realizar los pasos de arriba no funciona, inténtalo utilizando una versión no comprimida del archivo .DOL.
Navegación por Swiss
Controls
Control Acción Joysitck izquierdo o D-Pad Navegación a través de la UI A Seleccionar B Entrar/salir del menú inferior Swiss UI
El encabezado superior muestra el número de versión, el número de confirmación y el número de revisión de Swiss. Los paneles de la izquierda muestran qué dispositivo está utilizando. La parte más grande es el navegador de archivos suizo, a través del cual puede navegar por archivos y carpetas. La parte superior de cada carpeta incluye una opción .., y al seleccionarla, retrocede en una carpeta. El panel inferior, desde la izquierda: Selección de dispositivo Configuración global, configuración avanzada y configuración actual del juego Información del sistema, información del dispositivo y créditos Volver a la parte superior del sistema de archivos Reiniciar GameCube Swiss es una aplicación creada por emukidid.
-
WiiMC-SS
WiiMC-SS es una versión modificada de WiiMC, un popular reproductor multimedia para Wii, con nuevas funcionalidades.
Principales características de WiiMC-SS:
Carátulas incrustadas en MP3, MP4 (AAC, ALAC), FLAC, OGG, WMA y AIFF. Actualización dinámica de carátulas desde Tunein, Yggdrasil Radio y ANISON.FM. Renderizado automático en mosaico (720x480p reales desde MPlayer CE.) Habilitado vsync en vídeos de 30 fps en modos 480i/p. Visualización correcta de vídeo entrelazado en archivos MPEG-2. Otros códecs que utilizan elementos MKV. Los subtítulos utilizan siempre DAR en lugar de SAR. Compatibilidad con el mando de GameCube. Mejor manejo de los formatos de juego ADX y BRSTM. Varias opciones: Modo 240p, filtro nocturno, volnorm, deflicker, etc. Uso de la extensión ".dash" para omitir el filtro deblock en archivos H.264 y VP8. Se han añadido los modos aleatorio, bucle y continuo para vídeo. Visor de ilustraciones para vídeos y música con archivos externos. Compatibilidad con el tablón de Wii cuando se inicia desde un canal. El cambio de temas ahora requiere argumentos. El argumento Forzar IOS permite usar un módulo usb diferente con IOS202. Reconexión de flujos de radio después de un minuto si se detecta un fallo. Eliminado el visor de fotos, BMP, GIF, NTFS y varios codecs para bajo uso de memoria. WiiMC-SS ha sido desarrollada por SuperrSonic.
-
FCE Ultra GX
FCE Ultra GX es un port modificado de FCE Ultra Nintendo Entertainment System para PCs (Windows/Linux) x86. Con él podremos jugar a juegos de NES en nuestra Wii/GameCube.
Principales características
Compatibilidad con NES basada en FCEUX 2.2.3+ (git 21c0971) Compatibilidad con los mandos Wiimote, Nunchuk, Wii Classic/Classic Pro y Gamecube Compatibilidad con el mando de Wii U Pro, NES y SNES Classic Soporte para 1-4 jugadores Soporte para Zapper Compatible con el sistema Famicom 3D Soporte de trucos (archivos .CHT y Game Genie) Soporte para iNES, FDS, VS, UNIF y NSF ROM Carga/guardado automático de los estados del juego y de la RAM Configuraciones de controlador personalizadas Soporte de SD, USB, DVD, SMB, Zip y 7z Configuraciones de controladores personalizadas Soporte de pantalla ancha 16:9 Modo de vídeo original/filtrado (Sharp & Soft))/sin filtrar Modo Turbo - hasta el doble de la velocidad normal Soporte de parches automáticos IPS/UPS ¡Código abierto! -
WiiStation
WiiStation (anteriormente WiiSXRX_2022), es un emulador de Sony PlayStation 1 (PS1/PSX/PSone), bifurcado del emulador original WiiSX-RX por NiuuS, originalmente un port de PCSX-Reloaded, pero con muchos cambios de PCSX-ReARMed, para la Nintendo Wii/Wii U.
Se han realizado los siguientes cambios en el código basado en WiiSXRX.
Al incorporar los códigos CDROM y CDRISO de PCSX-ReARMed, se ha mejorado mucho la compatibilidad del sistema. Muchos juegos que antes no podían ejecutarse o tenían problemas pueden ejecutarse.
Compatibilidad con las pistas CDDA (Compact Disc Digital Audio).
Incorporación de los códigos de temporización de PCSX-ReARMed.
Combinado el módulo DFSound de PCSX-ReARMed y utilizado la librería SDL. Se ha mejorado mucho la calidad del sonido del sistema.
Modificación de algunas instrucciones de compilación dinámica, como sllv, SRLV, srav, Final Fantasy 9 y Biohazard 3 se pueden ejecutar. (Parte de la instrucción de división utiliza una instrucción de compilación estática)
Soporte para múltiples idiomas. Al principio, quería referirse a Snes9x GX y apoyar la biblioteca de fuentes TTF. Sin embargo, se encontró con un problema de fuga de memoria, lo que resulta en la salida automática. Así que sólo se puede hacer en una fuente específica. Información del char de la fuente: los dos primeros bytes: BigEndianUnicode código char, seguido de una imagen de caracteres en formato IA8 con un tamaño de 24 * 24.
Para algunos juegos de cultura china personalizados, se carga automáticamente la BIOS específica. Por ejemplo: sd:\wiisxrx\isos\武藏传.ISO => sd:\wiisxrx\bios\6B66↩藏传.bin
Otras correcciones menores, como el cambio de disco (swap) y las correcciones automáticas (funciones autoFix) para algunos juegos.
※※※ Nota: Lee un archivo de fuentes en una ubicación fija, así que asegúrese de que [sd:/wiisxrx/fonts/chs.dat] existe ※※※
Objetivos
(algunos tomados del readme de WiiSXRX de NiuuS)
Mejorar el código GTE para proporcionar la velocidad del juego en 3D. Aunque utilicé la instrucción única emparejada, pero la velocidad básicamente no se ha mejorado. Utilizar el modo de visualización de GL para proporcionar calidad de imagen y rendimiento. No sé nada sobre OpenGL, y no sé si puedo usar grrlib. Soporte de controladores DualShock 3, DualShock 4 y DualShock 5. Posibilidad de seleccionar otras BIOS con algunos botones básicos. Soporte de 240p. WiiStation ha sido creado por xjsxjs197.
-
Priiloader
Priiloader es una versión altamente modificada de Preloader. Es una aplicación que se carga antes del menú del sistema de Wii, lo que le permite reparar ciertos tipos de brickeos que dejan el menú del sistema roto (como un Bannerbrick), o agregar varios parches como bloqueadores de actualización al menú del sistema.
Nota rápida: Priiloader no salvará a tu Wii si te cargaste el menú de sistema IOS (en 4.3 es IOS80).
Qué ha cambiado desde la base de Preeloader 0.30?
Se agregó la opción de arranque Bootmii IOS al menú y al arranque automático (útil para restaurar y/o sneek) Compatibilidad con todos los ID de títulos de HBC se eliminó la necesidad de ES_DIVerify eliminó el error de giro de DVD (crediar olvidó cerrar la unidad de DVD en iOS) Actualización en línea agregada nuevamente agregamos nuestro propio instalador (phpgeek's) Se volvió a agregar el antiguo tema negro. Se agregó una verificación en el arranque para que algunas aplicaciones puedan reiniciar/iniciar el menú del sistema y obligar a priiloader a mostrarse o iniciar el menú del sistema Se agregó el inicio de los títulos de Wiiware/VC Carga de trozo de HBC Los hacks se pueden agregar con su compensación o con un valor hash para permitir parches independientes de la versión. Opción agregada para requerir una contraseña en el arranque Se corrigieron muchos y muchos errores. mucho mucho mas What do I need to install Priiloader?
Thats the best part! All you need is a way of booting homebrew (Homebrew Channel recommended). If you have The Homebrew Channel 1.0.7 or above, you don't need any patched IOS at all! if you don't, then a patched IOS36 is required (although it is recommended to just update the HBC)
Priiloader itself needs no hacked IOS at all (hell, we recommend using unpatched IOS).
by DacoTaco.
-
HackMii Installer
HackMii Installer es una aplicación capaz de instalar tanto BootMii como The Homebrew Channel en una Nintendo Wii.
Instrucciones de instalación
HackMii Installer instalará automáticamente BootMii como IOS al arracnar. A partir de la v0.7, se basa en él y no hay forma de evitar este paso.
Si no desea tener BootMii como IOS instalado, puede desinstálelo después, p. ej. instalando The Homebrew Channel. Al hacerlo, el HackMii Installer se cerrará automáticamente, porque no puede (desinstalar) instalar nada más sin él.
Si ha instalado anteriormente The Homebrew Channel, puede usarlo para iniciar el instalador de HackMii: utilice el binario boot.elf en este caso. Esta es la forma recomendada para todos los usuarios.
Si ha instalado anteriormente BootMii como boot2, también puede utilizar el navegador SD del shell BootMii para iniciar la versión MINI: utilice el binario bootmini.elf en este caso.
Nota sobre la versión MINI del instalador de HackMii (bootmini.elf):
Esta versión aprovecha un BootMii in situ como infraestructura boot2.
En este caso, ya tenemos control total sobre el hardware, lo que permite el instalador de HackMii para que funcione correctamente sin depender de fallas de IOS.
Esto significa que puede instalar nuestro software en cualquier pasado, presente o futuro versión del menú del sistema.
Tenga en cuenta que esto no evitará ni podrá evitar una posible eliminación de BootMii como IOS o The Homebrew Channel en futuras versiones del menú del sistema. Mientras no ingrese a ese futuro menú del sistema, siempre debe tener en funcionamiento The Homebrew Channel.
Créditos
bLAStY, bushing, dhewg, drmr, John_K, marcan, mha, segher, svpe, tmbinc y comex.
-
RiiConnect24 Patcher
RiiConnect24 Patcher es una aplicación para hacer más sencilla la instalación de RiiConnect24 en Wii. Con ella, siéntate y relájate mientras el parcheador hace todo por ti.
Características
Actualización automática: ¡mantenga actualizado el parche! Decida si desea ejecutar el parcheo manual o el parcheo guiado automático. ¡Solo tiene que descargar un archivo .bat para parchear IOS31 y IOS80, EVC, CMOC, NC y Mail! El parche descargará automáticamente los archivos necesarios para parchear todo. IOS Patcher y Everybody Votes Channel Patcher en uno. Copiar archivos parcheados a una tarjeta SD que ya está conectada a la PC. Descargando Wii Mod Lite y RiiConnect24 Mail Patcher y colocándolo en la tarjeta SD junto con los WAD. RiiConnect24 Patcher es una aplicación creada por KcrPL.
-
Disk Drive Lighter
Disk Drive Lighter es un pequeño programa de código abierto para encender y apagar la luz de la unidad de disco de Nintendo Wii.
Créditos
Gracias a Cboomf, el creador de libwiilight que utiliza este programa.
La aplicación ha sido creada por khjui.
-
GCMM (GameCube/Wii Memory Manager)
GGCM o GameCube/Wii Memory Manager, es una aplicación que nos permite hacer copias de seguridad de las partidas guardadas de Nintendo GameCube.
GCMM es un proyecto iniciado por dsbomb y justtb, que se basa en la modificación de Askot para agregar soporte SD al ejemplo de lkibofc de mcbackup.
Yo (suloku) actualicé el código a las bibliotecas más recientes para portarlo al sistema Wii, y lo que encuentro más importante: restaurar partidas guardadas ahora funciona correctamente.
Principales características de GCMM:
Realiza copias de seguridad y restaura partidas guardadas en formato GCI Restaura partidas guardadas en formato GCS / SAV Elimina partidas guardadas de la tarjeta de memoria Realiza copias de seguridad de imágenes sin procesar de la tarjeta de memoria en formato .raw Restaura las imágenes sin procesar de la tarjeta de memoria desde el formato RAW / GCP / MCI Formatee la tarjeta de memoria Compatibilidad con controladores Wiimote y GameCube Soporte de botón de encendido Soporte frontal SD, dispositivo USB FAT32 (wii), SDGecko (wii / gamecube), SD2SP2 y GCLoader (gamecube) Muestra información de partidas guardadas, junto con un icono y un banner animados. Una interfaz de usuario (algo) agradable De código abierto! Instalación
Descomprime el archivo. Encontrarás las siguientes carpetas dentro:
aplicaciones Contiene archivos listos para Homebrew Channel, tanto para GCMM de temática normal como oscura gamecube Contiene el archivo DOL de GameCube, tanto de temática normal como oscura (no es necesario para Wii) gamecube/ cli files: Contiene un conjunto de archivos cli para usar con swiss en el modo gamecube. Lea cli_readme.txt para obtener más información. Después del arranque, GCMM comprobará qué dispositivos están disponibles. Si solo hay un dispositivo disponible, GCMM lo usará como predeterminado. Si hay más de un dispositivo disponible, GCMM se iniciará en la pantalla de selección de dispositivos. Puede omitir la pantalla de selección de dispositivo en el arranque usando argumentos de línea de comando (verifique los archivos cli para el modo gamecube).
Dispositivos disponibles en el orden mostrado por GCMM. No conectes más de un dispositivo USB en el modo Wii.
Wii Wii SD Wii USB Ranura A SD Gecko Ranura B SD Gecko GameCube SD2SP2 Ranura A SD Gecko Ranura B SD Gecko Cargador GC Cargando / Ejecutando la aplicación:
Wii - A través del canal Homebrew:
-----------------------
El método más popular de ejecutar homebrew en la Wii es a través del Homebrew Channel. Si ya tiene el canal instalado, simplemente copie la carpeta de aplicaciones incluida en el archivo en la raíz de su tarjeta SD. Si no lo tiene, puede hacerlo vía HackMii Installer.
GameCube
-------------
Puede cargar gcmm a través de sdload y una tarjeta SD en la ranura A, o transmitiéndolo a su Gamecube, o iniciando un DVD de arranque con gcmm.
Este documento no cubre cómo hacer nada de eso.
Aplicación creada por suloku.
-
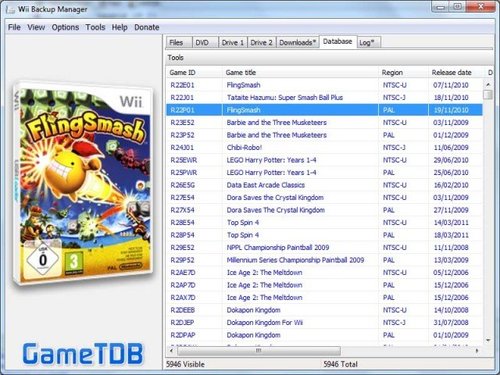
Wii Backup Manager
Wii Backup Manager es una aplicación que nos permite gestionar nuestros juegos de Wii que tenemos almacenados en un disco duro externo, entre otras cosas.
Title database
Support for Multi-language WiiTDB titles.txt. Use CustomTitles.txt to store manual entry edits. Different colours for each title source. Original = Titles taken from the file because they already match, or don't exist in the databases. WiiTDB = Title renamed on the fly from WiiTDB database. Custom = Title renamed on the fly from Custom database. Enable WiiTDB/Custom titles in the settings dialog. Double click to manually edit entries. Auto rename titles during drive/WBFS file transfers Use on-the-fly titles for FAT32/NTFS files/folders, without changing the internal titles. WBFS Drives
Convert WBFS to CISO, ISO, WBFS File. Direct drive to drive transfers. Simulated WBFS drives
Mount any drive with a WBFS folder and use it just like the WBFS drives. Use any Filesystem for backup of WBFS files. eg. Mount an NTFS drive with WBFS folder. Use the old or new .wbfs storage conventions. ie.A single WBFS folder, or multiple sub-folders. Switch between them in the settings dialog, with the option to auto convert when a drive is mounted. Multiple folder layouts. Title [GameID], Title_[GameID], GameID_Title Use sparse ISO on NTFS drives, instead of WBFS files. Select WBFS file split size. Auto, Unlimited, 1GB, 2GB, 4GB. Mount custom folders on the drive pages. Backup DVDs
Direct rip to ISO, CISO, WBFS file, WBFS. Support for Multiboot discs, convert each game partition back to full ISO or transfer to WBFS etc. recovering the game's original disc title and ID. Import/Export Files
Read RAR, ISO, CISO, WBFS File. Write ISO, CISO, WBFS Files. Direct conversion from any of the readable formats, to any of the writable formats. Transfer any readable format to WBFS or simulated WBFS drives. Multiboot ISO support. An entry is added to the file list for each game partition. General
Format drives to WBFS, FAT32 or NTFS. Extract RAR files when adding to the files list, or automatically when needed for transfer/conversion. Add folders recursively. Automatic WBFS file split size. Unlimited on NTFS, otherwise 4GB. Select Wii disc partitions to keep. (Game, remove update or keep all) Select Display unit size (auto, MB, GB). Hide any drive you don't want to see in the drive menus, format dialog etc. Set friendly display names for drives. Multi-thread. Start more than 1 operation at a time. eg. It's possible to rip a DVD to one drive, while transferring files to another. Rollup progress panels are shown on the relevent pages for current operations. Progress panels show ETA/Total expected time, transfer speed, current transferred size, percentage complete. Any operation can be paused or stopped at any time. Safely stop drive transfers etc. without damaging the file system. Buffered transfers for maximum speed, but the speed and ETA etc. can be erratic because of it. Speed is more important IMO. An MD5 Hash is calculated and stored in each disc transferred to a drive, so it's possible to verify the data integrity at a later date. The hash isn't calculated for ISO yet. Show/Hide list columns. Drag and drop to rearrange them. Incremental search on lists.eg. Quickly type "mar" to go to the next entry that contains that text. Uppercase = Full text search, Lowercase = Use only the start of the title -
Wexos's Toolbox
Wexos's Toolbox es una aplicación que carga complementos para poder editar archivos. También incluye algunas herramientas y calculadoras, como Float Converter y MKW KCL Flag Calculator. También utiliza ventanas MDI, lo que facilita la apertura de varias ventanas al mismo tiempo.
Plugins incluídos en la aplicación:
Cafe.dll CTR.dll Dolphin.dll Games.dll Nitro.dll Revolution.dll Tools.dll Aplicación creada por Wexos.
-
Nintendo Wii Homebrew DOL iNJECTOR
Nintendo Wii Homebrew DOL iNJECTOR es una aplicación que nos permite inyectar aplicaciones caseras, juegos, forwarders y más contenido en formato * .DOL a WAD de Wii homebrew base / fordwarders, creando tus propios canales caseros de Wii, forwarders para juegos y emuladores, etc., con la posibilidad de crear también una versión vWii del canal DOL inyectado WAD, para hacerlo compatible con el modo vWii de la consola Wii U.
Características principales
Posibilidad de inyectar DOL homebrew en Wii WAD Compatibilidad con la mayoría de los WAD caseros que utilizan comex Nandloader y Waninkoko Nandloader Posibilidad de crear un canal vWii (Wii U) para su nuevo WAD inyectado utilizando el diminuto vWii NAND Loader r2 de @ FIX94 (¡probado y FUNCIONANDO!) Un asistente de creación de vWii WAD fácil de usar, con código adicional para detectar si IOS o WAD ID entra en conflicto con las pautas del forwarder de vWii, solicita que se modifiquen. (¡todavía en prueba!) Agradecimientos
Un agradecimiento especial a @ person66 (por la herramienta Sharpii), @Leathl (por el libWiiSharp original), @ scooby74029 (por el mod de libWiiSharp), @ FIX94 (por el diminuto vWii NAND Loader r2), @JoostinOnline, @XFlak & plyscho (para el código de conversión de vWii original en Convert2vWii v1.4), @RunningSnakes (para ayudarme a probar la función de conversión de vWii), Superken7 (para la herramienta FreeTheWads) y @ Zorg1996 (para la gran compatibilidad con la inyección de Wii VC y las pruebas de la herramienta) por la ayuda y también por empujarme a hacer esta herramienta. 🙂
¡¡¡¡¡¡IMPORTANTE!!!!!! ¡¡¡DEBE DESHABILITAR TEMPORALMENTE SU PROGRAMA ANTIVIRUS ANTES DE EJECUTAR ESTA HERRAMIENTA !!! ¡¡¡MUCHOS ANTIVIRUS DETECTARON NUESTRAS HERRAMIENTAS COMO VIRUS "FALSO POSITIVO" !!!
Requisitos mínimos del sistema:
Sistema operativo: Microsoft Windows Vista / 7/8 / 8.1 / 10 (Windows XP no se recomienda debido a algunos errores) [recomendamos versiones x64, pero también funciona en versiones x32.] NOTA: Si usa las últimas versiones de Windows 10 (por ejemplo, Windows 10 versión 2004 o Windows 10 versión 20H2), tal vez deba configurar todas las rutas del sistema para que los programas funcionen. Memoria RAM: mínimo 512 MB o más, se recomienda 1 GB o más. Procesador: No estoy seguro, pero el procesador mínimo que debe tener para usar los programas sin problemas es Intel Celeron / Intel Core 2 Duo o superior. El programa funcionará perfectamente si utiliza un procesador superior, como Intel Core i3 / i5 / i7 (mínimo de cuarta generación o superior). Otro software: Microsoft .NET Framework 3.5 (es para hacer que el programa WadMii.exe pueda funcionar) Visual C++ Runtime Installer (para la funcionalidad adecuada de algunos programas). Esta aplicación ha sido creada por saulfabreg.
-
Not64
Port de Mupen64, el emulador de Nintendo 64, para Wii U, Wii y Gamecube.
QUICK USAGE:
* ROMs can be z64 (big-endian) or v64 (little endian), or .n64, of any size * To install: Extract the contents of wii64-beta1.1.zip to the root of your SD card * For SD/USB: Put ROMs in the directory named /wii64/roms, All save types will automatically be placed in /wii64/saves * For DVD: ROMs may be anywhere on the disc (requires DVDxV2 on Wii) * Load the executable from the HBC or in the loader of your choice Once loaded, select 'Load ROM' and choose the source and select the ROM to load (Note: to go up a directory select '..', B will exit the file browser) * Select 'Play Game' to play The game can be exited any time by pressing X and Y together on a GC pad or Classic Controller, 1 and 2 together on a Wiimote (only with Nunchuck attached), or the reset button (Note: this must be done to save your game; it will not be done automatically)
Controls:
Controls are now fully configurable so any button on your controller can be mapped The controller configuration screen presents each N64 button and allows you to toggle through sources There are 4 configuration slots for each type of controller To load a different, previously saved configuration, select the slot, and click 'Load' After configuring the controls as desired, select the slot, and click 'Save' After saving different configurations to the slots, be sure to save your configs in the input tab of the settings frame Clicking 'Next Pad' will cycle through the N64 controllers assigned There is an option to invert the Y axis of the N64's analog stick; by default this is 'Normal Y' The 'Menu Combo' configuration allows you to select a button combination to return to the menu Settings:
General Native Saves Device: Choose where to load and save native game saves Save States Device: Choose where to load and save save states Select CPU Core: Choose whether to play games with pure interpreter (better compatibility) or dynarec (better speed) Save settings.cfg: Save all of these settings either SD or USB (to be loaded automatically next time) Video Show FPS: Display the framerate in the top-left corner of the screen Screen Mode: Select the aspect ratio of the display; 'Force 16:9' will pillar-box the in-game display CPU Framebuffer: Enable for games which only draw directly to the framebuffer (this will only need to be set for some homebrew demos) 2xSaI Tex: Scale and Interpolate in-game textures (unstable on GC) FB Textures: Enable framebuffer textures (necessary for some games to render everything correctly (e.g. Zelda Subscreen), but can impact performance; unstable on GC) Input Configure Input: Select controllers to use in game Configure Paks: Select which controller paks to use in which controllers Configure Buttons: Enter the controller configuration screen described above Save Button Configs: Save all of the controller configuration slots to SD or USB Auto Load Slot: Select which slot to automatically be loaded for each type of controller Audio Disable Audio: Select to mute the sound Saves Auto Save Native Saves: When enabled, the emulator will automatically load saves from the selected device on ROM load and save when returning to the menu or turning off the console Copy Saves: Not yet implemented Delete Saves: Not yet implemented by Extrems.
-
Custom NAND Loader
Custom NAND Loader es una aplicación para canales de Wii, 100% legal y funcional con canales homebrew y comerciales.
Además, permite configurar las opciones de carga para cada canal.
Notas:
Si se mantiene presionado el botón RESET mientras arranca el canal se accede al menú de configuración. Custom NAND Loader es una aplicación creada por Waninkoko.
-
U8 Tool
U8Tool: U8 archive packer/extractor.
Usage:
===========
Extracting:
1a. Fill in the path to the file you wish to extract and press the extract button.
1b. Optionally you can also set the output folder, but this is done automatically if you leave that section blank.
2. Your file is now extracted! Note that the values of the various checkboxes are changed. These are the types of headers that were in the file and tell
you which settings to use when packing the file back up!
Packing:
1a. Fill in the path to the folder that contains all of your files. Be sure to end the path with a "\"
1b. Optionally you can set the output file name, but this is done automatically if you leave that section blank.
1c. Depending upon the type of archive you wish to make, you may need to check various header options. Please note that MOST can't be used together so you
should really only check one, but incase we run across some odd file in the future, I've left the option to check multiple headers.
WARNING!!! You can brick your wii by putting the wrong header on a 00000000.app! If you are unsure as to which settings to use, simply use the
"Get settings from Original File" button!!! (For the record, a 0.app uses a IMET header).
1d. If you checked IMET or IMETDVD then you need to fill out the name of the channel in the boxes that appear to the right. By default, what you type in one
box is cloned to all the others, but unchecking the clone checkbox will allow you to enter different titles for each game. Note that channel titles cannot
exceed 42 english characters!
2. Click "pack" and your file is now created!
Injecting:
First off understand that the inject mode is a simple work-around to prevent the corruption of tpl images in archives. This mode should NEVER be used if you
don't need it. Also understand that this mode only allows you to replace existing files with files of the EXACT SAME SIZE. If any of your files aren't
the same size then this mode will error out and exit!!! Third understand that "special" headers aren't supported for this mode. U8 "normal" archives and
imd5 are the only supported archives simply because it is IMPOSSIBLE to work on any of the other archive types without changing file sizes because the files
inside them are compressed with a tool that isn't available to us. This shouldn't matter anyway as tpls are never found in special archives, but in archives
INSIDE special archives, which don't use special headers. Also the only options you can set, for obvious reasons are the lz77 compression options.
Keeping all of that in mind:
1. Extract the archive you wish to inject normally and edit any files you wish to change in the extracted folders.
2. Select the extracted folder you've been working in as the source folder and the archive you extracted it from as the destination file.
2a. Optionally set the compression mode.
3. Click "Inject" and your original archive will now contain the files you edited!
Command Line Usage:
======================
u8tool.exe -file "path\to\filename.app" -folder "path\to\folder_out\" [-source "path\to\source\file\"] [-extract] [-pack] [-inject] [-IMD5] [-IMET] [-DVD] [-Lz77] [-Title "Channel Title"] [-jap-dut "Specific Channel Title"]
-file "path\to\filename.app" = Path to the file, this can be the source or destination, depending upon if you are packing or extracting.
-folder "path\to\folder_out\" = Path to the folder, this can be the source or destination, depending upon if you are packing or extracting. Note you need to
end this one with a "\"
-source path\to\source = sets all header settings based on the header of the file you specify.
-extract = extract the file to the folder
-pack = pack the folder into the file
-inject = inject the files in the folder you specify into the archive you spcify. NOTE READ INJECT INSTRUCTIONS ABOVE!!
-imd5 = add imd5 header to file
-imet = add imet (0.app) header to file
-sound = pack a sound.bin file.
-dvd = add dvd-specific imet header to file
-lz77 = add lz77 compression to the file
-lz77_nohead = add lz77 compression to the file without the "LZ77" header
-title "Channel Title"= Set ALL channel titles to this title
-jap-dut "Specific Title" = Set only this language (use the language codes found in the gui "Jap" "Eng" ect..) to this title.
Use this AFTER a global "-title" change to save yourself some typing.
Why you should use this tool instead of the u8tools already out there:
======================================================================
It's not part of the wii sdk, so it isn't "illegal" (mind you most we currently use are legal as well) This is the only legal u8tool that properly handles the root folder, meaning to the noobs that you don't have to use u8 coes to pack up 5.apps! This is the only u8tool that tells you what headers are in a file when it's extracted, allowing you to know exactly how to re-pack it. This is the only legal u8tool that can handle multiple recursive folders, meaning to the noobs that you can properly extract a html.arc! This tool doesn't pollute your headers with "MADE by some l33t guy" tags, which nintendo could potentially (very unlikely) use to block channel installs in the future. This is the only legal u8tool with command line options. With the help of gbalzss, this is the ONLY u8tool that'll automatically decompress lz77 compressed files, meaning to the noobs that you can extract and edit banner.bin and icon.bin without the need for generic, pre-decompressed 0.app "templates"! Notes:
==================
This tool can NOT be used in conjunction with other u8tools out there. (Why would you?) This is because most of them ignore the first "root" folder and
this one doesn't, meaning when you re-pack a file extracted with another tool, the root folder is lost!
Lz77 compression is NOT reccomended on the icon.bin or banner.bin atm as our compressor doesn't always work right.
TODO/BUGS/ECT:
=================
I have been getting reports that the lz77 compression might be corrupted. This part of the tool is external and I didn't write. The good news is in the
case of vc titles it doesn't matter as there is no need to re-compress files after you have edited them.
by HowardC.
-
Wiiload BNR Player
Extract to "c:\windows" and double click "registration.reg".
Trick 1:
--------
Associate "dol & elf" files with wiiload.exe (wiiload.exe has no icon, so I made a custom wiiload with wii icon) Add wiiload to windows "Environment variables" using "WIILOAD" as variable and "tcp:192.168.1.x" as Value (replace that with your Wii's IP - it's displayed in the homebrew channel - better having it static) Start Homebrew channel Now open your dols/elfs via double click 🙂 Trick 2:
--------
Associate "wad" files with customizemii Now you can edit the wads directly via double click
Trick 3:
---------
1. Associate "app & bnr" files with wiiplayer.exe (wii_bnr_player with custom icon) dll files included 2. Open registry Editor and replace %1 with %CURDIR% You can skip steps 1 and 2 if you have extracted the 7z in "c:\windows" and double clicked the registry file. 3. Now you can preview the banner files by just double clicking them Made by AbdallahTerro.
-
Trucha Signer
Inject Tools, Wii, Virtual Console, Injecting Tools, VC, Tools, WAD, Editing Tools.
Trucha Signer works on Wii Firmware US 3.2
THIS WILL NOT LET YOU PLAY BURNED ISO'S ON AN UNMODDED WII!
by IBNobody.
-
CustomizeMii
Inject Tools, Wii, Virtual Console, Injecting Tools, VC, Tools, WAD, Editing Tools.
thanks to Xuzz, icefireicefire, WiiCrazy (I.R.on), and others.
Original tool by Leathl.
-
WADder
WADder is a easy to use channel creator. It creates channels from just a DOL, a few images, and a name. Comes with an installer and easy GUI.
Instructions:
Install AS AN ADMINISTRATOR!. COPY COMMON-KEY.BIN TO C:\WADDER\ Run WADder from your desktop Enter values for the options. Pay special attention to the Title ID field: this MUST be different for EACH channel on your Wii You must enter something for every option. Do not enter fancy characters for the Channel Name. Banners and icons do not need a special size, they will be internally resized. Sound must be a WAV file, or click silent to not use any sound. Check to disable splashscreen if you want to watch the WADder magic . The splash is a nice coverup to the messy process of making a wad. Click Create WAD! and wait for it to ask you where to save the wad. Choose where and press save! The names of the WADs are CHANNEL_NAME-TITLEID. Choose where to save the images too. They are [channel name]-[banner/icon/logo].jpg. Thanks go out to:
Team Twiizers for making everything possible and for adding the bubblebreaker game to the HBC Waninkoko for letting us install WADs in the first place. djdynamite123 for initial encouragement and testing IronMask for testing Mrkinator for graphics and testing SpaceJump for ideas and testing deba94 for telling me more about the format of WADs Gally (whoever he is) for writing the U8 tools and the TPL converter Arm the Homeless for Linux discussion to keep me unbored many more (if you feel you should be in this list PM me ) by icefireicefire.
-
KeyFinder
Aplicación que nos facilita la búsqueda de las claves en los ficheros descifrados Wad a partir de su MD5.
Donde buscar:
1-md5 del md5 blanker: 4582417d623c81fca07a46a570c8969e 2-md5 del sd-iv: d9f2b2e045d22d3805a67fe0c340ccd2 3-md5 del sd-key: ef33e224e45c8d8c35ce32d8a810b603 4-MD5 del commonkey: 8D1A2EBCD82A3469B77FACF15D9C8E50 1-RVL-WiiSystemmenu-v226.wad 2-RVL-WiiSystemmenu-v226.wad 3-IOS21-64-v514.wad 4-BOOT2-v2-64.wad Nota: Los Wads tienen que estar descifrados.
Hecho IBNobody basado en el código de Calantra.
-
GameCube GX - USB Loader GX Forwarder
GameCube GX - USB Loader GX Forwarder v2.3.3
Yes, this is a separate channel you can move around!.
Changelog
2.0.0 finally boots! 2.2.0 icon is finished 2.3.0 added placeholder banner 2.3.3 added placeholder sound 2.4.0 partially fixed banner 2.5.0 forwards to standard version of USB Loader GX 2.6.0 fixed sound by NewGBAXL.
-
DolphiniOS
Emulador de Dolphin para Gamecube y Wii que se ejecuta a través de iOS.
There are two versions: one for jailbroken devices, one for non-jailbroken devices. If your device is not jailbroken, you must be running iOS 13.4.1 or lower.
NOTE: DolphiniOS is not affiliated with the Dolphin Project or Nintendo.
DolphiniOS requires at least iOS 12.0. In addition, your device must have an A9 processor or newer. If your device is not jailbroken, you must also be running 13.4.1 or below.
Jailbroken devices
You can figure out if you can jailbreak your device and iOS version at canijailbreak.com.
Once jailbroken, add our repo cydia.oatmealdome.me to your package manager (Cydia / Sileo / Zebra) and install DolphiniOS from it.
Non-Jailbroken Devices
You must be running iOS 13.4.1 or lower if your device is not jailbroken.
If you have access to the beta version of AltStore, you can add https://altstore.oatmealdome.me to your sources and install DolphiniOS from it.
Otherwise, you can download the IPA below and manually sideload it with the public version of AltStore.
DolphiniOS FAQ
Question: Can you install this without a jailbreak?
Answer: Yes! However, you must be on iOS 13.4.1 and below. Do not upgrade to iOS 13.5 or higher. Head over here for more information: dolphinios.oatmealdome.me.
Question: How do I add games?
Answer: Press the + button in the top right. If you want to add them manually, then put them in /var/mobile/Documents/DolphiniOS/Software for jailbroken users, or Files.app -> On my iPhone / iPad -> DolphiniOS -> Software for non-jailbroken users.
Question: Can I add cheats?
Answer: There is no easy way to do this yet. However, a guide can be found here here.
Question: Can I add custom textures?
Answer: Yes! Jack has written a super helpful guide here.
Question: Why is there is no DolphiniOS in your Cydia repo?
Answer: Remove other emulator repos you have and it will appear.
Question: Can I change the layout of the virtual buttons?
Answer: Not at this time, no.
Question: Why is there no audio?
Answer: Make sure that silent mode isn't enabled.
Question: Does online work?
Answer: Yes, if you have a NAND dumped from a real Wii, you can play online on the unofficial Wiimmfi servers.
Question: Can I connect a Wiimote?
Answer: Not yet, but it's planned. No ETA.
Question: Why do I hear no audio?
Answer: Make sure that your device isn't muted.
Question: How do I delete games?
Answer: You can swipe left on a game in the list to reveal a delete button. If you want to delete games manually, use Filza (jailbroken) or Files.app (non-jailbroken). See above for the games folder's location.
Question: Why am I getting "improper install" when I am jailbroken?
Answer: The AltStore version is for non jailbroken devices. If you are jailbroken, use the Cydia repo.
Question: How do you fix "Failed to map enough memory space: 0x3”?
Answer: Use AltStore to install DolphiniOS.
Question: What is dynamic-codesigning? Is it safe?
Answer: dynamic-codesigning is a special permission given to some official Apple apps, like Safari, which allows them to use JIT and access large amounts of memory. DolphiniOS needs this permission for its own JIT and to speed up emulation of the GC/Wii RAM. It is safe. DolphiniOS cannot access other app data.
Question: Is this project open source?
Answer: Yes it is! You can find the source code here. Note that the branch name is called ios-jb but both versions, jailbroken and non-jailbroken, are included in this branch.
Question: Where can I report issues?
Answer: Issues can be reported here.
Question: Is there an Apple TV app?
Answer: Not as of right now, no.
Question: Which iOS versions are supported?
Answer: iOS 12.0 - iOS 13.4.1. If you are jailbroken, then any iOS version is compatible as long as it's higher than 12.0 and can be jailbroken.
Question: When will this support iOS 13.5 or higher on non-jailbroken devices?
Answer: Not any time soon. If you want DolphiniOS, either jailbreak your device or stay on 13.4.1.
Question: Can you play with a keyboard?
Answer: Not as of right now, no.
Question: What files format does DolphiniOS support?
Answer: All GC/Wii files (.elf, .dol, .gcm, .iso, .tgc, .wbfs, .ciso, .gcz, .wad, .dff, .m3u).
Question: Why are games so slow on my iPhone 11 / 11 Pro / 11 Pro Max / SE 2?
Answer: There is an issue with devices with A13 chips. The only workaround is to downgrade to DolphiniOS 2.1.1 at this time.
This service was developed by OatmealDome and Simonx22, with help from itssimontime and Kupo.
-
All-in-One Wii VC Injecting Tools
This is a all-in-one pack for injecting Wii Virtual Console WADs that includes:
AutoInjectuWAD - developed by Creffca (AKA Avicr) Devilken Injector - developed by Devilken (special thanks to Corsario) CustomizeMii 3.11 - developed by Leathl ShowMiiWads 1.4 - developed by Leathl WADunpack - developed by BFGR WADpack - developed by KiKe (bashed on segher tools) U8 Tool / VC brlyt Editor / VC Save Icon Maker / VC Save Icon and Save Title Injector / CCF Tool / TPL Editor - developed by HowardC WADder 2.7 - developed by [ icefire ] and ( Jacol ) With these tools, you can inject and make your own Wii VC WADs of the following systems:
Nintendo Entertainment System (NES) Super Nintendo Entertainment System (SNES) Nintendo 64 (N64) SNK NeoGeo SEGA Master System SEGA Genesis / SEGA Mega Drive NEC PC Engine / Turbo Grafx 16 The WADs aren't included, so you need to obtain your WADs and ROMs to inject.
-----------------------------------------------------
WARNING WARNING WARNING!!!!!!
------------------------------------------------------
Unproperly packing the 00000000.app file will HARD BRICK your Wii!!!!!! DO NOT ATTEMPT TO CREATE CUSTOM WADS unless you know what are you doing!!!!!!
by saulfabreg.
-
ledheadWii
Based on Peter Hirschberg's LedHEAD (classic electronic LED handled game simulator) source code.
OVERVIEW
LEDhead is a program that simulates the classic electronic LED (light emitting diode) based handheld games of the 70's. Now you can relive the excitement of your childhood years all over again! All games feature fully authentic sound-effects, and faithfully replicate the game play of the originals.
Rather than using proprietary code or "ROM images", as is the case with emulators, LEDhead uses simple but extremely clever imitation to ensure excruciating faithfulness to the games you grew up with. Endless hours of painstaking effort have gone into ensuring the accuracy of each of these games.
NOTE
Wii version has some games not present in original version. These games was developed from scratch.
CREDITS
Thanks to Peter Hirschberg for the original source code. Thanks to ArcadeUSA and Rick.R for playing real hardware games and telling me how they work. And then for playing with the simulator to find the differences.
by nebiun.
-
WiiColEm
WiiColEm is a port of the ColEm ColecoVision emulator developed by Marat Fayzullin.
Features:
Super Game Module (SGM) compatibility Multiple video modes (240p, GX+VI, GX) Support for driving, roller, and super action controllers Tilt-based (Wiimote) driving support Cartridge database w/ recommended controller settings and keypad descriptions for most commercial cartridges Cartridge keypad overlays Per-cartridge button mappings Installation
To install WiiColEm, simply extract the zip file directly to your SD card or USB device (retain the hierarchical structure exactly).
Cartridge Database
WiiColem ships with a database that contains recommended settings for most commercial cartridges. These settings cover controls mappings, keypad overlays, keypad button descriptions, and advanced settings (whether the cartridge requires an EEPROM, SRAM, etc.).
To view/edit the settings applied for a particular cartridge perform the following steps:
Load the cartridge (via the "Load cartridge" menu item) Return to the WiiColEm menu Select "Cartridge-specific settings" menu item Examine the "Control settings" and "Advanced" settings for the cartridge For more information on mapping controls and creating and/or customizing cartridge settings, see the "Cartridge Settings" section (below).
Controls
The following section contains the "default" control mappings for WiiColEm.
It is important to note that if the cartridge that is being loaded exists in the Cartridge Database it may contain non-default mappings.
WiiColEm menu:
Wiimote: Left/Right : Scroll (if sideways orientation) Up/Down : Scroll (if upright orientation) A/2 : Select B/1 : Back Home : Exit to Homebrew Channel Power : Power off Classic controller/Pro: Up/Down : Scroll A : Select B : Back Home : Exit to Homebrew Channel Nunchuk controller: Up/Down : Scroll C : Select Z : Back GameCube controller: Up/Down : Scroll A : Select B : Back Z : Exit to Homebrew Channel In-game (Keypad):
The keypad allows you to press keys on the ColecoVision controller keypads. If a description has been provided for the currently selected key it will be displayed above the keypad.
You can select whether you want emulation to pause while the keypad is displayed via the "Keypad pause" option in "Advanced" settings (pausing is enabled by default). This value can be overridden on a cartridge-by- cartridge basis via Cartridge Settings (see "Cartridge Settings" section, below).
NOTE: The "Keypad pause" option is not available when the GX+VI or Double strike (240p) video modes are enabled. (Keypad pause is enabled and cannot be disabled).
When keypad pause is enabled, the keypad will be closed when a keypad button is pressed (or the keypad is explicitly closed). It is important to note that the keypad button will continue to be pressed as long as the controller button is held. This is necessary for games like War Room where you need to hold the keypad buttons down to see the different factories, etc. It is also necessary for games that require a longer button press for the selection to register (Star Trek, etc.).
When keypad pause is disabled, emulation will continue while the keypad is displayed. The keypad will continue to be displayed until it is explicitly closed.
It is also important to note that commonly used keys can be mapped to Wii controller buttons (see "Cartridge Settings" section, below).
Wiimote: D-pad : Choose Key 2, 1, A, B : Press Key + : Close Keypad Wiimote + Nunchuk: D-pad, Analog : Choose Key C, Z, A, B : Press Key + : Close Keypad Classic controller/Pro: D-pad/Analog : Choose Key A, B : Press Key + : Close Keypad GameCube controller: D-pad/Analog : Choose Key A, B : Press Key Start : Close Keypad In-game (Standard):
Wiimote: D-pad : Move 2 : Left Fire Button 1 : Right Fire Button + : Toggle Keypad Home : Display WiiColEm menu (see above) Wiimote + Nunchuk: D-pad, Analog : Move C : Left Fire Button Z : Right Fire Button + : Toggle Keypad Home : Display WiiColEm menu (see above) Classic controller/Pro: D-pad/Analog : Move A : Left Fire Button B : Right Fire Button + : Toggle Keypad Home : Display WiiColEm menu (see above) GameCube controller: D-pad/Analog : Move A : Left Fire Button B : Right Fire Button Start : Toggle Keypad Z : Display WiiColEm menu (see above) In-game (Super action):
Very few games use the "spinner" that is a part of the super action controller. You can enable/disable the "spinner" via Cartridge Settings (see "Cartridge Settings" section, below).
By disabling the spinner, you have more options available for the move controls (Nunchuk analog, both analogs on the Classic and GameCube controllers).
Wiimote + Nunchuk: D-pad, Analog : Move (if spinner disabled) D-pad : Move (if spinner enabled) Analog : Spinner (if enabled) C, 2 : Yellow Button Z, 1 : Orange Button A : Blue Button B : Purple Button + : Toggle Keypad Home : Display WiiColEm menu (see above) Classic controller/Pro: D-pad/Analog : Move (if spinner disabled) Left Analog : Move (if spinner enabled) Right Analog : Spinner (if enabled) A, R Trigger : Yellow Button B, L Trigger : Orange Button X, ZR : Blue Button Y, ZL : Purple Button + : Toggle Keypad Home : Display WiiColEm menu (see above) GameCube controller: D-pad/Analog : Move (if spinner disabled) Analog : Move (if spinner enabled) C Stick : Spinner (if enabled) A, R Trigger : Yellow Button B, L Trigger : Orange Button X : Blue Button Y : Purple Button Start : Toggle Keypad Z : Display WiiColEm menu (see above) In-game (Driving/Tilt):
In this mode, you steer by tilting the Wiimote (similar to Excite Truck/Bots). You can adjust the tilt sensitivity via Cartridge Settings (see "Cartridge Settings" section, below).
Wiimote: Tilt : Steer D-pad : Shift 2 : Gas 1 : Brake + : Toggle Keypad Home : Display WiiColEm menu (see above) In-game (Driving/Analog):
In this mode, you steer by using the analog controls (Nunchuk, Classic, GameCube). You can adjust the analog sensitivity via Cartridge Settings (see "Cartridge Settings" section, below).
Wiimote + Nunchuk: Analog : Steer D-pad : Shift C, 2 : Gas Z, 1 : Brake + : Toggle Keypad Home : Display WiiColEm menu (see above) Classic controller/Pro: Right Analog : Steer D-pad : Shift A : Gas B : Brake + : Toggle Keypad Home : Display WiiColEm menu (see above) GameCube controller: C Stick : Steer D-pad : Shift A : Gas B : Brake Start : Toggle Keypad Z : Display WiiColEm menu (see above) In-game (Roller):
In this mode, the trackball motion is simulated via analog controls (Nunchuk, Classic, GameCube). You can adjust the analog sensitivity via Cartridge Settings (see "Cartridge Settings" section, below).
Wiimote + Nunchuk: Analog : Move C, 2 : Left Fire (2p) Z, 1 : Right Fire (2p) A : Left Fire B : Right Fire + : Toggle Keypad Home : Display WiiColEm menu (see above) Classic controller/Pro: Left Analog : Move A : Left Fire (2p) B : Right Fire (2p) X : Left Fire Y : Right Fire + : Toggle Keypad Home : Display WiiColEm menu (see above) GameCube controller: Analog : Move A : Left Fire (2p) B : Right Fire (2p) X : Left Fire Y : Right Fire Start : Toggle Keypad Z : Display WiiColEm menu (see above) In-game (Aquattack):
Aquattack has a very unique control scheme. It uses the keypad buttons to fire in eight different directions. Essentially, it uses the "keypad" as a "d-pad". While the keypad buttons have been mapped to the eight different buttons on the Classic controller (and pro) it is cumbersome to use. In addition to mapping these buttons, a special control scheme has been added to WiiColEm that allows for the use of the right analog stick on both the GameCube and Classic controller/Pro for firing in the eight different directions.
Cartridge Settings
WiiColEm contains the ability to manage per-cartridge settings. The settings that can be edited include:
Control settings Advanced settings (Whether it requires an EEPROM, SRAM, etc.) Control Settings
The following control options are available:
The controller type (standard, super action, driving/tilt, driving/analog, roller) Wiimote orientation Sensitivity (Roller and driving controllers) ColecoVision keypad and controller button mappings When mapping buttons, you map a ColecoVision keypad or controller button to one of the "button groups" listed below. This allows you to map a button once across the different Wii controllers.
You can use the "(View as)" menu item to toggle and view how the ColecoVision buttons are mapped to a particular Wii controller (Wiimote, Nunchuk, Classic/Pro, and GameCube).
Button 1: Button 2: Button 3: --------- --------- --------- Wiimote : 2 Wiimote : 1 Wiimote : A Nunchuk : C Nunchuk : Z Nunchuk : (n/a) Classic : A Classic : B Classic : X GameCube : A GameCube : B GameCube : X Button 4: Button 5: Button 6: --------- --------- --------- Wiimote : B Wiimote : (n/a) Wiimote : (n/a) Nunchuk : (n/a) Nunchuk : (n/a) Nunchuk : (n/a) Classic : X Classic : R Trigger Classic : L Trigger GameCube : X GameCube : R Trigger GameCube : L Trigger Button 7: Button 8: --------- --------- Wiimote : (n/a) Wiimote : (n/a) Nunchuk : (n/a) Nunchuk : (n/a) Classic : ZR Classic : ZL GameCube : (n/a) GameCube : (n/a) SMB (Network support)
WiiColEm allows for loading ROMs over the network via SMB. To enable SMB support, you must edit the "wiicolem.conf" file located in the "/wiicolem" directory and provide values for the following:
share_ip : IP address of the computer to connect to. share_name : Name of the share on the computer. share_user : Name of the user to connect as share_pass : Password for the user Credits
NeoRame : Icon Pixelboy : Source overlays James Carter : Source overlays Mastershoes : Testing (0.3) Murph74 : Testing (0.2) Astroman : Testing (0.2) Yurkie : Testing (0.1) Special thanks
Marat Fayzullin : Creating an awesome emulator and answering all of my annoying questions Tantric : Menu example code and SDL enhancements Daniel Bienvenu : Help resolving the Mode 2 issues Opcode : Providing a ROM for testing the Opcode memory expansion and MegaCart(R) support by raz0red.