PS Vita
176 archivos
-

PS Vita gamecard to microSD adapter
A plug-in that can read the SD2VITA adapter placed in the port of the game cartridges.
by xyzz.
-
PS Vita OFW 3.65
Firmware oficial 3.65 de PS Vita.
-
PS Vita OFW 3.72
Firmware oficial de PS Vita, versión 3.72.
-
PSM Manager
This program bypasses the PSN account requirement when using PSM games.
by Yoti.
-
PSMPatch
Allows you to modify PSM Games, and also can be used to load PSM Homebrew.
Simply put patched files into ux0:psm/TITLEID/Documents/p
files here will be read instead of the files in /Application
Think of it as PSM Repatch..
How to decrypt PSM Games tho??!
Use FuckPSSE
to decrypt the PSSE Layer on PSM Games and then you can modify whatever you want!
For executables, you can use dnSpy or ILLSpy to decompile and modify the executables.
About loading homebrew?
Well this is a bit of a hack-y system. but it should work.
if you compile an app using the PSM SDK there is an unsigned copy of it created.
you can simply copy the unsigned files into the patch folder and it'll load the homebrew instead of the original game! PS: if u get compile errors while using the PSM SDK try running 'setx MSBUILDENABLEALLPROPERTYFUNCTIONS 1' in CMD.
Installation
Place the plugin under the *ALL section of your config.txt and your good to go,
NOTE: Do not use this plugin at the same time as FuckPSSE. you will break the universe
-
PSP Emulators Installer
PSP Emulators Installer is a homebrew app put together by theheroGAC that automatically installs 20 emulators for that run on Adrenaline for PS Vita and PS TV.
INSTALLATION:
Install the vpk on your homebrew enabled PS VITA or PS TV, preferably using VitaShell Start PSP-EMULATORS-INSTALLER Press CROSS, CIRCLE or TRIANGLE (depending on where you have Adrenaline installed) Wait 3 minutes Profit!
EMULATORS:
COELM PSP = Colecovision CPS1 = Capcom DaedalusX64 = Nintendo 64 (N64) Emuodd = Magnavox Odyssey Fuse = ZX Spectrum 48K LYNX = Atari Lynx Masterboy = Sega Master System MVS = Neo Geo Picodrive = Megadrive/Genesis PSP7800 = Atari 7800 PSPATARI = Atari 800,800XL,130XE PSPCAP32 = Amstrad CPC464 PSPHUGO = Pc-Engine/TurboGrafx-16 PSPINT = Intellivision PSPTHOM = Thompson TO7 PSPVE = Vectrex RACE = Neo Geo Pocket/Color s9xTYLcm_mod = Super Nintendo (SNES) SMSPSP = Sega Master System Vice = Commodore C64 by theheroGAC.
-
psp2etoi
psp2etoi es un administrador de identificadores únicos de dispositivos para PS Vita y Playstation TV.
Esta herramienta le permite hacer una copia de seguridad o editar los Identificadores únicos de dispositivos: ConsoleID y OpenPSID.
La utilidad también es capaz de volcar o actualizar el syscon S/NVS que contiene datos de configuración, como indicadores de control de calidad, indicadores de gestión, indicadores de arranque y mucho más.
Uso
Tenga en cuenta que esta herramienta está destinada únicamente a usuarios avanzados; una configuración incorrecta o un error del programa pueden provocar daños irrecuperables en el sistema que requieran el reemplazo de la placa base.
Requisitos previos
Recomendado: La consola Playstation Vita/TV de destino debe ejecutar la versión de firmware 3.65 del tipo CEX/DEX/TOOL/CFT Como forma de recuperación la consola debe tener instalado y funcionando enso_ex v5.0 Requerido: La consola Playstation Vita/TV de destino debe tener una versión de firmware entre (incluidas) 3.60 y 3.74 La consola debe tener el framework taihenkaku CFW instalado y funcionando El paquete de la aplicación psp2etoi.vpk debe instalarse a través de VitaShell Crear una copia de seguridad
Abra la aplicación 'psp2etoi'. Después de aceptar el descargo de responsabilidad, realizará una autocomprobación. Seleccione "Copia de seguridad del Único actual...". Creará una copia de seguridad de ConsoleID y OpenPSID encriptados Seleccione "Volcar el dispositivo actual...". Creará una copia de seguridad de la configuración actual del dispositivo y S/NVS Copie los archivos de copia de seguridad de ux0:data/psp2etoi/. Guárdelos en múltiples copias en almacenamientos separados udi.bin es ConsoleID y OpenPSID en un formato cifrado que se puede escribir directamente en idstorage output.cfg es un archivo de configuración de psp2etoi que contiene todos los datos que psp2etoi puede modificar nvs.bin es un volcado del S/NVS de la consola Creación de una configuración personalizada a través de psp2etoi
Limpie el directorio ux0:data/psp2etoi/ Coloque un archivo de configuración como ux0:data/psp2etoi/input.req esta configuración servirá como 'plantilla' para la configuración personalizada la configuración debe tener la etiqueta INPUT establecida en falso Abra la aplicación 'psp2etoi'. Después de aceptar el descargo de responsabilidad, realizará una autocomprobación. Seleccione "Crear un personalizado...". Analizará la plantilla y generará una configuración coincidente La configuración personalizada se puede encontrar en ux0:data/psp2etoi/custom_input.cfg Instalación de una configuración de psp2etoi
Limpie el directorio ux0:data/psp2etoi/ Coloque el archivo de configuración de entrada como ux0:data/psp2etoi/input.cfg si la configuración requiere archivos adicionales, colóquelos allí también la configuración de entrada debe tener la etiqueta INPUT establecida en verdadero Abra la aplicación 'psp2etoi'. Después de aceptar el descargo de responsabilidad, realizará una autocomprobación. Seleccione "Aplicar una costumbre...". Analizará el archivo de configuración y mostrará los cambios esperados. Después de confirmar que los cambios son correctos presione triángulo para escribir la nueva configuración un archivo de configuración de copia de seguridad basado en la configuración de entrada se escribirá en backup_input.cfg Debe copiar los archivos de copia de seguridad_ y almacenarlos en varias copias en almacenamientos separados Se pueden usar para revertir los cambios realizados por input.cfg Notas
Es extremadamente fácil "bloquear" permanentemente su consola usando esta herramienta un simple error, como un byte incorrecto o un espacio en el lugar incorrecto, puede resultar en un "ladrillo" Solo debe usar esta herramienta habiendo entendido cómo la escritura de los datos de configuración deseados afecta el dispositivo. Siempre debe verificar dos veces el archivo de configuración de entrada, así como la salida del analizador de la aplicación antes de aplicar El tipo/subcódigo de ConsoleID incorrecto debería poder recuperarse con enso_ex v5, siempre que tenga una copia de seguridad de udi.bin psp2etoi es una aplicación creada por SKGleba.
-
psp2hfw
The goal of this repository is to provide tools and instructions for running a hybrid firmware (HFW) on the Playstation Vita console
in this case a different firmware/software version than the bootloaders version(s). Preparation
Make sure that you have the latest version of enso_ex installed and running also make sure that your GC-SD adapter is fully functional in case of recovery Download the correct 0syscall6 bootmgr version for from https://github.com/SKGleba/enso_ex/tree/master/sdrecovery/BOOTMGR/0syscall6 and put in ux0:eex/data/ as bootmgr.e2xp Download 0syscall6 HFW version from https://github.com/SKGleba/0syscall6 , put it in ur0:tai/ and add to taiHEN config.txt Download the correct firmware version fix from https://github.com/SKGleba/enso_ex/tree/master/sdrecovery/PATCH/fw_spoof and put in ux0:eex/payloads/ Download the correct sector redirect script from https://github.com/SKGleba/psp2hfw/tree/master/scripts/sector_redir and put in ux0:eex/payloads/ This is optional for non-dualfw users but highly recommended for recovery purposes Copy os0:sm/update_service_sm.self to ux0:eex/data/ as zss_ussm.self; if you have a decrypted kprxauth sm - put it in there as zss_ka.elf Open the enso_ex installer and sync scripts; after reboot make sure that 0syscall6 is working correctly, do it before vita goes to sleep In os0 you should have the following files: bootmgr.e2xp, patches.e2xd, and zss_ussm.self. Additional steps for dual-fw users
Dual FW lets you run the second firmware from a SD card in a GC-SD adapter; it is experimental and expected to be less stable (but safer) than having a single fw.
Make sure that you have your GC-SD adapter inserted and detected by the system; use either YAMT or mount as uma0 using another tool Download and run the emmcfw->gcsd clone tool from https://github.com/SKGleba/psp2hfw/tree/master/tools/clone_int2ext ; it will clone firmware/software sectors to GCSD It is recommended to use xerpi's plugin loader for that ( https://bitbucket.org/xerpi/vita_plugin_loader ) If the load fails it means that the SD card was not detected; also cloning will take some time After the clone finishes uninstall your GC-SD driver unless you are using sony's (internal manufacturing mode or yamt) Connect your vita to a power supply and boot holding START, if it boots - emunand works You can make sure by deleting/adding a file in tm0 and rebooting normally; if the change is not present - emunand works Sony's built-in GC-SD driver is very strict in terms of compatibility, not all sd cards will work For the rest of this guide use the emunand instead of the internal emmc, HFW will be installed to the emunand. Usage
Compatibility
Currently not all firmwares can be installed on top of current base bootloaders [3.60 | 3.65]
Check out the issues tab to know what needs to be done to increase compatibility Please note that not all homebrew apps/plugins are compatible with all firmwares; HenKaku and TaiHen may be incompatible too. Base: 3.60
3.61 everything works fine. Base: 3.65
3.67 - 3.73 everything works fine. Installation
Download and install the HFW installer (HFWI.vpk); make sure that you have unsafe homebrew enabled in henkaku settings Download the desired firmware PUP and extract os0/vs0 fs images from it, you may use https://github.com/TeamMolecule/sceutils for that psst, if you don't have the required keys use this fork: https://github.com/zecoxao/sceutils Put them in ux0:data/hfw/ as os0.bin and vs0.bin; if you are using dualfw put os0:patches.e2xd in ux0:data/hfw/patches.e2xd Open the installer and press [start] to flash, it may take some time; after the flash completes it will show you the current HFW info and ask to reboot if the vita does not reboot follow the steps in the recovery section Open the enso_ex installer and sync scripts. Uninstallation
Download your original firmware PUP and extract the vs0 fs image from it Put it in ux0:data/hfw/ as vs0_r.bin; if you want to go back to a pristine os0 put it as os0_r.bin Open the installer and press [start] to restore, it may take some time; after the restore completes it will ask you to reboot if the vita does not reboot follow the steps in the recovery section. Recovery
With enso_ex you should be able to recover from all possible HFW related soft/"hard" bricks.
If you corrupt boot_config.txt or suspect that it causes a bootloop hold VOLUP at boot. Bootloop
If you synced incompatible patches follow the [Bootloop - broken patches] section; skip this step if you already did it Download the correct sdrestore image from https://github.com/SKGleba/psp2hfw/tree/master/recovery , its version should match the current bootloaders version Flash this image to an SD card and put it in the GC-SD adapter into the PS Vita GC slot Connect the console to a power source and hold [select] and [power] for 20-30s, then keep holding select; it will restore the previous os0. If the vita does not show the logo, hold power for 30s afterwards and see if it works If the vita shows the bootlogo - go into safe mode and reinstall the firmware, do not follow the next steps Dump the first 0x200 bytes from the SD card (using [read] in win32dimg or dd) and open using a hex editor if the first 4 bytes are BE BA FE CA (0xcafebabe) - payload did not run (either faulty GC-SD/slot or incorrect image; or just held select for too short); retry from step 1 if the first 4 bytes are EF BE AD DE (0xdeadbeef) - should not happen, weird, retry from step 1 if the first 4 bytes are EF BE FE CA (0xcafebeef) - payload finished, if the vita does not boot up then the inactive/recovery os0 is broken; follow the next steps if the bytes 12-20 are not 00 - the flash or read failed, make sure its a correct image and retry from step 1; if it still fails create an issue here on github Download the correct sdosflash image from https://github.com/SKGleba/psp2hfw/tree/master/recovery , its version should match the current bootloaders version Flash this image to an SD card and put it in the GC-SD adapter into the PS Vita GC slot Connect the console to a power source and hold [select] and [power] for 20-30s, then keep holding select; it will flash a clean os0. If the vita does not show the logo, hold power for 30s afterwards and see if it works; if it still does not - create an issue here on github If the vita shows the bootlogo - go into safe mode and reinstall the firmware. Bootloop - broken patches
You can not just hold VOLDOWN to skip patches since bootmgr is required for HFW to boot. Download the correct cleanboot image from https://github.com/SKGleba/psp2hfw/tree/master/recovery , its version should match the current bootloaders version Flash this image to an SD card and put it in the GC-SD adapter into the PS Vita GC slot Connect the console to a power source and hold [select] and [power] for 20-30s, then keep holding select; it will skip all custom patches. If the vita does not boot, follow the [Bootloop] section Notes
While psp2hfw is in beta it should be considered a PoC for advanced users; A 1-click method will come with the next firmware update. My base testing firmware is 3.65 and i recommend it for using this toolset with, it assures full compatibility and ease of debugging. You can find some pre-extracted filesystem images here: https://mega.nz/folder/v45lhYBR#t2TSvnynd50e76B5OTR2XA Credits
Team Molecule for henkaku, taihen, enso and the update_sm 0x50002 write primitive. TheFlow for help with the sleep/resume stuff. by SKGleba.
-
psp2pm
Internal Producting Mode (i_manufacturing_mode) enabler/disabler for PSP2 Dolce (PSTV) and Vita (PSVITA)
Warning
Messing with the device at such low level may result in a unrecoverable brick, DO NOT USE IT unless you know what the target mode does.
Description
This tool should be compatible with firmwares 3.60, 3.65 - 3.71. It has been tested on firmwares 3.65 and 3.70.
This tool sets the internal producting mode bit on the console's secure memory by using a crypto coprocessor exploit. It can also disable "manufacturing_mode" on any console.
Notes
To set External Producting Mode (e_manufacturing_mode) use the patch_pm_jig payload instead.
Credits
Team Molecule for their crypto processor exploit and spoonfeeding help on discord.
Mathieulh and Zecoxao for their useful ideas.
by SKGleba.
-
psp2renga
Custom lv0 framework for Playstation Vita/TV
Usage (end-user)
Put psp2renga.skprx in ur0:tai/ Add a line to ux0: or ur0: /tai/config.txt under *KERNEL ur0:tai/psp2renga.skprx Reboot For developers
psp2renga requires taihen.
Basic info
- For all communication ARM<->FRAMEWORK the Camera SRAM (p: 0x1C000000 - 0x1C1FE000) or a custom-mapped phycont block is used. - In renga it is referred to as "commem" or "corridor". - There are two patches used: - run_sm::set_state(5) hook - After SM load, before jumping to it. - fcmd_handler() hook - After ARM command is received, before executing it. - At every sleep/resume the crypto processor is reset, commem is reset too. - The framework is injected by exploiting update_sm::0x50002 - If logging is enabled, psp2renga creates a log in "ux0:data/0psp2renga.log". Commem layout
- 0x0-0x200: Framework config. - 0x200-0x500: Entry manager, run_sm hook jumps there. - 0x500-0xD0000: 12 0x10000 entry blocks, one additional smaller block. - 0xD0000-0xF0000: Reserved for any-time-run code, fcmd_handler hook jumps there. - 0xF0000-0x1FE000: Unused. Usage
- For kernel-exports check /Include/renga-funcs.h - For user-exports check /Include/renga_user-funcs.h - For important defines check /Include/renga-defs.h - You may use lv0_loader.vpk (/User/app/) to easily run your own MeP payloads. - You may use renga.suprx (/User/plugins/) to easily switch between Camera SRAM and the phycont block. - Add the _settings one to SceSettings, there will be a new entry in Settings->System - Add the _forcephy or _forcesram to target apps, either phycont or sram mode will be forced. Credits
- Team Molecule for the update_sm 0x50002 exploit and help over discord - Team Molecule for HenKaku, TaiHen and Enso - xerpi for the vita-baremetal-loader - CelesteBlue for the ssmgr-resume hook
-
PSP2SHELL
psp2shell is an utility/remote shell (plugin+client, wifi) to ease the development process on ps vita devices. You should be able to print debug output over the shell (sceClibPrintf), send files, send/restart your application at anytime saving some precious time for the real stuff.
Building the plugins
mkdir cmake-build && cd cmake-build cmake -DCMAKE_TOOLCHAIN_FILE="$VITASDK/share/vita.toolchain.cmake" -DCMAKE_BUILD_TYPE=Release .. make Building the client (linux/deb)
sudo apt-get install libreadline-dev cd psp2shell_cli && mkdir cmake-build && cd cmake-build cmake .. make Installation
Tipcal usage
Enable debug print in your application/module
Use "sceClibPrintf" in your application/module to print debug messages to the shell.
Get a shell, get messages
Connect to your ps vita device from your computer with the client (replace "ip" with your ps vita ip address) :
./psp2shell_cli ip 3333 From there, you'll be able to see your sceClibPrintf messages coming in. Note that, to not miss some messages, the module wait for the shell on every print. This means your application will run slower if you use a lot of debug output.
Update, restart your application
Re-build your application then, from the shell, you can send the newly complied version of your application, and restart it automatically :
reload /path/to/my/app/build/eboot.bin Note that if your application is not running (or crashed), you'll have to specify the title id (9 chars) of your application (so we know where to put the new eboot.bin) :
load TITLEID01 /path/to/my/app/build/eboot.bin A little more
There are a few more commands available, like "ls", "rm", "send", "modlist", "modinfo"... You can type "help" in the shell for a list of available commands.
Thanks
consolex-bordeaux.fr, ScHlAuChi, noname120, motoharu, xyz, yifanlu, frangarcj, Rinnegatamante, davee and people i may forget for what they do for the ps vita.
-
psp2spl
Custom tiny lv0 framework for Playstation Vita/TV
Usage
Put psp2spl.skprx in ur0:tai/ Add a line to ux0: or ur0: /tai/config.txt under *KERNEL ur0:tai/psp2spl.skprx Reboot Basic info for developers
This framework's only task is to run lv0 code when requested: check [spl_exec_code] in main.c
For any more advanced tasks use psp2renga.
For all communication ARM<->FRAMEWORK the secure kernel enc addr in Venezia SPRAM is used. In spl it is referred to as "commem" or "corridor", spl uses only first 32 bytes of it for config. There is one patch used: fcmd_handler() hook - After ARM command is received, before executing it. At every sleep/resume the crypto processor is reset, commem is reset too. The framework is injected by exploiting update_sm::0x50002 and is stored @0x00809e00 Credits
Team Molecule for the update_sm 0x50002 exploit and help over discord Team Molecule for HenKaku, TaiHen and Enso TheFlow0 for help with the sleep-resume stuff by SKGleba.
-
PSSE Decrypt
Descifrar la capa PSSE de los juegos de PSM (en PC) Funciona en juegos de Unity y PSM.
Uso
decrypt.py <psm game folder> Desafortunadamente, es probable que no seha posible jugar a juegos PSM sin licencia....
Después de 9 años, la encriptación usada por los juegos de Playstation Mobile ha sido crackeada.
Requiere pycryptodome.
PSSE Decrypt ha sido creado por KuromeSan.
-
PSV ShowInfo
Plugin para PS Vita y Playstation TV que muestra la identificación del título, el nombre de la aplicación en ejecución y su versión en la parte inferior de la pantalla.
El complemento se puede usar de dos maneras, dependiendo de si elegimos cargarlo bajo un cierto * TITLE_ID (en este caso, el complemento solo funcionará en este juego) o debajo * ALL (para que funcione con todos los juegos).
by Yoti.
-
PSVIMGTools
This is a MultiPlatform GUI Interface For Team Molecule / Yifanlu's PSVIMGTools Which is a tool that can be used to decrypt & extract PSVita Backup Files (.psvimg) Providing you know the AID (AccountID) of the account that created said backup
Requirements
A PC 32 or 64 Bit PC Running Windows, Mac or Linux. A PSVita on ANY Firmware (even 3.70) QCMA by Codestation (Normal SONY CMA will work, but not recommended.) If your on linux you require libcurl4-gnutls-dev libboost-all-dev zlib1g-dev and libgcrypt-dev -
Psvimgtools Easy FrontEnd
This is a graphical interface for the PSVIMGTools Team Molecule / Yifanlu Which is a tool that can be used to decrypt and extract backup files PSVita (.psvimg) You just need to know the AID (QCMA Key) of the account that created the backup,
This works on all firmwares to date, including 3.65 / 3.67 / 3.68.
Usage
Create a user or multiple users for each psn account you have. After creating a user, select an account. The tool saves the last logged in account, and can load the last used account the next time you open the tool! Every account created the tool saves in a sqllite database, being able to be accessed in the root folder "EXTRA" \ Config.db
Auto H-encore
FrontEnd for h-encore automating all steps with just one click All steps of TheFlow's work have been automated in this frontend, the steps can be found here: TheFlow h-encore steps To use the automatic mode below:
0 - The tool checks if the game has been downloaded, if it was not, the tool asks you if it can download automatically, if you choose yes, you can skip to step 3 Step 1 and 2 are optional
1 - Download the vulnerable DRM-free demo of Bitter Smile
2 - After downloading, place the pkg in the path below inside the program (C:\Program Files (x86)\PsvimgToolsEasy\Psvimgtools Easy FrontEnd\PKG-h-encore)
3 - select the account IDQCMA and click on the option "Extraction of pkg to h-encore" All the work was done automatically and now it's just connect the psvita with QCMA and pass the app to vita.
TUTORIAL in English GamersRebirthDL - Youtube
TUTORIAL in English REDUCE H-ENCORE SIZE FROM 240mb to 13mb GamersRebirthDL - Youtube
TUTORIAL in Portuguese RobertGhidini - Youtube
Extracting of pkg to NoNpDrm
Just download pkg, if you want suggestions there is a list in the file Download.txt, after download put your file.pkg in the PKG folder, if there is a zRIF add to the file ListKey.txt: ex: Title_ID;zRIF
List the Title_ID of pkg that are in the PKG folder List the Title_ID of work.bin that are in the zRIF folder. Extract the zRIF from work.bin Extract pkg with zRIF, zRIF needs to be added in ListKey.txt together with Title_ID Extract pkg without zRIF In the PKG folder, you have a list of suggestions for downloading from the Zeus list, with the zRIF already added to the ListKey.txt file. You need the NoNpDrm plugin in your vita. PFS Decrypt
For decrypt Games, DLC, SAVEDATA and TROPHY including 3.61+
First you have to extract a pkg using the option "Extraction of PKG to NoNpDRM" Put the extracted pkg in the PFS folder, and use the "PFS Decrypt" option to extract PFS from your file. In the PFS folder, you have two .txt files, one is GAME.txt and the other is DLC.txt, they contain the necessary ZRIF. You can add more ZRIF, just by adding the separate GAMEID + ZRIF separated by semicolons. Automatic Clone PSP games
Added ability to clone PSP games, doing all the work, automatic
Copy the PSP game and sequence the renamed folder Change param.sfo with new numbering Extract the changed game. Change the VITA_PATH.txt with the new numbering. Recreate cloned games. Automatic themes
List of themes that are included in themas folder, but you can add more
Theme Flatcons Theme GraceUX Theme HACKINFORMER Theme Mario Theme Nighttime To add more, just copy your custom internet theme to the THEME folder Automatic SQL commands
List of SQL commands included in the SQL folder, but you can add more
Package-Installer RemoveFeatured-PSTV Whitelist-PSTV To add more, just create a .txt file with the SQL command and copy it to the SQL folder Added ability to add custom themes
Automatic mode exploits:
When pressing the Exploits Automatic button, the program searches all PSP games in the PGAME\ID folder in a listbox, after selecting the game, should select which exploit will use VHBL or ARK, confirming the program will extract and recreate the game with the informed exploit Automatically, and add the folder of the chosen exploit, within the SAVEDATA automatically
Manual option for PSP/PS1
Extract PSP/PS1 The program will look for the PSP games in PGAME / ID and extract the game in a folder Psvita / EXTRAIR
Recreate PSP / PS1 The program will look PSP games extracted in Ps vita / EXTRAIR, and recreate in PGAME / ID
Backup Options
Extract Backup The program will look for your backups in Psvita / SYSTEM / ID and extract in PSvita EXTRAIRBackup
Recreat Backup The program will look your backups in EXTRAIRBackup and recreate in PSvita Ps vita / SYSTEM / ID
Manual option for APP / Games - PSVITA
Extract APP / Games The program will look for the APP / Games in APP / ID and extract the game in a folder Psvita / EXTRAIRAppGame
Recreat APP / Games The program will look for the APP / Games in EXTRAIRAppGame and recreate in PSvita Ps vita / APP / ID
Option for App´s
In this option, it searches all APP in the root of the APPGAMES folder list program in a listbox, and after selecting loads within Ps vita / APP Here are some APP options that you can install directly on psvita.
VITASHELL-VitaShell MLCL00001-MolecularShell HACKINFOR WOLOLO HIDENAPPS PCSA00044-SKYPE URICALL00 If you want to add more app, add it directly to the root folder of the tool in Program Files (x86) \ PsvimgToolsEasy \ Psvimgtools Easy FrontEnd \ APPGAMES
Special thanks
Team Molecule / Yifanlu Motoharu for psvpfstools Codestation for QCMA DaveeFTW for cracking CMA keys. (cma.henkaku.xyz) St4rk, weaknespase and everyone involved in PkgDecrypt. For zRIF string decode/inflate code. TheFlow for H-encore Hackinformer for pkg list and all its publications GamersRebirthDL thanks for all your publications Nukasnel / Bergot / Danilo / Codebreaker / chronoss09 for test -
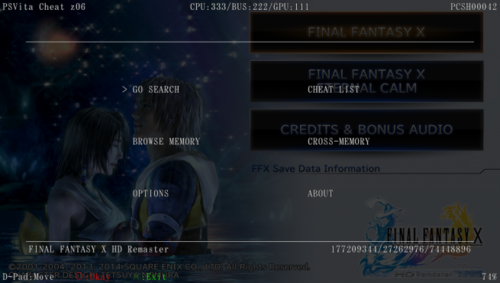
PSVita Cheat
This is a plugin that allows you to add cheats, improvements in games, such as ammunition, money, or lives endless thanks to the support of NoNpDRM, MaiDump or Vitamin games.
Changelog Z06:
VitaCheat only supports firmware 3.65 or higher Added support for the plugin suprx Using the double buffer to improve the flickering of the image Replaces font files and adds an interface in traditional Chinese The coding of cheat files has gone from GBK to UTF8 The memory dump generates a .txt file of the same name and stores all the information about the process module to use. Improved code in B2 format Accurate search range increases Auto option The main interface displays the game name and information about the remaining memory. Installation:
Copy vitacheat.suprx to the folder ux0: vitacheat and copy vitacheat.skprx to the ur0: vitacheat folder. Add to the config.txt file under * KERNEL: Ur0: vitacheat / vitacheat.skprx -
PSVita Reverse Engineering Tools
This toolkit provides tools that aid in the development of vita homebrews and plugins. By providing tools that speed up development through automation of processes and gives a more friendly view into complex things of PSVita OS.
These tools aided in the development of plugins such as: NoAVLS, ReStore and ReNpDrm and many RE things that helped in Wiki and vitasdk improvements.
What it won’t do:
These tools are solely used to aid in homebrew / plugins / hacks development. It probably will not produce a major hack. It will not magically make you a vita god. It will not automatically hack the vita. These tools are purely tools, most of them already existed in some form or another.
THIS TOOLSET PURELY SPEEDS UP THE PROCESS OF DEVELOPMENT THROUGH EASE OF ACCESS AND DOES NOT GIVE YOU ANYTHING YOU ALL DID NOT HAVE.
*** Remember: IF YOU DO NOT UNDERSTAND WHAT THESE TOOLS DO, IT MAY NOT BE FOR YOU! ***
## Description of the tools
ShipLog v2.0 - by @dots-tb
---
A complete logging solution for any homebrew, user plugin, kernel plugin. It can use network or file logging.
+ Added kernel network, removed user plugin dependency
+ Added ability to select which logging methods.
- Removed all user plugin dependency
- USB removed because it causes problem with Shell and CMA (Content Manager Assistant), it is fast but not stable
* Credits: xerpi, psxdev for their works on logging solutions. Cpasjuste for net.
That Hooker Got NIDS – by @dots-tb
---
A PC tool that hooks specified NIDS automatically.
* Credits: xerpi for base code used, TheFlow for db.yml parsing, yasen for the name ideas
VitaDecompilerMod – by @dots-tb - based on vitadecompiler by TheFloW, itself based on prxtool by TyRaNiD
---
A FREE alternative to IDA. It has a great pseudo-C decompilation that offers a quick view thanks to text file exporting.
Compared to original @TheFlow's version we added a few features such as:
+ More strings (EVEN MORE), including data section. (homebrew strings now work)
+ Generates .c, .h, .txt (NIDs), and db_lookup (<module_name>.yml)
+ ELF and fSELF support
+ Compressed fSELF support
+ Fixed issues with NIDS being improperly found
+ Includes offsets and vaddr
+ Automatic entry point (the entry point is retrieved properly from ELF header)
+ Automatic entry point location (for badly generated ELFs)
+ Relocation support
+ There might be more ?
* Credits: TheFloW for original VitaDecompiler and PSP prxtool's contributors
prxtool for PSVita - by TheFloW
---
An alternative to VitaDecompilerMod: prxtool cannot decompile to pseudo-C but it can decompiles ASM very well.
* Credits: TheFloW and xerpi for PSVita port and PSP prxtool's contributors
vita-unmake-fself – by @dots-tb
---
A PC tool that decompresses an unencrypted SELF file (skprx, suprx, self, eboot.bin) into an ELF file.
This tool can't decompress NPDRM encrypted SELF nor System encrypted SELF. That means that you will have to use FAGDec to first get a unencrypted SELF. Read SELFtoELF documentation for more informations.
vita-elf-inject – by @dots-tb
---
A PC tool that injects a decrypted elf(made by FAGDec or vita-unmake-fself) into an decrypted eboot.bin (made by FAGDec).
* Credits: Motoharu and CelesteBlue for make-fself rev ur engs.
PSVita-ELF-builder – by @CelesteBlue-dev
---
A PC tool that rebuilds ELF from decrypted modules' segments. To be used after using vitaDecrypt or vDump.
* Credits: zecoxao for the tutorial (how to rebuild ELF from decrypted segments and original SELF), vitasdk for vita-make-fself
French-American Games Decrypter (FAGDec) - by @CelesteBlue-dev and @dots-tb
---
A PSVita homebrew that decrypts easily PSVita user/kernel and games modules and can generate .ppk (compatibility pack for low FWs)
* Credits: Motoharu, Molecule Team, zecoxao for vitadump (new), xerpi for both, the NPS team esp. @juliosueiras, check app for further credits.
psvitalibdoc
---
Some lists of functions names / NIDs / libraries / modules to be used with vitadump IDA plugin, vitaldr IDA plugin, VitaDecompilerMod or prxtool for PSVita.
ioPlus 0.1, 0.2 – by @dots-tb
---
A PSVita kernel plugin that allows more IO operations in userland. Fast, simpler, and efficient alternative to kuio (by @Rinnegatamante) (3x smaller). It allows elevated IO permissions of user applications and plugins using the original sceIo functions. This includes reading, writing, opening, and folder management within applications such as official games. It may also include getting stats, not sure.
Version 0.2 is much more inefficient, but supports decryption of files within devices that may open such as PFS devices. (WARNING THIS PLUGIN MAY BYPASS SAFE-MODE)
physmem_dumper - by xyz
---
A kernel plugin that dumps Non-Secure World (NS kernel + userland) memory using RAM physical range: from 0x40200000 to 0x5FD00000.
See wiki for more information on PSVita's physical memory: https://wiki.henkaku.xyz/vita/Physical_Memory.
The output dump stored in ur0:dump/physmem-dump.bin is aimed to be loaded in IDA PRO using https://github.com/xyzz/vita-ida-physdump.
bootimage_extract - by @zecoxao
---
Extracts embedded kernel modules ELFs from os0:/bootimage.skprx.
+ Dropped support for segment file, added support for ELF input.
Kdumper - by @TheFloW and @CelesteBlue
---
A fSELF to run on an activated testkit/devkit on FW <=3.67 in order to dump its kernel !
Confirmed working between 3.50 and 3.67. Will need some changes for lower FWs (sceMotionDevGetEvaInfo is only on FW >= 3.50)
Credits: TheFloW for the kernel exploit. CelesteBlue for the many improvements, Mathieulh for SceNgsUser code.
nids-extract - by @dots-tb
---
A PC program that extracts exports NIDs from an ELF.
kdump-extract - by @dots-tb
---
A PC program that finds and extracts segment 0 of a kernel module from a continous kernel memory dump. It ourputs a .elf that can be used for RE (see vitadecompiler), for extracting NIDs (see nids-extract). It is to be used in conjunction with Kdumper on PSVita side.
--------------------------------------------------------------------------------
## Using the Tools
ShipLog v2.0 usage
---
### Usage:
Install backdoor_exe.skprx in taiHEN config.txt under *KERNEL and install ShipLog.vpk. You must reboot the Vita with the kernel plugin installed to open the configuration app. Logs are stored in a buffer and must be obtained using one of the following methods:
- Network:
1. Open the ShipLog application and configure the network configuration. Make sure you enable net logging. Be sure to save your configuration.
2. Type the command mentioned on the network configuration page.
3. Reboot the vita.
4. The netcat instance should show logs when the vita initializes shell/connects to network.
- File:
1. Open the ShipLog application and enable file logging. Make sure you save the configuration.
2. Reboot the vita.
3. Check ux0:data/logger.txt for new logs.
NOTE: This method may ware down your memory card and is slow. This method is only recommended when tested material may crash the system, preventing the dumping of logs.
- Dumping the buffer
1. Open the ShipLog application and select dump logs to disk.
2. Check ux0:data/logs.txt for new logs.
In the application you wish to log use:
ksceDebugPrintf, printf (when SceLibc is included such as in games), or sceClibPrintf
### Building:
./build.sh
It builds ShipLog.skprx and ShipLog.vpk.
--------------------------------------------------------------------------------
That Hooker Got NIDs usage
---
### Usage:
Dependencies: zlib, libyaml
Run: ./THGN binary <all/library_name/exports/imports> <kernel/user> db.yml <sys:1/0>
Options:
All: Every NID will be hooked. This will try to hook as an export at first, then attempt hook it as an import.
Library_name: Every NID of a library (such as “SceCtrl”) within the module specified will be hooked. This will try to hook as an export at first, then attempt hook it as an import.
Exports: Every export NID will be hooked.
Imports: Every import NID will be hooked.
Kernel: The generated code will work in kernel space.
User: The generated code will work in user space.
Sys: You may choose 1 or 0 to enable or disable syscall mode. You may omit this argument. Some functions will not log unless it enters syscall mode. If you do not see anything within your logs, you may try this option. Try not to use it.
--------------------------------------------------------------------------------
VitaDecompilerMod usage
---
Dependencies:
VitaDecompiler requires capstone (a disassembler) libraries and libyaml. (On Windows, capstone must be compiled from sources). Make sure you install the *.a and header files to the right directories.
Run: ./vitadecompiler binary db.yml
It will create 4 files:
<binary>.c (The decompiled code)
<binary>.nids.txt (A detailed list of imports and exports)
<binary>.yml (a db_lookup or exports in yml format)
<binary>.h (Prototypes/list of all functions in the source code.
Interpreting the output:
The top section is a printed NIDS table which gives the exports and imports of a module. This information will provide the offsets, virtual address, NID, library name, library NID, and the NID name (or generated name).
Each function has a virtual address and offset displayed next to it. This offset given (if not for a function that has a NID) maybe hooked with Taihen.
Most strings or values are accompanied by a s_text/s_data which gives you the original address. The address is then checked repeatedly until a non-address is found.
--------------------------------------------------------------------------------
prxtool usage
---
### Usage:
Put the module ELF and db.yml in the same folder as prxtool.exe.
The provided build is compatible with Windows. Simply open command line and:
Run: prxtool -n db.yml -w <module_name>.elf > <module_name>.S
### Building:
The source code and building instructions are available on TheFloW's github repository:
https://github.com/TheOfficialFloW/prxtool
--------------------------------------------------------------------------------
vita-unmake-fself usage
---
### Usage:
Run: ./vita-unmake-fself.exe input_fself
(you most likely will be able to drag-and-drop also)
The output will be produced in the same folder with .elf appended on to the end of the original file name.
### Building:
Dependencies: zlib
make
--------------------------------------------------------------------------------
vita-elf-inject usage
---
### Usage:
Run: ./vita-elf-inject.exe input_fself input_elf
(you most likely will be able to drag-and-drop also)
### Recommended usage for modding:
1. Run FAGDec to obtain a SELF.
2. Use vita-unmake-fself to extract the elf from the self.
3. Make required modifications to the elf.
4. Use vita-elf-inject to inject this modified elf back into the self.
The original eboot will be replaced with the product of injection. Please make a backup to plan accordingly.
NOTE: The product will run, however it will have slight changes that differentiates it from a eboot made with the official make-fself.
### Building:
Dependencies: zlib
make
--------------------------------------------------------------------------------
FAGDec usage
---
Install the .vpk on a PSVita.
### Controls:
Left/Right switches panels. Holding down each key will expand that pane to fullscreen.
On the Modules list panel, you may hit "Circle" twice to delete a module. "Cross" cancels this action. You can hold down circle.
On a menu with special option that can be jumped to with a button, the button that executes this option is indicated to the right of that specifc option.
### Menus:
Decrypt to...:
SELF - These are verified against the original ELF and can be ran directly on the PSVita. Big ELFs (50MB+) may have trouble verifying.
ELF - These are not verified to increase speed. The product must be make_fself'd on the computer or by another method. However, the sha256 is saved to be verified later if you wish.
#### NOTE: Modders need a ELF to modify, then they have to make a SELF from the modded ELF. See just below:
### To manually convert ELF to SELF (on PC using make_fself):
1) Obtain the leaked SDK make_fself.exe (YOU CANNOT USE THE VITASDK VERSION).
2) Run: make_fself.exe -c -e <modulename>.elf <modulename>
3) Open self_auth.bin/<modulename>.auth and copy the first 8 bytes to offset 0x80 of the output SELF of make_fself.exe. These 8 bytes data is the program-authority-id.
NOTE: If you do not wish to use illegally obtained material or want a cross-platform solution, use vita-elf-inject
### Decrypting games (when installed on PSVita):
Just select the title from the screen, and select the modules you wish to be decrypted.
### Decrypting games (when NOT installed on PSVita) -> Using the PATH_ID spoofing system:
vs0/os0 - Drop the module into the vs0:/vs0_em or os0:/os0_em and it will decrypt as if it was the respective device.
app/patch (YOU DO NOT NEED ASSETS TO USE THIS MODE) - Drop the game module into ux0:/app_em/<titleid> or ux0:/patch_em/<TITLEID>. They must be in their respective folder. They also must be PFS decrypted.
NOTE: IN ORDER FOR A NPDRM GAME TO BE DECRYPTED, appropriate work.bin must be located at ux0:/app_em/<titleid>/sce_sys/package/work.bin. This applies to both patches and base games.
### WHEN MODDING YOU NEED THE self_auth.bin FROM THE BASE GAME! PLEASE DO NOT FORGET!
--------------------------------------------------------------------------------
PSVita-ELF-builder usage
---
To reverse PSVita, you need some dumps of the PSVita modules. These dumps are either memory dumps (St4rk's vitadump) or decrypted SELF (vitaDecrypt).
Now you also have a ALL IN ONE solution: vDump. But in case you want to decrypt quickly a lot of SELFs, you will keep using vitaDecrypt.
vitaDecrypt outputs only compressed decrypted segments. But you have to decompress these segments, or better, convert to ELF file format. This is the aim of this tool.
The output .elf are valid for RE and they can also be rebuilded into SELF using vita-make-fself.
### Usage :
1) In os0-, ud0- and vs0-, place the REAL files of your PSVita filesystem.
2) In ux0-/dump/, place the out folder that you got using vitadecrypt.
3) To rebuild ELF, on Windows run _RUNME.BAT.
4) After having rebuilded ELF, to rebuild SELF, on Windows run BATCH_MAKE_FSELF.BAT.
5) You can now use the ELFs in vitadecompiler, IDA, or radare2 or simply use an hexadecimal editor to look into them.
You can also hexedit as you want the ELFs then transform them into SELFs.
### WARNING : NEVER WRITE to your PSVita os0: nor vs0:.
--------------------------------------------------------------------------------
ioPlus 0.1/0.2 usage
---
### Installation:
This is a kernel plugin and so it must be added to the taihen config.txt under the *KERNEL section. Once installed, you may use the standard sceIo functions such as sceIoOpen in user plugins and applications as normal.
#### ioPlus 0.2 only:
Using PFS decryption on ioPlus 0.2: to use decryption, use the “iop-decrypt:” device.
Ex: to open app0:/Media/level0 ----> iop-decrypt:/Media/level0
NOTE: an opened device with the file decrypted must be currently opened in order for this to work.
### Building:
mkdir build
cd build
cmake ..
make all
--------------------------------------------------------------------------------
physmem_dumper usage
---
### How to get a dump:
Put physmem_dumper.skprx in ur0:tai/. You have 3 ways to start this kernel module:
1. EARLY KERNEL INIT. If you have enso, add this line at the start of ur0:tai/boot_config.txt:
-load ur0:tai/physmem_dumper.skprx
2. PRE SHELL INIT. Add this line in ur0:tai/config.txt under *KERNEL line:
ur0:tai/physmem_dumper.skprx
3. POST SHELL INIT. Rename physmem_dumper.skprx to kplugin.txt and move this file to ux0: root. Launch kplugin loader app by xerpi. Wait until the app tells you to press START to exit.
### How to use the dump:
The output dump stored in ur0:dump/physmem-dump.bin is aimed to be loaded in IDA PRO using https://github.com/xyzz/vita-ida-physdump.
bootimage_extract usage
---
Obtain os0:/bootimage.skprx.elf using FAGDec in ELF mode or some other means.
Run:
./bootimage_extract bootimage.skprx.elf outdir
--------------------------------------------------------------------------------
Kdumper usage
---
Before compiling, you have to change IP address to the one of your PC in main.c. After compiling, install the app on activated testkit/devkit <3.68. On PC listen TCP on port 9023
. Run the PSVita app. Follow the instructions on screen. The kernel dump is sent to PC through socket.
kdump-extract usage
---
Obtain a kernel dump from Kdumper. Be sure that the vaddr of SceSysmem seg0 is at offset 0x0 of the kdump. Kdumper will write it to the file, but you must remove preceeding information.
Run:
./kdump_extract kdump.bin
--------------------------------------------------------------------------------
nids-extract usage
---
A db yaml will be generated to stdout using the exports of a specified ELF. You will need to specify a version to be inserted to yaml such as "3.60", which is shown in the following example.
Run:
./nids-extract binary.elf 3.60 > <output>.yml
--------------------------------------------------------------------------------
## Further thanks
zecoxao, xerpi, Team_molecule, mr.gas, MajorTom, TheFloW, Rinnegatamante, cpasjuste, Freakler, sys(yasen), Nkekev, SilicaAndPina, motoharu, mathieulh, aerosoul, SKGleba, frangarcj, velocity, der0ad, SKFU
by @dots-tb and @CelesteBlue-dev (and other devs if they add their tools there)
Every tool provided here will be licensed under GPLv3.0 unless stated otherwise.
-
PSVita UDCD USB Video Class plugin
This is a kernel plugin that uses lets you stream your PSVita screen to your computer via USB.
How does it work?
The plugin uses the SceUdcd module of the PSVita OS to setup the necessary USB descriptors to simulate and behave as an USB Video Class device (like a webcam or an USB video capture card).
The hardware color space converter of the PSVita's SoC is used to perform the conversion to the destination pixel format; then the USB controller directly performs a DMA transfer from the physical address of the resulting converted framebuffer, and therefore, saving CPU usage and power consumption.
Supported formats and resolutions
960x544 @ 30 FPS and (less than) 60 FPS 896x504 @ 30 FPS and (almost) 60 FPS 864x488 @ 30 FPS and 60 FPS 480x272 @ 30 FPS and 60 FPS Installation:
Copy udcd_uvc.skprx to your PSVita Add udcd_uvc.skprx to taiHEN's config (ur0:/tai/config.txt or ux0:/tai/config.txt): *KERNEL ur0:tai/udcd_uvc.skprx
Reboot your PSVita. Troubleshooting
If the video looks glitched, try to change the video player configuration to use the NV12 format or switch to another player (like PotPlayer or OBS).
If you use Windows 10 you might have to change the Camera access permissions on the Privacy Settings.
On Linux I recommend using mplayer (mplayer tv:// -tv driver=v4l2:device=/dev/videoX:width=960:height=544).
Audio noise fix:
Disable USB power supply (Settings > System) Note: Remember that if anything goes wrong (like PSVita not booting) you can always press L at boot to skip plugin loading.
Note 2: No, it doesn't stream audio. For that use a 3.5mm jack to jack adapter (a ferrite bead might help reduce the electromagnetic noise).
by xerpi.
-
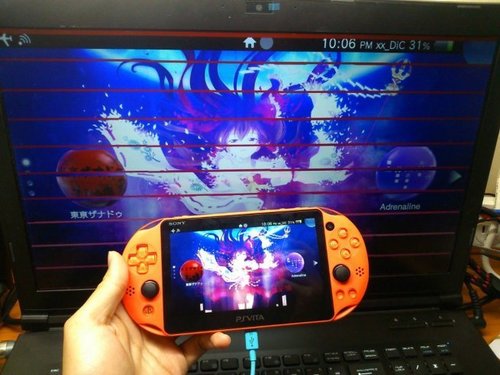
PSVitaDock
A Streaming app which let's you plug and play your PSVita to your PC without hassle.
Actual knowing issues: Theres a big change you gonna have audio latency and theres a small change you won't but most of the time theres an audio latency about 0.2 ms to 0.5ms, For now instead of using the in app sound you can mute the app and enabled from your windows audio panel the ability to hear your audio input through the speakers.
The plugin i used to stream the PSVita has a watermark as seen in the previous post video basicaly the green purple line. The fix for that is either finding a new plugin to embed in the app or either buying the plugin which is about 180 Euros :(. And last if you connect an external audio card like usb headphones for example while playing the app may freeze and crash.
Preperation:
The app takes advantage of xerpi's UDCD USB Video Class plugin, so make sure you have it installed on your PSVita. Link for xerpi's plugin https://github.com/xerpi/vita_udcd_uvc.
Download The PSVitaDock Connect your PSVita to mic-in or audio-in input on your computer. For the app to recognize which audio input is from your PSVita go to your Sound Settings then recording find which is your Vita for example "Microphone Line-In Front" or "Audio Line-In Rear" double click and rename it by adding the suffix or prefix "PSVita" so it should be like "Audio Line-In Rear PSVita". Theres a big change your computer has Realtek audio interface so it doesn't matter if you connect it to mic input (Pink) or line-in input (Blue) just in case you connect it to the mic input make sure you pick the mic input to work as line in input from the Realtek panel beacuse mic input is to sensitive and the sound would be loud. Start the PSVitaDock and Enjoy! Shortcuts: Enter(Return key): Shows up "Options menu". ESC (Escape): Goes fullscreen or windowed. TAB: Changes quality from HQ To smooth or vice-versa. SPACE: Takes a screenshot. In case you have any problem i added a PDF file with all the errors and solutions. -
PSVitaRebootShutdown
This is an app that reboots or powers off your PS Vita depending on what trigger you hold. You can now also press X and □ to update the database (keep icons) or left and up on the d-pad to delete the database and restore it (lose icons).
To compile, run the following from inside the folder with "CMakeLists.txt": cmake . && make
By Mc_Callum_99
Thank you SilicaAndPina (@SilicaDevs) for the help troubleshooting - I'm new to this okay?
-
PSVshell
Yet another overclocking plugin.
Features:
Allows you to change CPU, GPU, BUS and XBAR clocks separately, in these steps: CPU: 41, 83, 111, 166, 222, 333, 444, 500 MHz GPU (ES4): 41, 55, 83, 111, 166, 222 MHz BUS: 55, 83, 111, 166, 222 MHz XBAR: 83, 111, 166 MHz Supports per-app profiles Shows per-core CPU usage in %, including peak single-thread load Runs in kernelland (=> visible in LiveArea) Pretty GUI with some useless eye-candy metrics such as ram/vram usage, battery temp, etc... Does not slow down games when menu is open Does not crash Adrenaline Clean code and patches 3.60 and 3.65 FWs are supported How to use:
Press SELECT + UP or SELECT + DOWN to toggle between 3 GUI modes When in 'FULL' mode:
Use UP/DOWN to move in the menu Press X to toggle frequency mode for currently selected > device <: Default freq. (WHITE) - the plugin will not interfere, but rather use the default freq. for current game Manual freq. (BLUE) - the plugin will use your specified freq. press LEFT/RIGHT to immediately change the frequency Press X when > save profile < is selected to save/delete profiles All Manual freq. (BLUE) will be loaded and applied next time you start/resume the game All Default freq. (WHITE) will be kept to default (set to whatever freq. the game asks for) by Electry.
-
Q-Encore
Quick h-encore (or Q-encore for short) is just a modification of the h-encore by TheFloW.
It has same stability and functionality as original one, but lacks menu for automation.
Notes:
If you have no HENkaku installed or accidentaly removed at least one of their modules it will be auto restored. If you have no VitaShell it will be auto downloaded from TheFloW's GitHub. There is no force reinstall option. If you have no both taiHEN config.txt files it will be restored. Or hold R in first three seconds after start. SHA-256 of the system.dat is 1d3b765154d77a9765bb6dcfd51e57fc30e8aca83538f26b44106e0253b9daba Installation:
You must install h-encore by TheFloW first! Copy provided system.dat file to your Vita Open VitaShell and go to the folder with file Highlight it, press TRIANGLE and select Copy Navigate to the ux0:user/00/savedata/ Highlight PCSG90096 folder and press TRIANGLE Select Open decrypted, then TRIANGLE and Paste If it works without any issues do QCMA backup I wish you a Merry Christmas.
And a happy New Year!
~Yoti
-
Qcma
QCMA is a cross-platform application to provide a Open Source implementation of the original Content Manager Assistant that comes with the PS Vita. QCMA is meant to be compatible with Linux, Windows and MAC OS X.
Features
The aim of this project is to provide an implementation that is on par with the official CMA and also offer some features missing in the original one.
Implemented features:
Metadata for PSP savedatas. Basic metadata for single songs (album, artist, title, cover art). Basic metadata for videos (duration, dimensions, thumbnail). Basic metadata for photos (dimensions, thumbnails). Simple backup browser: view and delete the backups on your PC without a Vita. Easy wireless pairing (show PIN to the user when a Vita is detected). Ability to restart the connection if the Vita is reconnected. -
re3-vita
re3-vita is a port of re3, a full reverse engineered reimplementation of Grand Theft Auto III using librw, a full and open source reimplementation of RenderWare graphics engine.
re3-vita allows to play Grand Theft Auto III on PSVITA/PSTV after providing game files from your own copy of the game.
by Rinnegatamante & TheFloW.