Nintendo 3DS
152 archivos
-

Checkpoint (Nintendo 3DS)
A fast and simple homebrew save manager for 3DS written in C++.
Why use Checkpoint?
Checkpoint is created following ideas of simplicity and efficiency. The UI has been designed to condense as many options as possible, while keeping it simple to work with.
Moreover, Checkpoint is extremely lightweight - while being packaged with a nice graphic user interface - and is built using the most recent libraries available.
Checkpoint for 3DS natively supports 3DS and DS cartridges, digital standard titles and demo titles. It also automatically checks and filters homebrew titles which may not have a save archive to backup or restore, which is done without an external title list and filters. For this reason, Checkpoint doesn't need constant user maintenance to retain full functionality.
Checkpoint for Switch natively supports NAND saves for the titles you have played. Title information are loaded automatically.
Usage
You can use Checkpoint for 3DS with both cfw and Rosalina-based Homebrew Launchers. *hax-based Homebrew Launchers are not supported by Checkpoint.
Checkpoint for Switch runs on homebrew launcher. Make sure you're running up-to-date payloads.
The first launch of the 3DS version will take considerably longer than usual (usually 1-2 minutes depending on how many titles you have installed), due to the working directories being created - Checkpoint will be significatively faster upon launch from then on.
You can scroll between the title list with the DPAD/LR and target a title with A when the selector is on it. Now, you can use the DPAD or the touchscreen to select a target backup to restore/overwrite.
Working path
Checkpoint relies on the following folders to store the files it generates. Note that all the working directories are automatically generated on first launch (or when Checkpoint finds a new title that doesn't have a working directory yet).
sdmc:/3ds/Checkpoint: root path sdmc:/3ds/Checkpoint/config.json: custom configuration file sdmc:/3ds/Checkpoint/saves/<unique id> <game title>: root path for all the save backups for a generic game sdmc:/3ds/Checkpoint/extdata/<unique id> <game title>: root path for all the extdata backups for a generic game Configuration file
You can add and toggle features to Checkpoint for 3DS by editing the config.json configuration file.Sample configuration file:
{ "filter": [ "0x000400000011C400", "0x000400000014F100" ], "favorites": [ "0x000400000011C400" ], "additional_save_folders": { "0x00040000001B5000": { "folders": [ "/3ds/mySaves/1B50", "/moreSaves" ] }, "0x00040000001B5100": { "folders": [ "/3ds/PKSM/backups" ] } }, "additional_extdata_folders": { }, "nand_saves": true, "version": 2 }
-
CIAngel
¡Ahora podemos obtener juegos directamente en la 3DS! Usando una ID de título y una clave de título encriptada, o buscando un título por nombre, se producirán o instalarán directamente BUENAS CIA que se pueden volver a descargar desde eshop y actualizar desde eshop si sale nuevo contenido. Estas CIA no interferirán con el contenido de eShop.
Puedes optar por crear una CIA, instalar el juego directamente o instalar solo el ticket.
Uso
Buscar por nombre
CIAngel utiliza HBKBlib para buscar títulos por nombre. Los datos se leen desde /CIAngel/wings.json (que se descarga automáticamente en el primer lanzamiento) para buscar el nombre ingresado.
Cola de descarga
Al ver la lista de resultados de la búsqueda, puede presionar X para agregar el título a la cola de descarga. Si selecciona "Procesar cola de descarga", podrá descargar o instalar todos los títulos en cola uno tras otro. Esto usa el modo de descarga / instalación seleccionado actualmente.
Soporte Input.txt
CIAngel puede leer un archivo de texto (sd: /CIAngel/input.txt) que tiene 2 líneas.
La primera línea debe ser la identificación del título. La segunda línea debe ser la clave de título cifrada.
Aplicación creada por llakssz.
-
Custom 3DS Title Install
Experimental script to automate the process of a manual title install for Nintendo 3DS. Originally created late June 2019.
Summary
Dump boot9.bin and movable.sed from a 3DS system. Install pycryptodomex: Windows: py -3 -m pip install --user --upgrade pycryptodomex macOS/Linux: python3 -m pip install --user --upgrade pycryptodomex Run custom-install.py with boot9.bin, movable.sed, path to the SD root, and CIA files to install (see Usage section). Use custom-install-finalize on the 3DS system to finish the install. Setup
Linux users must build Save3ds and place save3ds_fuse in bin/linux.
movable.sed is required and can be provided with -m or --movable.
boot9 is needed:
-b or --boot9 argument (if set) BOOT9_PATH environment variable (if set) %APPDATA%\3ds\boot9.bin (Windows-specific) ~/Library/Application Support/3ds/boot9.bin (macOS-specific) ~/.3ds/boot9.bin ~/3ds/boot9.bin A SeedDB is needed for newer games (2015+) that use seeds.
SeedDB is checked in order of:
--seeddb argument (if set) SEEDDB_PATH environment variable (if set) %APPDATA%\3ds\seeddb.bin (Windows-specific) ~/Library/Application Support/3ds/seeddb.bin (macOS-specific) ~/.3ds/seeddb.bin ~/3ds/seeddb.bin Usage
Use -h to view arguments.
Examples:
py -3 custom-install.py -b boot9.bin -m movable.sed --sd E:\ file.cia file2.cia python3 custom-install.py -b boot9.bin -m movable.sed --sd /Volumes/GM9SD file.cia file2.cia python3 custom-install.py -b boot9.bin -m movable.sed --sd /media/GM9SD file.cia file2.cia License/Credits
pyctr/ is from ninfs d994c78.
save3ds by wwylele is used to interact with the Title Database (details in bin/README).
Thanks to @BpyH64 for researching how to generate the cmacs.
by ihaveamac.
-
Dead Simple EULA Set
DSES is a simple tool to set the EULAs for the 3DS to accepted.
What
In order to play 3DS games online/make use of streetpass, the 3DS makes the user accept an EULA. If this is for in-region titles, this is can be handled by the 3DS itself. If you wish to make use of out-of-region titles however, you will need to use homebrew to set the EULA to accepted.
Why
A number of EULA setting tools exist already (notably, SciresM/EULASetter, which is the base for this tool).
However, all of these tools I've encountered so far sometimes offer a lot of other features and more importantly, put hex values in front of the user.
This tool does none of that. It does one thing. Set your EULA to accepted if it isn't and to unaccepted if it is. No complications, nothing. Just press A and it changes the EULA.
Note that when unaccepting the EULA, you will need to reaccept it the next time you use a 3DS game in your own region.
Usage
Download the CIA from the releases page and open it with FBI. Press A to change your EULA. Press SELECT to remove the program after running it.
If for whatever reason you need to reset the EULA to its initial values, rerun the application again.
There is also a 3DSX option available for those who prefer 3DSX homebrew. Put it on your SD card and run it with the Homebrew Launcher or with 3dslink. Press SELECT to remove the program after running it.
-
Decrypt9
Multipurpose content dumper and decryptor for the Nintendo 3DS
Decrypt9 WIP (work-in-progress) by d0k3
This is a work in progress fork of Archshifts original Decrypt9, including bleeding edge new features. Note that the names of the executable files for this are Decrypt9WIP.* instead of Decrypt9.*.
Decrypt9, Decrypt9WIP, Decrypt9UI - which one to use?
There are at the present time, three main versions of Decrypt9 available:
Decrypt9 by Archshift: This is the original version of Decrypt9 by Archshift. New features are pulled into this once they are thoroughly tested. This is as stable as it gets, but may also miss some of the newer features. Decrypt9 WIP by d0k3: This is the work in progress fork of Archshifts original Decrypt9. It contains the newest features and is always up to date. Releases in here can be considered tested beta versions. Decrypt9 UI by Shadowtrance: This is a themed version of Decrypt9 WIP created by Shadowtrance. It contains a nice graphical user interface (instead of text only as the other two versions), but may not be up to date at all times
What can I do with this?
See this incomplete list, more detailed descriptions are found further below.
Create XORpads for decryption of NCCH ('.3DS') files Create XORpads for decryption of files in the '/Nintendo 3DS' folder Create XORpads for decryption of the TWLN and CTRNAND partitions Decrypt Titlekeys, either from a file or directly from SysNAND / EmuNAND Backup & restore your SysNAND and EmuNAND Dump & Inject any partition from your SysNAND and EmuNAND Dump & Inject a number of files (ticket.db, ..) from your SysNAND and EmuNAND Inject any app into the Health & Safety app Create and update the SeedDB file Directly decrypt (cryptofix) NCCH ('.3DS') and CIA files Directly decrypt files from the '/Nintendo 3DS/' folder Dump retail game cartridges ... and a lot more How to run this / entry points
Decrypt9 can be built to run from a number of entry points, descriptions are below. Note that you need to be on or below 3DS firmware version v9.2 for any of these to work.
A9LH & Brahma: Copy Decrypt9.bin to somewhere on your SD card and run it via either Brahma or arm9loaderhax. Brahma derivatives / loaders (such as BrahmaLoader, BootCTR and CTR Boot Manager) and A9LH chainloaders (such as Luma3DS and BootCTR9) will work with this as well. Build this with make a9lh. Homebrew Launcher: Copy Decrypt9.3dsx & Decrypt9.smdh into /3DS/Decrypt9 on your SD card. Run this via Smealums Homebrew Launcher, Mashers Grid Launcher or any other compatible software. Build this with make brahma. CakeHax Browser: Copy Decrypt9.dat to the root of your SD card. For MSET also copy Decrypt9.nds to your SD card. You can then run it via http://dukesrg.github.io/?Decrypt9.dat from your 3DS browser. Build this via make cakehax. CakeHax MSET: Copy Decrypt9.dat to the root of your SD card and Decrypt9.nds to anywhere on the SD card. You can then run it either via MSET and Decrypt9.nds. Build this via make cakerop. Gateway Browser Exploit: Copy Launcher.dat to your SD card root and run this via http://go.gateway-3ds.com/ from your 3DS browser. Build this with make gateway. Please note: this entrypoint is deprecated. While it may still work at the present time with little to no problems, bugs will no more be fixed and it may be completely removed at a later time. Use CakeHax instead. If you are a developer and you are building this, you may also just run make release to build all files at once. If you are a user, all files are already included in the release archive. When building this, you may also select to compile with one of four available fonts by appending FONT=ORIG/6X10/ACORN/GB to the make command line parameters. Working folders
Basically every input file for Decrypt9 can be placed into the SD card root and output files can be written there, too. Working folders are mostly optional. However, using them is recommended and even required for some of the Decrypt9 features to work. These two folders (on the root of your SD card) are used:
/files9/D9Game/: NCCH (.3DS), CIA, BOSS, SD card files (from the '/Nintendo 3DS/' folder) go here and are decrypted in place by the respective features. The cart dumper uses this directory as output directory. /files9/: Everything that doesn't go into /files9/D9Game/ goes here, and this is also the standard output folder. If /files9/D9Game/ does not exist, NCCH, CIA, BOSS and SD card files are also processed in this folder. Decryption of game files (NCCH, CIA, BOSS, SD) needs at least one of these two folders to exist. Input files are first searched in /files9/ and (if not found) then in the SD card root.
Support files
Depending on the environment, Decrypt9 is ran from, you may need support files to have full functionality. Support files are placed into either the root folder, or the work folder (/files9/). Here's a list of support files used in Decrypt9, when you need them and what they are used for:
slot0x05keyY.bin: This file was previously needed for access to CTRNAND features (which is basically everything) on N3DS. At the moment it is not needed on any entrypoint. slot0x25keyX.bin: This file is needed to decrypt 7x crypto NCCHs and CIAs on O3DS < 7.0. slot0x18keyX.bin: This file is needed to decrypt Secure 3 crypto NCCHs and CIAs on O3DS without A9LH. slot0x1BkeyX.bin: This file is needed to decrypt Secure 4 crypto NCCHs and CIAs in every environment. slot0x24keyY.bin: This file is needed to properly dump & inject GBA VC savegames. aeskeydb.bin: This is an alternative to the four slot0x??key?.bin files mentioned above. It can contain multiple keys. It can be created from your existing slot0x??key?.binfiles in Decrypt9 via the 'Build Key Database' feature. seeddb.bin: Decrypt9 can create and update this file from the seeds installed in your system. This file is needed to decrypt seed crypto NCCHs and CIAs. Note that your seeddb.bin must also contain the seed for the specific game you need to decrypt. otp.bin: This file is console-unique and is required - on entrypoints other than A9LH - for decryption of the 'secret' sector 0x96 on N3DS (and O3DS with a9lh installed). Refer to this guide for instructions on how to get your own otp.bin file. movable.sed: This is dumpable by Decrypt9. It is needed to decrypt SD files from another 3DS, or from another installation on your own 3DS. It is not needed when decrypting your own SysNAND / EmuNAND SD files. secret_sector.bin: A copy of the decrypted, untouched (non-a9lh) sector0x96.bin. This is required for decryption of the encrypted ARM9 section of N3DS FIRMs. It is not required for anything else. As an alternative to this you can also provide slot0x11key95.bin and slot0x11key96.bin. d9logo.bin: Contains a logo (or, in fact, anything) to be displayed on the bottom screen. A d9logo.bin file is included in the release archive. If you want to create one yourself, install ImageMagick and run convert [your image] -rotate 90 bgr:d9logo.bin, where [your image] is any image of 320x240px resolution. Decrypt9 controls
The most important controls are displayed on screen, here is a list of all:
DOWN/UP - Navigate menus, scroll output, select between options. A - Enter submenu or confirm action. B - Depending on location, leave submenu or cancel. L/R - Switch between submenus (first level submenu only). X - Make a screenshot. Works in menu and on console output, after a feature finishes. X + LEFT/RIGHT - Batch screenshot all submenus / entries (only on menu) SELECT - Unmount SD card (only on menu). HOME - Reboot the console. POWER - Poweroff the console. START (+ LEFT) - Reboot (START only) / Poweroff (with LEFT) the console. There are some features (NAND backup and restore, f.e.), that require the user to choose a file or a directory. In these cases, use the arrow keys (that includes LFET/RIGHT) to select and A / B to confirm and cancel. Also, most file write operations (NAND writes excluded) can be cancelled by holding B.
Decrypt9 features description
Features in Decrypt9 are categorized into 7 main categories, see the descriptions of each below.
XORpad Generator Options
This category includes all features that generate XORpads. XORpads are not useful on their own, but they can be used (with additional tools) to decrypt things on your PC. Most, if not all, of the functionality provided by these features can now be achieved in Decrypt9 in a more comfortable way by newer dump/decrypt features, but these are still useful for following older tutorials and to work with other tools.
NCCH Padgen: This generates XORpads for NCCH/NCSD files ('.3DS' f.e.) from ncchinfo.bin files. Generate the ncchinfo.bin via the included Python script ncchinfo_gen.py (or ncchinfo_tgen.py for theme packs) and place it into the /files9/ work folder. Use Archshift's XORer to apply XORpads to .3DS files. NCCH Padgen is also used in conjunction with Riku's 3DS Simple CIA Converter. Important Note: Depending on you 3DS console type / FW version and the encryption in your NCCH/NCSD files you may need additional files (see 'Support files' above) and / or seeddb.bin. SD Padgen (SDinfo.bin): This generates XORpads for files installed into the '/Nintendo 3DS/' folder of your SD card. Use the included Python script sdinfo_gen.py and place the the resulting sdinfo.bin into your /files9/ work folder. If the SD files to generate XORpads for are from a different NAND (different console, f.e.), you also need the respective movable.sed file (dumpable via Dercrypt9) to generate valid XORpads. By now, this feature should only make sense when decrypting stuff from another 3DS - use one of the two features below or the SD Decryptor instead. Use padXORer by xerpi to apply XORpads. SD Padgen (SysNAND dir): This is basically an improved version of the above feature. For typical users, there are two folders in '/Nintendo 3DS/' on the SD card, one belonging to the SysNAND, the other to EmuNAND. This feature will generate XORpads for encrypted content inside the folder belonging to the SysNAND. It won't touch your SysNAND, thus it is not a dangerous feature. A folder selection prompt will allow you to specify exactly the XORpads you want to be generated (use the arrow keys to select). Generating all of them at once is not recommended, because this can lead to several GBs of data and very long processing time. SD Padgen (EmuNAND dir): This is the same as the above feature, but utilizing the EmuNAND folder below '/Nintendo 3DS/' on the SD card. The EmuNAND folder is typically a lot larger than the SysNAND folder, so be careful when selecting the content for which to generate XORpads for. Any Padgen (anypad.bin): This feature is a more versatile alternative to various other padgen features. It uses the anypad.bin file as base. For information on the format of this file, refer to xorpad.h. A few pointers to get you started: If setNormalKey, setKeyX, setKeyY are non zero, the respective keys in the struct are used, if zero, the keys are unused. ctr array is the initialization vector, or, if either AP_USE_NAND_CTR or AP_USE_SD_CTR the offset of the initialization vector. mode is the AES mode, refer to either aes.h or to 3DBrew. CTRNAND Padgen: This generates a XORpad for the CTRNAND partition inside your 3DS console flash memory. Use this with a NAND (SysNAND/EmuNAND) dump from your console and 3DSFAT16Tool to decrypt and re-encrypt the CTRNAND partition on PC. This is useful for any modification you might want to do to the main file system of your 3DS. CTRNAND Padgen (slot0x4): This is an N3DS only feature. It is the same as the above option, but forces to use slot0x04 when generating the XORpad. Slot0x04 XORpads are required for decryption and encryption of the CTRNAND partition from downgraded N3DS NAND (SysNAND / EmuNAND) dumps. TWLNAND Padgen: This generates a XORpad for the TWLNAND partition inside your 3DS console flash memory. Use this with a NAND (SysNAND/EmuNAND) dump from your console and 3DSFAT16Tool to decrypt and re-encrypt the TWLNAND partition on PC. This can be used, f.e. to set up the SudokuHax exploit. FIRM0FIRM1 Padgen: This generates the combined XORpad for the FIRM0 and FIRM1 partitions inside your 3DS console flash memory. Use this with a NAND (SysNAND/EmuNAND) dump from your console and 3DSFAT16Tool to decrypt and re-encrypt the FIRM0 / FIRM1 partition on PC. This is useful f.e. for manual installation of the arm9loaderhax exploit. Titlekey Options
This category includes all titlekey related features. Decrypted titlekeys (decTitleKeys.bin) are used to download software from CDN via the included Python script cdn_download.py and PlaiCDN. Encrypted titlekeys are used, for the same purpose, by FunKeyCIA. You may also view the (encrypted or decrypted) titlekeys via print_ticket_keys.py.
Titlekey Decrypt (file): First, generate the encTitleKeys.bin via the included Python script dump_ticket_keys.py and place it into the /files9/ work folder. This feature will decrypt the file and generate the decTitleKeys.bin, containing the decrypted titlekeys. Titlekey Encrypt (file): This feature takes a decTitleKeys.bin file and encrypts it to encTitleKeys.bin. This is useful to convert between the two formats, to make sure you have the right format for the tools you use. Titlekey Decrypt (SysNAND): This will find and decrypt all the titlekeys contained on your SysNAND, without the need for additional tools. The decTitleKeys.bin file will be generated on your SD card. Titlekey Decrypt (EmuNAND): This will find and decrypt all the titlekeys contained on your EmuNAND, without the need for additional tools. The decTitleKeys_emu.bin file will be generated on your SD card. Titlekey Dump (SysNAND): This will find all the titlekeys contained on your SysNAND and dump them, without the additional step of decryption, to encTitleKeys.bin. Titlekey Dump (EmuNAND): This will find all the titlekeys contained on your EmuNAND and dump them, without the additional step of decryption, to encTitleKeys_emu.bin. Ticket Dump (SysNAND): Use this to dump all tickets found inside your SysNAND ticket.db file. Naming scheme for tickets is (commonkey index)-(console id)-(title id).tik. Commonkey index is typically 0 for eShop titles and 1 for system titles, a console id of zero for eShop titles typically means a forged (= non genuine) ticket. Dumped tickets are installable via FBI. Ticket Dump (EmuNAND): Same as above, but uses the ticket.db file from your EmuNAND. SysNAND / EmuNAND Options
This is actually two categories in the main menu, but the functionality provided the same (for SysNAND / EmuNAND respectively). These categories include all features that dump, inject, modify or extract information from/to the SysNAND/EmuNAND. For functions that output files to the SD card, the user can choose a filename from a predefined list. For functions that use files from the SD card for input, the user can choose among all candidates existing on the SD card. For an extra layer of safety, critical(!) features - meaning all features that actually introduce change to the NAND - are protected by a warning message and an unlock sequence that the user has to enter. Caution is adviced with these protected features. They should only be used by the informed user.
(Sys/Emu)NAND Backup & Restore...: This contains multiple options to backup or restore your SysNAND or EmuNAND. The submenu contains the following entries: NAND Backup: Dumps the NAND.bin file from your SysNAND or the ÈmuNAND.bin file from your EmuNAND. This is a full backup of your 3DS System NAND and can be used to restore your 3DS SysNAND / EmuNAND to a previous state or for modifications. NAND Backup (minsize): Same as the above option, but only dumps the actually used size of the NAND (the remainder is only unused data). Use this instead of the above to save some space on your SD card. NAND Restore(!): This fully restores your SysNAND or EmuNAND from the provided NAND.bin file (needs to be in the /files9/ work folder or in the SD card root). Although backups will be checked before restoring, be careful not to restore a corrupted NAND.bin file. Also note that you won't have access to this feature if your SysNAND is too messed up or on a too high FW version to even start Decrypt9 (should be self explanatory). NAND Restore (forced)(!): Same as the above option, but skips most safety checks. This is not recommended to be used without being properly informed. Keep in mind that, if the above option stops you from restoring a NAND backup, it is normally with good reason and means a prevented brick. NAND Restore (keep a9lh)(!): Only available on SysNAND, this is the same as the standard (unforced) restore option, but keeps all your arm9loaderhax files intact. Only use if you actually have arm9loaderhax installed. Validate NAND Dump: Use this to check and verify NAND dumps on your SD card. If this check passes on a NAND dump, you will also be able to restore it via the standard restore option. CTRNAND Transfer...: This menu contains various options to enable transfer of CTRNAND partitions between consoles. Auto CTRNAND Transfer: Automatically transfer a transferable CTRNAND image to this consoles NAND. Without A9LH installed, this will overwrite the FIRM0, FIRM1, CTRNAND. With A9LH installed, this will only overwrite CTRNAND. O3DS images can be transferred into N3DS consoles, but the NCSD header of the NAND may be overwritten. Dump transferable CTRNAND: Dump a CTRNAND image for later use in the feature above. Transferables images can be shared between consoles. Autofix CTRNAND: Use this to automatically fixes the CMACs for movable.sed, *.db and system saves inside the CTRNAND. It will also fix the <id0> inside the data folder. This is useful f.e. when a CTRNAND from another console was previously injected the regular way. Partition Dump...: This allows you to dump & decrypt any of the partitions inside your NANDs (TWLN / TWLP / AGBSAVE / FIRM0 / FIRM1 / CTRNAND / Sector0x96). Partitions with a file system (TWLN / TWLP / CTRNAND) can easily be mounted, viewed and edited on Windows via OSFMount. These partitions are included in your NAND and can be dumped by this feature: TWLN: TWL-NAND FAT16 File System - this is the same as on a Nintendo DSi console. Installed DSiWare titles reside in this partition. This partition can be used, f.e. to set up SudokuHax. TWLP: TWL-NAND PHOTO FAT12 File System - this is a Nintendo DSi specific partition for storing photos. AGBSAVE: AGB_FIRM GBA savegame - this contains a temporary copy of the current GBA games savegame. FIRM0: Firmware partition - this is here for development purposes only and should not be changed by users. FIRM1: Firmware partition backup - usually an exact copy of FIRM0. CTRNAND: CTR-NAND FAT16 File System - this contains basically you complete 3DS setup. Titles installed to the NAND reside here, and you can extract basically any file of interest from this partition. Sector0x96: Console-unique encrypted New3DS key-storage - this contains N3DS keys, access to it is required for A9LH installation. NAND header: NCSD header - the header of your NAND, this is is console-unique and contains the offsets/sizes of all partitions. It also contains the encrypted TWL MBR partition table. Partition Inject...(!): This allows you to reencrypt & inject any of the partitions on your NAND from the respective files (TWLN.bin / TWLP.bin / AGBSAVE.bin / FIRM0.bin / FIRM1.bin / CTRNAND.bin / Sector0x96.bin) (see above). Only use this if you know exactly what you're doing and be careful. While there are some safety clamps in place, they won't protect you from a major messup caused by yourself. System File Dump...: This allows you to directly dump & decrypt various files of interest from your SysNAND and EmuNAND. These files are included in this feature: ticket.db: Contains titlekeys for installed titles - use this with Cearps FunkyCIA to download installed (legit, purchased) titles directly to your PCs ard drive. title.db: A database of installed titles - apart from informative purposes this doesn't serve a direct purpose for most users at the moment. import.db: A database of titles to be installed - this can be used to get rid of the FW update nag at a later time. Read more on it in this GBAtemp thread. certs.db: A database of certificates - any practical use for this is unknown at the moment. SecureInfo_A: This contains your region and an ASCII serial number - this can be used to temporarily change your 3DS region. The dump / inject options in Decrypt9 simplify the tutorial found here. LocalFriendCodeSeed_B: This contains your FriendCodeSeed - in theory this can be used to import your friend list to another 3DS. movable.sed: This contains the keyY for decryption of data on the SD card - Decrypt9 itself uses this in the SD Decryptor / Encryptor and in SD padgen. System File Inject...(!): This allows you to directly encrypt & inject various files of interest into the SysNAND and EmuNAND. For more information check out the list above. System Save Dump...: This allows you to directly dump & decrypt various system saves from your SysNAND and EmuNAND. These files are included in this feature: seedsave.bin: Contains the seeds for decryption of 9.6x seed encrypted titles - only the seeds for installed (legit, purchased) titles are included in this. Use SEEDconv (recommended) or the included Python script seeddb_gen.py to extract the seeds from this into the Decrypt9 readable seeddb.bin. nagsave.bin: Contains some data relating to system updates - it is possible to block automatic system updates (ie. the 'update nag') with this file. Research is still in progress. Read this and the posts after it for more information. nnidsave.bin: Contains your NNID data - this can be used to reset / remove the NNID from your system, without removing any other data. See here for instructions. friendsave.bin: Contains your actual friendlist - this can be used to backup and restore your friendlist in conjunction with LocalFriendCodeSeed_B. Also see here. configsave.bin: The config savegame - this contains various things that are set via the config menu. It also contains a flag telling the system that initial setup was already executed. System Save Inject...(!): This allows you to directly encrypt & inject various system saves into the SysNAND and EmuNAND. For more information check out the list above. Miscellaneous..: This section contains various features that don't fit into any of the other categories. Health&Safety Dump: This allows you to to dump the decrypted Health and Safety system app to your SD card. The dumped H&S app can be used to create injectable files for any homebrew software. Health&Safety Inject(!): This is used to inject any app into your Health & Safety system app (as long as it is smaller than the original H&S app). Multiple safety clamps are in place, and this is a pretty safe feature. Users are still adviced to be cautious using this and only use eiter the original hs.app or inject apps created with the Universal Inject Generator. This feature will detect all injectable apps on the SD card and let the user choose which one to inject. GBA VC Save Dump: Only available on SysNAND, use this to dump the GBA VC Savegame from your NAND. Other than the headered AGBSAVE.bin format, this allows usage in emulators. slot0x24keyY.bin is required for this to work. For info on how to use this and the below feature, see here or here. GBA VC Save Inject: Only available on SysNAND, use this to inject back a GBA VC Savegame (f.e. after manual editing) to your NAND. Same as above, slot0x24keyY.bin is required for this to work. Update SeedDB: Use this to create or update the seeddb.bin file on your SD card with the seeds currently installed in your Sys/EmuNAND. Only new seeds will get added to seeddb.bin, seeds already in the database stay untouched. Dump Config (for Citra): Use this to dump the config file, which is required by the Citra emulator for certain games. Also see here. NCCH FIRMs Dump: Use this to dump NATIVE_FIRM, SAFE_MODE_FIRM, TWL_FIRM and AGB_FIRM from your NAND. For N3DS FIRMs, the ARM9 section will be decrypted as well. This feature is at the moment only useful for research. FIRM ARM9 Decryptor: Use this to decrypt the ARM9 section of N3DS FIRMs. This feature is at the moment only useful for research. Content Decryptor Options
This category includes all features that allow the decryption (and encryption) of external and internal content files. Content files are directly processed - the encrypted versions are overwritten with the decrypted ones and vice versa, so keep backups. The standard work folder for content files is /files9/D9Game/, but if that does not exist, content files are processed inside the /files9/ work folder.
NCCH/NCSD File Options: Files with .3DS and .APP extension are typically NCCH / NCSD files. NCCH/NCSD typically contain game or appdata. NCCH/NCSD Decryptor: Use this to fully decrypt all NCCH / NCSD files in the folder. A full decryption of a .3DS file is otherwise also known as cryptofixing. Important Note: Depending on you 3DS console type / FW version and the encryption in your NCCH/NCSD files you may need additional files key files (see 'Support files' above) and / or seeddb.bin. NCCH/NCSD Encryptor: Use this to (re-)encrypt all NCCH / NCSD files in the folder using standard encryption (f.e. after decrypting them). Standard encryption can be processed on any 3DS, starting from the lowest firmware versions. On some hardware, .3DS files might need to be encrypted for compatibility. CIA File Options: CIA files are 'Content Installable Files', this entry contains all related features. CIA Decryptor (shallow): Use this to decrypt, for all CIA files in the folder, the titlekey layer of CIA decryption. The internal NCCH encryption is left untouched. CIA Decryptor (deep): Use this to fully decrypt all CIA files in the folder. This also processes the internal NCCH encryption. Deep decryption of a CIA file is otherwise known as cryptofixing. This also may need additional key files and / or seeddb.bin, see 'Support files' above. CIA Decryptor (CXI only): This is the same as CIA Decryptor (deep), but it does not process the 'deep' NCCH encryption for anything but the first CXI content. On some hardware, fully deep decrypted CIA files might not be installable, but CIA files processed with this feature will work. CIA Encryptor (NCCH): Use this to encrypt the NCCH containers inside of the CIA files in the folder. NCCH encryption is required, for example, for system CIA files to be installable. BOSS File Options: BOSS files are typically received via Spotpass, this entry contains all related features. BOSS Decryptor: Use this to decrypt BOSS files. This feature will decrypt all encrypted BOSS files (with a valid BOSS header) found in the folder. BOSS Encryptor: Use this to encrypt BOSS files. This feature will encrypt all unencrypted BOSS files (with a valid BOSS header) found in the folder. SD File Options: SD files are titles, extdata and databases found inside the /Nintendo 3DS/// folder. This entry contains all related features. SD Decryptor/Encryptor: Use this to decrypt or encrypt 'SD files'. For this feature to work, you need to manually copy the file(s) you want to process. Copy them with their full folder structure (that's everything after /Nintendo 3DS/<id0>/<id1>/) to the work / game folder. This feature should by now only be useful to encrypt content, decryption is much easier handled by the two features below. SD Decryptor (SysNAND dir): An improved version of the feature above. This allows you to select content from /Nintendo 3DS/ (more specifically from the subfolder belonging to SysNAND) to be directly copied to your work / game folder and then decrypted from there. SD Decryptor (EmuNAND dir): This has the same functionality as the feature above, but handles the content of the /Nintendo 3DS/ subfolder belonging to the EmuNAND instead. SD CXI Dumper (SysNAND dir): This feature is similar to the SD Decryptor, but only handles the CXI (CTR eXecutable Image), uses title_id.cxi as file name and fully decrypts the NCCH. This is useful to create images for use in Citra from installed content. This handles content from the /Nintendo 3DS/ subfolder belonging to SysNAND. SD CXI Dumper (EmuNAND dir): This has the same functionality as the feature above, but handles the content of the /Nintendo 3DS/ subfolder belonging to the EmuNAND instead. CIA Builder Options: This subsection contains various features that allow you to build CIAs from files installed to / stored on your SD card. Build CIA from NCCH/NCSD: This was previously called 'NCCH/NCSD to CIA Converter'. It allows you to convert any NCCH/NCSD file (that means .3DS files, too) to an installable (on a signature patched system) CIA file. The CIA file will be written to filename.ext.cia. CIA Builder (SysNAND/orig.): This was previously called 'Content to CIA (SysNAND dir)'. This feature allows you to directly convert content installed to the SD card to a CIA file. It handles content from the /Nintendo 3DS/ subfolder belonging to SysNAND. This variant of the feature tries to build CIAs as genuine as possible, while still wiping identifying information from the file. If you need similar functionality for titles installed to NAND, use ctrnand-title-cia-gen by ihaveamac. CIA Builder (EmuNAND/orig.): This was previously called 'Content to CIA (EmuNAND dir)__' and has the same functionality as the feature above, but handles the content of the /Nintendo 3DS/ subfolder belonging to the EmuNAND instead. CIA Builder (SysNAND/decr.): This feature has the same functionality as the features above. In addition, it fully decrypts the CIA files it generates for better compatibility. Take note that the additional decryption and recalculation of checksums mean longer processing times. This handles content from the /Nintendo 3DS/ subfolder belonging to SysNAND. CIA Builder (EmuNAND/decr.): This has the same functionality as the feature above, but handles the content of the /Nintendo 3DS/ subfolder belonging to the EmuNAND instead. Gamecart Dumper Options
This category includes all features handling dumping of content from external cartridges. Cartridge dumps are also known as .3ds files.
Dump Cart (full): This feature dumps the full, unaltered data from the inserted cartridge. For 4GB cartridges, the last sector is silently discarded, because the FAT32 file system can't handle files equal or above 4GB. This feature also handles NTR/TWL cartridges (aka. NDS and DSi crtridges). Dump Cart (trim): Same as the above feature, but discards the unused padding for smaller output and faster processing. Using this is recommended unless the padding is required for digital preservation purposes. Dump & Decrypt Cart (full): Same as 'Dump Cart (full)', but also decrypts the cartridge data on-the-fly. Decrypted cartridge data is required for emulators and recommended for CIA conversion. The recommended CIA conversion tool is 3dsconv. NTR/TWL cartridges are not encrypted and thus won't be decrypted. Dump & Decrypt Cart (trim): Same as above, but discards the unused padding for smaller output and faster processing. This is recommended over the above feature. Dump Cart to CIA: Use this to directly dump an inserted cartridge to a fully decrypted CIA file, which can be installed to a patched system using CIA installer software like FBI. For most users, this type of dump will be the most convenient. NTR/TWL cartridges can't be dumped to a CIA file. Dump Private Header: Dumps the cartridge unique private header from the inserted cartridge. Flash Savegame to Cart: Flash a savegame file to a retail game cartridge. This currently only works for NTR/TWL carts. The savegame to flash must have a filename of ndscart*.sav. NDS Flashcart Options
This category includes special features for certain NDS type flashcarts (currently only the AK2i).
Auto NTRCARDHAX to AK2i: This performs an automatic NTRCARDHAX injection to the AK2i flashcart.
Dump AK2i: Use this to dump the AK2i flashcart bootrom to the game directory.
Inject AK2i: Use this to inject the AK2i flashcart bootrom from the game directory.
Inject NTRCARDHAX to AK2i: Patch and inject the NTRCARDHAX payload to the AK2i flashcart. AK2i 1.41 version is required. If your AK2i is not on this version, upgrade or downgrade to it.
Restore AK2i bootrom: Restore the AK2i flashcart original bootrom.
Maintenance Options
This category includes special features which allow you to test and manage Decrypt9 internal functionality.
System Info: Displays various information about your 3DS and SD card on screen. Used for informational purposes and to test if information is available. Create Selftest Reference: Run this first on a known working entrypoint to generate the selftest reference data. This will create a file called d9_selftest.ref inside your SD card root or work folder. Run Selftest: Run the actual selftest (must have created the reference data before). This will create or update a file called d9_selftest.lst on your SD card root or work folder. Note: on O3DS failed ncch_sec3_key, ncch_sec4_key and nand_ctrn_key tests are normal and expected. On O3DS <= FW 7.0, ncch_7x_key may fail. On N3DS and O3DS ncch_sec4_key may fail. With all key files (see 'Support files') available, no test should fail. This is used, for example, to assure that everything works as intended on a new entrypoint. Build Key Database: This is used to build the aeskeydb.bin file from all available slot0x??key?.bin files. It will also process files that are not used by Decrypt9. With the aeskeydb.binavailable, Decrypt9 can load keys from it and doesn't need the slot0x??key?.bin files anymore. De/Encrypt Key Database: By default, the aeskeydb.bin created in Decrypt9 is encrypted, and the keys in it are not readable via a Hex Editor. Use this to either decrypt an encrypted database, or to encrypt a decrypted one. Note that Decrypt9 can load keys from both. License
You may use this under the terms of the GNU General Public License GPL v2 or under the terms of any later revisions of the GPL. Refer to the provided LICENSE.txt file for further information.
Credits by Archshift
Roxas75 for the method of ARM9 code injection Cha(N), Kane49, and all other FatFS contributors for FatFS Normmatt for sdmmc.c as well as project infrastructure (Makefile, linker setup, etc) Relys, sbJFn5r for the decryptor Credits by d0k3
Everyone mentioned by Archshift above Archshift for starting this project and being a great project maintainer b1l1s, Normmatt for their 'behind-the-scenes' work and for making arm9loaderhax support possible Gelex for various code improvements and useful advice throughout D9 development ihaveamac for first developing the simple CIA generation method and for being of great help in porting it patois, delebile, SteveIce10 for Brahma and it's updates mid-kid for CakeHax and for hosting freenode #Cakey Shadowtrance, Syphurith, AuroraWright for being of great help developing various features dark_samus3 and Plailect for making CTRNAND transfers a possibility osilloscorpion and idgrepthat for enabling NTR cart dumps profi200 for helpful hints that first made developing some features possible Al3x_10m for helping me with countless hours of testing and useful advice Shadowhand for being awesome and hosting my nightlies SciresM and Reisyukaku for helping me allow devkit compatibility liomajor, Datalogger, zoogie, atkfromabove, mixups, key1340, k8099, Supster131, stbinan, Wolfvak, imanoob, Stary2001, kasai07 and countless others from freenode #Cakey and the GBAtemp forums for testing, feedback and helpful hints Everyone I forgot about - if you think you deserve to be mentioned, just contact me -
DiskWriter
Sky3ds User Instruction
Download DiskWriter tool and template file here. Running DiskWriter,will show a window like bellow ,insert an USB adapter with MicroSD card,click “Go”. Note: Please run the diskWriterV2.02b1 on a Win7/8 PC as an administrator role, and make sure to use a USB adapter (not a SD adapter) with your microSD card. If it’s first time for you to use the MicroSD card, will notify you “The selected drive is not currently formatted for this application”,which means you didn’t format the microSD card for DiskWriter to use,click “OK”。
3.1 DiskWriter functions introduce
*File
Write:write games into microsd card.
Backup Games:Bckup all of the games and savers from microsd
Restore Games:Restore all of games and savers to Microsd card
Backup Save Data:Backup all of savers from Microsd card
Restore Save Data:Restore all of savers to Microsd card
Format:Format microsd card to use on diskwriter
ReFormat:Restore microsd to Windows rewriteable format Optimiser:manage and optimise the microSD space size
*Options
Change Template: change to choose the updated template file (game titles header information)
3.2 When it’s first time to use microsd card, you have to execute Format:format to use on DiskWriter tool
click “Yes”
and also click “Yes”
click “OK” again , then format completed in few seconds
.
3.3 Write:write games into mcirosd card.
If the Windows OS 8.0 or lower versions,you can simply drag favorite 3ds roms into diskwrite to write. Otherwise, you have to choose those“*.3ds”games roms. You will be asked if you need to do copy for them,click “Yes”to start writing.
3.3.1 Drag to write mulit-roms :Press to hold on KEY“CTRL”,choose those roms you want to write, drag them into Diskwriter tool directly.
3.3.2 Choose to wirte multi-roms:Choose option “Write”on diskwriter,press to hold on KEY“CTRL”,choose those roms you want, and start to write.
3.4 You will be asked if you need to copy for them,click “Yes”to start writing.
3.5 Backup Games:Bckup all of games and savers from microsd
It will Bckup all of the games and savers from microsd, save as“*.bkg”file to PC. Recommend to do backup when you changed games, because different capacity of each game, when changing the game, it will cause a waste of memory space, with backup and restore will help you the memory space to be reorganized and optimized.
3.6 Restore Games:restore all games and savers to microSD card.
Select the backup file ( extension with “.bkg”), click “Open”, it will automatically execute the file back to the microSD card
3.7 Backup Save Data: backup all savers from microSD
backup all the games save data, save as“.bks” file, with small size, so periodic backups is recommended.
3.8 Restore Save Data:restore all savers to microSD card.
Select the backup file( extension with “.bks”), click “Open”, and it will automatically execute the file to restore back to the microSD card.
3.9 Format:Format mircosd card to be used for DiskWriter burning
Operating instructions like Step 4.1 for the first time, formatted as DiskWriter programming format.
3.10 ReFormat:Revert to the Windows erasable format
To enable microSD card open to use on your PC, select “ReFormat”, click the“Yes” button, then do the PC Format(format microsd card on PC directly). When you need wirte game again for Sky3DS to use, you must execute another format as DiskWriter programming format.
3.11 Optimiser:manage and optimise the microSD space size.
It will Bckup all of the games and savers from microSD, save as“*.bkg”file to PC. Recommend to do backup when you changed games, because different capacity of each game, when changing the game, it will cause a waste of memory space, with backup and restore will help you the memory space to be reorganized and optimized.
3.12 Options
Change Template:to change template file(game title header info)
Choose “Options”-> “ Change Template”
choose the newest template file,and click open to start.
3.13 Verify
When burning game after you check “Verify”, the diskwrite will check if the contents of memory is correct, in case of disk bad sectors , skip it when re-writing , so burning time will be longer.
backup/restore instruction for single game
Backup Save:backup as “.sav”file with single game save data
Restrore Save:restore single game save data with “.sav”file
Backup Game:backup as “.3ds”with single game and save data
Delete Game:delete single 3ds game
3.14 Backup Save
Use mouse to focus on single game title, right-mouse to choose “Backup Save”to save as “.sav”file( Or drag directly to PC desktop to save).
3.15 Restrore Save
3.15.1 Use mouse to focus on single game title, right-mouse to choose “Restore Save”to restore game save data with one of your “.sav”file, click ”Open”to start.
3.15.2
You can drag one more “.sav”files one time into DiskWriter directly.
3.16 Backup Game
Use mouse to focus on single game title, right-mouse to choose “Backup Game”to save as “.3ds” file with the game and the save data, click ”Yes”to start.
3.17 Delete Game
Use mouse to focus on single game title, right-mouse to choose “Delete Game”.
You will be asked if you are sure that you wish to delete the game, click “Yes”to confirm.
3.18
Diskwriter 2.02b1 added two sections in main menu, the available games listed in the top section(section#1),and the bottom section(section#2) is for saving(all save data of the games listed in this section will be saved here). Break over 31 games in one microsd card.
Section#1 can list 31 games , and section#2 64 games, 95 in total.
Simply, you can list the games you want to play in section#1, otherwise list them to section#2, never worry about losing game save data.
Note: You have to convert your old saved data on microSD card(DW1.06)
if any to the new DW2.02 format by the pop up window "Save backup file".
After the convert process completed, there will be message window like below , and then please follow as the instructions did to avoid damage or lost upon game save data:
3.18.1 Down to Reserve
Move game(s) to section#2 by selecting the game(s) to right-click with option "Down to Reserve" in section#1;
3.18.2 Up to Positive
Move game(s) to section#1 by selecting the game(s) to right-click with option "Up to Positive" in section#2.
SKY3DS card user instruction
1. Switch to next GAME:
Press red / blue button , sky3ds will save EEPROM to microSD card, it will skip to next game, at the same time,will read this game save data with EEPROM to microSD card, then you can start to play.
2. Restore single game save data from PC:
With your sky3ds on 3DS, switch to other game(not the game you need to restore save data), and poll out the microSD card , insert with adapter to connect with PC.
Open Diskwrite tool to do single game “Restore Save”option from one of your“.sav”files, insert Sky3ds with microSD card into 3DS Slot, press red/blue button and cycle to the game(you need to restore save data one) and enjoy.
Note:If you forgot switch to other game , please follow step 4.
3. Restore all games save data:
Open Diskwriter tool to do “File”->“Restore Save data”, save file to PC , insert Sky3ds with microSD card into 3DS Slot.
Then follow the step 4 did.
4. Initial SKY3DS:
Power on your 3ds console , hold to press red/blue button with finger, insert to 3DS Slot with your sky3ds , it will not display any game icon on screen.
Poll out sky3ds and insert to 3DS again , the LED light will flashing fast, the game icon still doesn’t display.
Again, poll out sky3ds and insert to 3DS, LED light flashing and turn off in few seconds, this means the first game save data has been read EEPROM normally from MicroSD card, you can play to enjoy it.
5. Before you change to new MicroSD Card or delete game save data:
If you currently have game save data saved in SKY3DS, and you want to be change to another new MicroSD Card, you should press the red / blue button to switch to next game, the game save data will be saved from the EEPROM memory to the SD Card.
-
DS GameMan
DS GameMan is an easy to use open-source game manager.
Tips:
Press "Insert" to open the console.
Caution!:
This program is NOT supporting piracy. Only use this program with homebrew/the games you legally dumped and own!!! by LeonPro12.
-
DS-Scene Room Tool
If you don't know what this is then you've been missing out on a really useful tool.
It includes an AP Patch Database which will is regularly updated by RetroGameFan and you can even view information for valid roms that are found right here on ds-scene.net.
The latest addition to the DS-Scene Rom Tool is a partnership with the CMP team. The application will now check for regular updates of the CMP Cheat Database (the largest and most complete DS cheat database on the web) all totally free of charge of course!
The tool has had some extensive reworking since the last build any many bugs have been ironed out. If you are using an old version of the tool then we highly recommend you update to this version. There's really too many changes been made since the last re-dist pack to list here so please check the changelog provided within the application or the comments section below for more information.
Some of the menus have changed slightly in this version as they were getting a bit messy, please take your time to familiarise yourself with the new options.
Included is RetroGameFan's latest AP Database v2.1.7.
NOTE : Open the tool and click on Databases/AP Database/Update Alerts/ and make sure that Enable Update Alerts is not ticked, so you don't get nagged anymore
Requirements :
Windows with Net Framework 4 ~50mb RAM Functions :
Basic DS rom header information Extract rom icon (png) Trim rom AP patch roms using an auto updating database Check for updates of the CMP Cheat Database Auto updates for the application itself Uses open patch format patches that can be extracted Download information from DS-Scene.net Supports AP Patching of 1032 games currently.
-
DSBF Dumper
DLDI enabled tool that will dump your DS firmware, Arm7 and Arm9 bios to your device. For more info on what DLDI is, see here.
Currently only tested on a NA DSLite using EZ4LD GBA slot card and EZ5 DS slot card.
Based on: CaitSith’s arm7 asm code posted at GBATemp and a firmware dumper source that I no longer remember exactly where I found it.
by Cory1492.
-
dsbuff
Introduction:
dsbuff is a Windows .NET application which allows you to perform basic operations on *.nds files. It removes the need to use batch files or command line arguments just to perform a simple task.
How to Use dsbuff:
On the top of the form, you see a large browse button. Use this to find your *.nds file. Once you have done that, then there are several things you can consider doing. I think this would be a good place to list the features:
*Trim
*DLDI
*Unpack
*Pack
*Arm7
*Drive
*CrashMe Scan
*Edit the Header
Each of these features does a different operation. They will be explained further down. For now, an example scenario could be:
You want to shrink the *.nds file, so you use the Trim function. The header has some random advertising text in it, so you remove it and press the Edit Header button. Then you hit the Drive button to send the *.nds file straight to your flashcard.
That is just an example of what you can do with this program, and how you can use it.
Feature Description:
Trim: Use this to remove excess empty data from *.nds files. This empty data is not needed for use, only for allowing the file to fit on an official cartridge.
DLDI: Patches homebrew *.nds files so that they can use your flashcards filesystem. Sometimes this is mandatory for homebrew to function. For instance, PocketPhysics requires patching to use it's Open/Save functions. Many newer flashcards do this for you automatically.
Unpack: Extracts the contents of an *.nds file. Unlike *.gba files, *.nds files have a file structure which can be extracted and modified. This allows for easy editing of a game. You can select to have every file unpacked, or only a few sections.
Pack: This compiles the unpacked *.nds structure back into a single file. This new file would be identical to the original if you didn't make any changes to the previously unpacked files.
Arm7: Replaces the arm7.bin in the *.nds file structure with a different one. This feature may be slightly outdated/useless now, but I don't have any other features to add it its place. Primarily used by those who need the Arm7 fix in order to run the game on their flashcart.
Drive: Copies the *.nds file to your specified location, whether it be your flashcard or a hard drive. **Be sure to set this option in the Options menu** It will be sent to C:\ by default!
Edit the Header: This modifies the internal header in the *.nds file, which is basically a description and an icon. This is different from the other features, in that it is situated in the middle of the form, instead of just being a button. You can change the (ordered from top-left to bottom-right) Game Title, Game Code, Game Description, and Game Icon. The only confusing part might be the icon controls. The big picturebox shows the icon, and you can either double click that or click the folder button beside to to browse for a different icon. The little save button saves the icon to your computer. The small arrow sets the picturebox back to the icon in the file, incase you browsed for the wrong one and wanted to leave the current one in the *.nds file. The checkbox is checked if the file is homebrew/has an invalid header. You shouldn't have to worry about it(set automatically). To save the changes, press the Save Header button, which appears after you make any changes.
Icon Database: This is the button below the homebrew checkbox near the header controls. It allows you to search for a game icon by release number. I really need a different database to search from, since the icons will probably not work, they are poor quality and do not meet the icon pallete color requirements. So if you receive an error when trying to save the header with a downloaded icon, it is just the incorrect formatting of the icon.
Notes:
*dsbuff is in no way affiliated with dslazy. They are seperate programs all together, and I have never been involved with the development of dslazy.
*You MUST have the dsbuff.exe.config file in the same directory as the exe! This holds all your settings, and without it you will receive errors a lot!
*If anyone was still wondering, you need the .NET Framework 2.0 or greater to use this!
Credits and Thanks:
DarkFader - author of NDSTool
http://darkfader.net/
Chishm - author of DLDITool
http://chishm.drunkencoders.com/
Kyuzumaki - author of RomeR
http://nswgaming.com/kyuzumaki
Mark James - Silk icon set 1.3
http://www.famfamfam.com/lab/icons/silk/
TPDK Casimir - NDS Application Icon
http://tpdkcasimir.deviantart.com/
And I suppose I wrote the entire interface, so if you need to contact me, you could try
http://wb3000.co.nr
http://wb3000.nintendo-scene.com/
I will always be checking the http://nintendo-scene.com forums, so if you need help beyond the (to-be-completed) help documents, then feel free to post there!
Hope you find this useful!
WB3000
-
DSHobro (DS Homebrew Browser)
DSHobro is a homebrew that lets you surf the web on your DS. It is based on a PC application that parses web pages, and sends the result to the DS. Version 0.1 alpha was released long ago, in april 07, but was just a tiny demo of the possibilities offered by the PC/DS mechanism. DSHobro 0.4 now takes full advantage of this mechanism and allows you to really surf the web, actually read text and view images (text is clear enough to be read) and so on.
Some of the usual navigation possibilities are available such as the "back"/"forward"/"refresh"(...) buttons. Also, the server application supports multiple simultaneous connections, allowing for several people to use DSHobro at the same time, with only one instance of the program.
You may also use DSHobro from a remote location: if you run the server on your own PC, you can surf the web with your DS from any wifi access point.
There is no configuration required. Just start the app, click a button, start DSHobro on your DS and you're set! The automatic configuration tool will take care of everything.
The changes in DSHobro 0.4 are:
* Multi-line text support. To insert a line break, just type /n in DSHobro.
* Upgraded DSWifi library to the latest version: connecting to Wifi AP now works a lot better. Transfer rates apparently haven't improved though.
* Manual configuration is now possible. You may enter your IP & port manually -- for those who had problems with the automatic configuration.
* Improved graphics slightly and corrected a few bugs.
Usage:
Step 1: run the "Server.exe" application on your PC. Tweak the settings if you need to, and click the "Start!" button.
Step 2: run "DSHobro04.nds" on your DS. Press A if your DS and your PC are on the same network (at home, for example), or press B if you are using your DS from a remote access point. In this last case, you will need to check the "Enable remote access" option during step 1, and enter the key that is given to you. Press X if you prefer to configure your network settings manually.
Step 3: surf!
Note: DSHobro does NOT require DLDI patching.
Controls:
DSHobro was developped for both right-handed and left-handed persons. You may then use your DS with the hand of your choice.
* Bottom screen: preview ("miniature" version of the web page).
* Top screen: a portion of the web page, with 1:1 scale (zoom 100%).
* D-Pad, or A/B/X/Y for left-handed: horizontal and vertical scroll on the page.
* L/R: swap screens
* Select: display interface
* Start: refresh display
* Stylus: when the bottom screen shows the miniature version of the page, clicking with the stylus focuses the top screen on the zone that you clicked.
When the screens are swapped, a click with the stylus means a real click on the page (ie. clicking on a link, on a button...)
Interface:
These features are similar to a regular web browser:
Back: go back (display previous page)
Forward: go forward (display next page)
Refresh: refreshes page
Text: opens the text bar and lets you write text with the virtual keyboard. If you enter :erase and send it to your PC, the text field you are currently writing text to will be cleared.
Home: goes to homepage, aka. www.google.com
Also, if you press Start, the PC won't actually redownload the web page, but only send the current page again to the DS. It may prove useful when you click somewhere on the page and it doesn't load a new page (ie. opening a frame, a menu, ajax...)
/!\ WHAT YOU CAN *NOT* DO WITH DSHOBRO 0.4 /!\
DSHobro 0.4 is better than 0.3, but there are still a lot of things that it can't do.
These things are (among others):
- Manage bookmarks - Save settings to the cart - many other things... All of the above features are not available in v0.4
But it doesn't mean I won't be able to implement them in later versions!
Credit:
Costello developped both the NDS & the PC applications. Huge thanks to my friend Mollusk for the help with the DS part. -
DSTT Official Firmware
This is the new official version by Top Toy DS team for DSTT flashcard.
-
DSVideo
Aplicación creada por Dominic Ludlam que permite reproducir video en la Nintendo DS.
How to watch videos
===================
First you will need to DLDI patch the DSVideo.nds file. DSVideo doesn't contain any drivers by default, so you'll have to patch it even if you have a homebrew device that doesn't usually need patching, like the supercard.
When run, DSVideo presents a filesystem browser to find video files made with the encoder (described below) which must have a filename ending with ".dsv". By default, the player will start in a directory called "videos" if it exists, or the top level otherwise. You can play a video file either by touching it on the screen or by using the up and down keys to highlight it then pressing the A button to start it playing.
While watching, you can use the touchscreen controls to rewind, fast forward, pause, seek, return to the video selection screen and to change the screen brightness. In addition to the touch screen, fast- forward and rewind can be used with the left and right keypad keys and shoulder buttons. The A button will toggle between pause and play, X will change the brightness and select will go back to the select screen.
NOTE FOR THE R4: There is a special version of DSVideo for the R4, which has been patched with a slightly modifier version of the R4 dldi driver (source is also included here). If you have an R4, you'll need to use the r4tf7.dldi patch and stop the R4 from autopatching it when it boots. This can be done with the 'dldinoap' tool (source is in the thirdparty directory).
How to encode videos
====================
The encoder is a command line utility. The basic usage is very simple - the command:
dsvideo input_video.avi
will convert the file 'input_video.avi' into a file called 'input_video.dsv' which can then by copied onto your homebrew flashcard.
By default, 16:9 (or other widescreen sizes) will be encoded as centre- cut-out, meaning the height will fit the DS screen and the sides will
be removed. The original video size can be kept by passing the "-l" option to the encoder, for example:
dsvideo -l input_video.avi
There are some other options to control the encoder which are explained (briefly) by running the encoder with no arguments.
Credits
=======
DSVideo was developed by Dominic Ludlam, with artwork and design by Denise Wilton, and additional artwork and the website by Nick Ludlam. Nick also made the spiffy intro video. Many thanks to Lee Maguire for testing and feedback.
The sound track for the intro video is by James Tubbritt (Sharp), downloadable from http://fxhome.com/sounds/
The following additional software is used:
devkitPro. Used to build the decoder. FFMpeg. Used by the encoder to provide input video and audio data. TwoLAME. Used by the encoder for audio encoding. LibFB. Used by the decoder to access the flash card on the DS. Freetype2. Used during the build process to convert a freetype font to a bitmap font usable on the DS. * Libungif. Used during the build process to convert images into a format usable on the DS. Yasm. Used while building the encoder. -
eNDryptS Advanced
eNDryptS is strictly a non-profit project. It's main purpose is being a reference for the research of the secure area in Nintendo DS carts. This is done both for research and in order to preserve the infos of the games as close to the original as possible. This is our only focus.
It is not our intention to infringe on any copyrights or patents of the original games and hardwares. No portions of the original game code are included in the executable.
---------
I. Costs
---------
eNDryptS is free. Selling is strictly prohibited.
---------------
II. ROMS Files
---------------
ROMS are copyrighted material and in most cases their usage is illegal.
They cannot be distributed without the explicit permission of the copyright owner. PLEASE DON'T DUMP AND DON'T DOWNLOAD THEM!
eNDryptS is not intended to be used as a tool for mass copyright infringement.
Therefore, please follow the author's wishes and do NOT sell, advertise, or link to resources that provide illegal copies of ROMs.
by SolidSnake and Friends.
-
EZ Flash IV
This is the latest firmware for the EZ Flash IV GBA cart, 1.720 RESET.
It is a custom skin made by Dr. Meat from the Starmen.net forums from 2 years ago in honor of the MOTHER 3 fan translation. It is designed to look like the MOTHER 3 menu and is a must have for MOTHER fans with this card.
He uploaded it with the 1.720 Firmware, this is a custom compiled version by me that has his skin with the LATEST firmware. This has numerous bugfixes including the one for Yoshi's Island.
Thanks EZF Team! And thanks Dr Meat for the skin!
-
EZ3 Manager
EZ3 (note not the 3 in 1 expansion pack for the DS) management program.
-
EZ4 Firmware
For the 2.0 kernels we implement the on-cart patch engine, it means the desktop version of EZ4Client was no longer needed. just copy the clean rom to the sd card and run it directly. the kernel will patch rom automatically.
2.02 brings soft reset and sleep (called global soft reset and sleep aka GSS) back.
EZ4Client is no longer needed after EZ4 Kernel 2.00
UPDATE FIRMWARE
Download the newest firmware and extract it to the root folder of SD card. Power up GBA/NDS with R key pressed, the card will go to the firmware upgrade procedure automatically. The new kernel will boot after the upgrade finished, please check the version on the top right corner of the desktop. You can delete the ezfla_up.bin safely. SETUP
Choose the third icon on the desktop. the first option is language setting. you can select between Chinese and English. The second option is deprecated.
LAUNCH GAME
Choose the first icon on the desktop, go to the EZDISK folder, the gamesgame on the SD card will be listed there. there are TWO mode for different game and circumstances.
PSRAM MODE
This mode is working with game size <= 16Mb, though it loads fast but it needs loading time every time.
In the game browser, just press A key will launch the game in PSRAM MODE.
NORFLASH MODE
This mode is working with all sizes of game, it needs longer time to write the game to the NORFLASH, but it launches game like a flash every time. You can write multiple games in the NORFLASH with total size no more than 32Mb. For example: 4 x 8Mbit, 2 x 16Mbits, 1 x 16Mbit + 2 x 8Mbit.... PLEASE DO NOT USE TRIMMED GAME IN NORFLASH MODE!!
In the game browser, press SELECT key will popup a windows to let you confirm the NORFLASH MODE, A to YES, B to NO. The game wrote to the NORFLASH will be listed beside EZDISK folder. press A to launch it.
SAVE BACKUP
EZ-FLASH IV uses a SRAM chip to keep the game save data, the kernel will backup the save data every time when the kernel boot up, the backup procedure can be skiped by press L key when kernel booting up. The game saves are stored in a folder named SAVE on the SD card. Backup the folder to computer frequently is strongly recommended.
-
EZ5 Kernel (EZ-Flash V)
These files are the loaders for the EZ5.
There are five main lines presently in existence:
The 3.0 The 2.0 line The 1.9 line The 1.86 line The older lines. EZ5i users can only use open beta 1 and beyond of the 3.0 line if they have updated to v101 firmware. Otherwise EZ5i users can only use beta 6 of 1.90 and all the 2.0 line.
EZ5 plus users can only use 1.86c and beyond.
EZ5 original and NYE users can use just about anything they can find.
The 3.0 line was initially aimed at the EZ5i but is based on the 2.0 line.
The 2.0 loaders are a total rewrite of the loader bringing loader speed increases.
They now feature all the features that were initially lost in the transition and they are probably better than those they replaced.
The 1.9 line is a beta line but featured some new and interesting tweaks to things. As of this moment 2.0 does everything better than 1.9 but prior to that
1.86c has some features but not as fully developed as the 2.0 line, it does however have the most stable support for the EZ 3 in 1 GBA slot device. While it is considered the stable version of the three it no longer gets backports of fixes.
The most notable use for the even older lines is that they still use a savelist; this is a list of games and their save types that the EZ5 then emulates. This means roms with anti piracy or otherwise in need of a patch can often work with these versions.
They will feature rudimentary cheats and soft reset only.
-
EZClient
Those not wanting to use the installer 7zip (and maybe other good archiving programs) should be able to extract it by treating it as a normal archive (right click and force an extraction).
Note you can improve compatibility by for NDS roms running a rom through EZ4Client beforehand
Information:
NDS Compatibility updated to the latest games. Bottom screen is turned off when playing GBA games in DS mode. Updated Goldfinger data to the latest GBA games. -
fastboot3DS
A bootloader for the 3DS console, written by derrek, profi200, d0k3.
fastboot3DS is a bootloader for the 3DS console, intended to be installed to the FIRM0 partition. It allows you to assign homebrew in .firm format to bootslots, and to chainload bootslots via either a bootmenu or a button combo of your choosing. fastboot3DS also contains basic tools for NAND backups and restores.
Disclaimer
fastboot3DS installs to a critical partition of your system, and thus becomes one of the softwares critical to the functioning of your system. Although having been thoroughly tested, some risk may still remain, especially when fastboot3DS is not used in the way it is intended. In short: we are not responsible for any damage that may occur to your system as a direct or indirect result of you using fastboot3DS.
Quick start guide
These short instructions require you to have a way of booting OpenFirmInstaller. If you already have boot9strap installed, this is as simple as chainloading the OpenFirmInstaller.firm (either via some chainloader of your choosing, or put it on your SD card as sdmc:/boot.firm).
Have fastboot3DS.firm inside the sdmc:/ofifolder on your SD card. When installing from A9LH, secret_sector.bin is also required. Boot OpenFirmInstaller and follow the on screen instructions. You will reboot to the fastboot3DS menu. [optional] Enter Boot setup... -> Setup [slot 1]... -> Select [slot 1] firm and select the FIRM file of your main CFW. On typical systems that is smdc:/boot.firm, but anything goes.[optional] Enter Boot setup... -> Change boot mode... -> Set quiet boot. Your system is now set to autoboot and will silently boot the CFW you selected above. You may also want to set up the other boot slots and assign key combos to them. Keep in mind you need one autoboot slot (= a slot with no key combo assigned). If you want to access the fastboot3DS menu at a later point in time, hold the HOME button when powering on the console. From the fastboot3DS menu, you may continue the boot process via Continue boot, chainload a .firm file via Boot from file..., access the boot menu via Boot menu... or power off the console via the POWER button.
-
FBI (3DS File Manager)
FBI is an open source title manager for the 3DS.
Requires devkitARM, along with 3ds-zlib and 3ds-jansson from the devkitPro pacman repository, to build.
Credit
Banner: Originally created by OctopusRift, touched up by Apache Thunder, updated for new logo by PabloMK7.
Logo: PabloMK7
SPI Protocol Information: TuxSH (TWLSaveTool)
-
FlashMe
Flashme is a hacked firmware replacement for both the DS and DS Lite. It looks and acts exactly the same as the original DS firmware except for the fact you will not need a Passme or Passcard to boot DS roms anymore.
The standard version of Flashme removes the DS intro screen (including the Warning screen) when booting up. If you wish to keep this boot up screen please use Flashme_Stealth, which leaves it intact.
What you will need
A DS/DS Lite AC Adapter A Passme2 + Compatible game/Passcard device A GBA flashcart An insulated conductive tool to bridge the SL1 connection A small Phillips head screwdriver Are there any risks involved?
Yes, but the only risk is if your DS turns off while you are installing Flashme. This could result in a brick (non-functioning unit). If you take precautions to prevent your DS from losing power there is nothing to worry about.
The only other thing to note is that you void your Warranty by installing Flashme.
Installation Instructions (on a DS Lite)
1. Make sure you have everything you need and have your DS charged on a full battery. It is also recommended to plug in the AC adapter as a precaution.
2. Copy Flashme or Flashme_Stealth to your flashcart
3. Unscrew the battery cover. Make sure you hold the battery into place to prevent it falling out.
4. Using your Passme2 or Passcard device boot up the flashme installation file (Settings may depend on your passme or flashcart device, if you are inexperienced a Passcard device may be preferable as it requires no setting up). On an EZ-Flash 4 I believe you can get it to work by changing the extension of flashme from .nds to .bin. So try that if you are having troubles.
5. If you receive a warning screen telling you your Firmware is not recognized do not panic. This is normal for later DS Lites. However be aware that if you install flashme on an unrecognized firmware you may run into complications if you uninstall flashme at a later date. Uninstalling flashme is not recommended or necessary at any stage. Later versions of Flashme can be installed on top of your current version of Flashme, you do not need to uninstall it first before installing any possible later version.
6. If you received the warning screen wait 5 seconds and it will tell you to press START to continue anyway.
7. The next screen will advise you that losing power during the installation can harm your DS. Press the button combination X, B, X, B to continue.
8. The installation will now begin. At the bottom of the screen 0% will be shown. You now have to bridge the SL1 connection to make the percentage rise. The SL1 hole is the hole on the left underneath the battery cover. You will need a metal conductive tool that will fit inside the hole. Please remember to insulate the entire tool except for the very tip with something non-conductive. I insulated my nail head with scotch tape. People have reported that a toothpick covered in foil and then insulated with tape works well for bridging the SL1.
9. The hole next to the SL1 is known as the VR. If your flashing tool makes contact with both the SL1 and VR your DS will turn off so be careful when bridging the SL1. Also on the left hand side of the SL1 hole on the DS Lite only is a thin piece of metal not seen unless you open the DS Lite. This piece of metal connects back to the VR so if your flashing tool makes contact with this tiny piece of metal and the SL1 the DS will also turn off. That is why the flashing tool MUST be insulated.
10. If the SL1 is bridged you should see the installation percentage increasing. Installation will only take about 20 seconds. If the percentage is not moving you have not bridge the connection correctly. Wiggle your tool around slowly and carefully until the percentage starts going up. If you lose the connection at a certain percentage of the installation don’t worry, just make the connection again and the installation will continue automatically.
11. Once the percentage reaches 100% you can safely turn off your DS. Do NOT turn your DS off before it reaches 100%.
12. Enjoy your new homebrew enabled DS! You will now never have to worry about a passme or passcard device again! You may now commence celebrating.
Quick Installation Overview
1. Unscrew the battery cover on your fully charged DS/Lite and plug in the AC Adapter. 2. Boot up the flashme install file with your Passme2/Passcard and flashcart. 3. Press the button combination to begin the installation. 4. Bridge the SL1 connection. 5. Wait until the installation reaches 100% before turning off your DS. Things to Remember
Have your DS fully charged before beginning. Insulate your flashing tool with something non-conductive. Remember to hold your DS battery in place during the installation to avoid it falling out. If the installation has begun do not turn off your DS until it reaches 100% Although on paper the installation may sound a bit daunting don’t be put off! Flashme is a wonderful addition to any DS. Not having to worry about a passme device again is something worth 10 minutes of your time to install. I’ve flashed both my original DS and my DS Lite without any problems what so ever, so have countless other members of GBAtemp.net. Enjoy and flash responsibly!
Tips for using your newly flashed DS
When a flashcart is inserted into the DS's GBA slot flashme will detect it and automatically boot to the flashcart menu not the original DS menu. If you don't want to boot to the flashcart when you turn it on hold in SELECT as soon as you power on your DS, It will then go straight to the normal DS menu. Alternatively if you don't have a flashcart inserted your DS will boot up exactly like normal. You can also hold in A+B+START+SELECT to force flashme to boot if you feel the need. Nearly all flashcarts don't need this anymore though. -
Frogtool
Frogminer is a free CFW (Custom Firmware) installation method for the Nintendo 3DS family of systems.
-
FTPD for Nintendo 3DS
FTP Server for Nintendo 3DS (here the Switch version).
Features
Appears to work well with a variety of clients. Supports multiple simultaneous clients. The 3DS itself only appears to support enough sockets to perform 4-5 simultaneous data transfers, so it will help if you limit your FTP client to this many parallel requests. Cutting-edge graphics. Supported Commands
ABOR ALLO (no-op) APPE CDUP CWD DELE FEAT HELP LIST MDTM MKD MLSD MLST MODE (no-op) NLST NOOP OPTS PASS (no-op) PASV PORT PWD QUIT REST RETR RMD RNFR RNTO SIZE STAT STOR STRU (no-op) SYST TYPE (no-op) USER (no-op) XCUP XCWD XMKD XPWD XRMD Planned Commands
STOU by mtheall.
-
G6-Flash Kernel
New method:
Steps:
Put both "g6vervify.sys" and "g6loader.sys" files into the root directory of the G6 U-Disk drive. Entering into GBA mode. (read "note" for details.) Select the "G6update" icon and press the "A" to run the update program. Old method:
Steps:
GBA console:
Put both "g6vervify.sys" and "g6loader.sys" files into the root directory of the G6 U-Disk drive. Press A+B+sel+start simultaneously when the "green text" screen come out. Click "yes" to confirm the update when the configuration screen come out. NDS console:
Put both "g6vervify.sys" and "g6loader.sys" files into the root directory of the G6U-Disk drive. Entering into GBA mode. (read "note" for details.) Press A+B+sel+start simultaneously when the "green text" screen come out. Click "yes" to confirm the update when the configuration screen come out. (PASSCARD, PASSKEY, PASSME, FLASHME may be necessary for properly booting flashcard.)
Note:
To Check the G6 loader version by clicking the "G6 manager" tag from the G6 nds main menu. The version information contains inside the "about" document. If errors occur during the update process, please use the G6 maintainence tools "MPutility" to format the G6 u-disk and format G6 with "FAT(16)" under window system. Then carrying out the update procedures again. There are 3 following methods below to get into GBA mode. For all users: Booting up the NDS, press "Y" at the G6 main menu to make console entering into GBA mode. For Flashme users: Press the "select" button while booting up the console to allow users entering into the NDS main menu. Users may chick the GBA icon from the menu to enter into GBA mode. For Passcard users: Un-plug the PASSCARD may also allow users entering into the NDS main menu. Users may chick the GBA icon from the menu to enter into GBA mode.
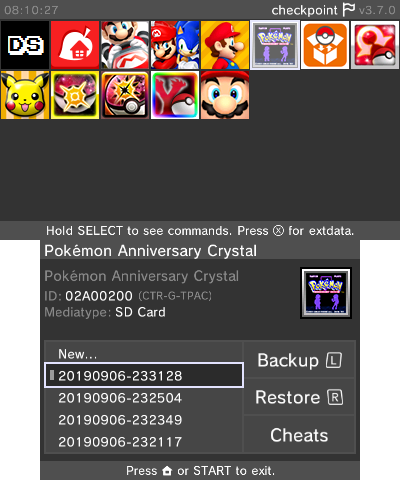

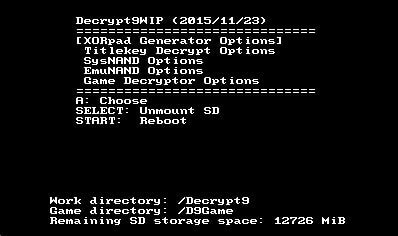
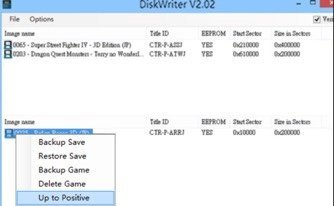


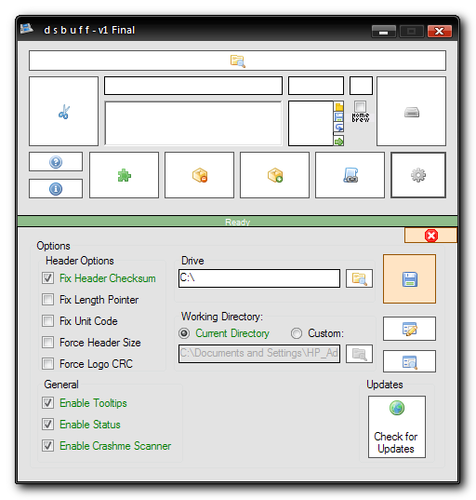


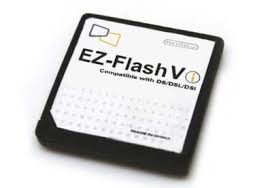

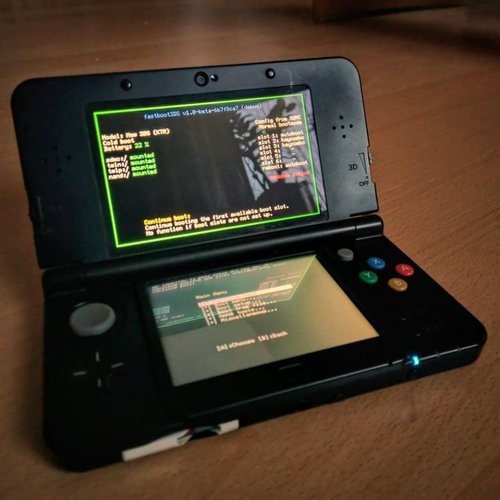


-
Recientemente actualizado
-
Novedades populares