Windows, macOS y Linux
101 archivos
-

Cemu
Cemu es un emulador de Nintendo Wii U para Windows, macOS y Linux, capaz de ejecutar la amyoría de los juegos de la consola y homebrew.
Está escrito en C/C++ y se está desarrollando activamente con nuevas características y correcciones.
Requisitos del sistema
Windows 7 (x64) o superior OpenGL 4.1 minimo (4.6 recomendable) RAM: 4 GB minimo, 8 GB o más recomendable Microsoft Visual C++ 2017 X64 Redistributable: vc_redist.x64.exe Compatibilidad con tarjetas gráficas
NVIDIA GPU: Funciona bien con los drivers más recientes. AMD GPU: Funciona bien con los drivers más recientes Intel GPU: Sin soporte oficial. Errores visuales bastante llamativos. Aplicación creada por el Team Cemu.
-
BetterJoy
Allows the Nintendo Switch Pro Controller, Joycons, and Switch SNES controller to be used with Cemu using Cemuhook, Citra, Dolphin, and system-wide with generic XInput support.
It also allows using the gyro to control your mouse and remap the special buttons (SL, SR, Capture) to key bindings of your choice.
How to use
Install drivers Read the READMEs (they're there for a reason!) Run Drivers/ViGEmBus_Setup_1.16.116.exe Run BetterJoyForCemu.exe Connect your controllers. Start Cemu and ensure CemuHook has the controller selected. If using Joycons, CemuHook will detect two controllers - each will give all buttons, but choosing one over the other just chooses preference for which hand to use for gyro controls. Go into Input Settings, choose XInput as a source and assign buttons normally. If you don't want to do this for some reason, just have one input profile set up with Wii U Gamepad as the controller and enable "Also use for buttons/axes" under GamePad motion source. This is no longer required as of version 3 Turn rumble up to 70-80% if you want rumble. As of version 3, you can use the pro controller and Joycons as normal xbox controllers on your PC - try it with Steam!
Connecting and Disconnecting the Controller
Bluetooth Mode
Hold down the small button (sync) on the top of the controller for 5 seconds - this puts the controller into broadcasting mode. Search for it in your bluetooth settings and pair normally. To disconnect the controller - hold the home button (or capture button) down for 2 seconds (or press the sync button). To reconnect - press any button on your controller. USB Mode
Plug the controller into your computer. Disconnecting [Windows 10]
Go into "Bluetooth and other devices settings" Under the first category "Mouse, keyboard, & pen", there should be the pro controller. Click on it and a "Remove" button will be revealed. Press the "Remove" button Acknowledgements
A massive thanks goes out to rajkosto for putting up with 17 emails and replying very quickly to my silly queries. The UDP server is also mostly taken from his ScpToolkit repo.
Also I am very grateful to mfosse for pointing me in the right direction and to Looking-Glass without whom I would not be able to figure anything out. (being honest here - the joycon code is his)
Many thanks to nefarius for his ViGEm project! Apologies and appreciation go out to epigramx, creator of WiimoteHook, for giving me the driver idea and for letting me keep using his installation batch script even though I took it without permission. Thanks go out to MTCKC for inspiration and batch files.
A last thanks goes out to dekuNukem for his documentation, especially on the SPI calibration data and the IMU sensor notes!
Icons (modified): "Switch Pro Controller", " Switch Detachable Controller Left", "Switch Detachable Controller Right" icons by Chad Remsing from the Noun Project. Super Nintendo Controller icon by Mark Davis from the the Noun Project; icon modified by Amy Alexander.
by Davidobot.
-
DS4Windows
DS4Windows es una aplicación que nos permite obtejer la mejor experiencia posible con el DualShock 4 en PC gracias a que emula como si fuese un controlador de Xbox 360, haciendo los juegos mucho más accesibles.
Este proyecto es un fork del trabajo de Jays2Kings.
Requisitos de DS4Windows
Windows 7 SP1 o superior Microsoft .NET 4.6.2 or superior (necesariio para descomprimir el driver para que los macros funcionen debidamente) Visual C++ 2015-2019 Redistributable. x64 o x86 ViGEmBus driver (DS4Windows lo instalará por ti) Microsoft 360 Driver Sony DualShock 4 Método de conexión: Cable Micro USB Adaptador inalámbrico de Sony Bluetooth 4.0 (via adaptador o incluído con el PC). Solo tiene soporte para Microsoft BT. CSR BT stack is confirmed to not work with the DS4 even though some CSR adapters work fine using Microsoft BT stack. Toshiba's adapters currently do not work. Desactivar soporte de configuración y Xbox en las opciones de Steam. Guía del usuario
Después de completar la configuración inicial de los controladores y dependencias necesarias, se le presenta la pestaña principal de DS4Windows, controladores.
Pestaña de controladores
Aquí se muestran todos los controladores conectados. Al pasar el ratón por encima del ID del controlador se mostrará el retardo de entrada del controlador en cuestión.
La casilla Vincular perfil/ID permite vincular un perfil específico a un determinado ID de controlador, de modo que cuando se conecte el controlador la próxima vez se le aplicará siempre el perfil seleccionado. Esto es útil si utiliza más de un controlador. El botón de edición le llevará a la pestaña Perfiles para editar el Perfil seleccionado. También puede utilizar el menú desplegable para crear un nuevo perfil.
Perfiles
La pestaña Perfiles muestra todos los perfiles creados. Los perfiles se pueden utilizar para asignar diferentes ajustes a su controlador para diferentes circunstancias. Además de crear nuevos perfiles, editarlos, renombrarlos y eliminarlos, también puedes importar otros perfiles y exportar los tuyos para compartirlos con tus amigos. Al crear un nuevo perfil, se recomienda utilizar una opción preestablecida. Para el método de salida, si usas un DS4, elige DualShock 4. Si utilizas una Xbox, Switch Pro u otro mando estándar, se recomienda elegir Xbox 360.
En la pantalla resultante es donde puedes personalizar completamente el nuevo perfil.
La pestaña de Controles es para reasignar las salidas de los botones del controlador. Para abrir la página de abajo, haga clic en el botón deseado para reasignar en la imagen del controlador. A continuación, seleccione la nueva salida deseada para esa entrada. La pestaña Acciones especiales permite crear acciones que se activan cuando se pulsa un botón o una combinación de botones. La pestaña Lecturas del Controlador ofrece una lectura en vivo de los datos de los joysticks que se transmiten a DS4Windows La pestaña Axis Config permite ajustar la configuración de los joysticks y ajustar parámetros como la zona muerta y la sensibilidad. La pestaña Lightbar permite cambiar el color de la barra de luces de los mandos DualShock 4. La pestaña Touchpad permite configurar el panel táctil de los mandos DualShock 4 para que salga como movimiento del ratón o del mando. La pestaña Giroscopio contiene la configuración del giroscopio y permite asignar comandos específicos a determinadas acciones de matización. La pestaña Otros contiene la configuración del mando que se está emulando, el porcentaje de rumble y la tasa de sondeo. Problema de detección del dispositivo
Si su DS4 no es detectado por DS4Windows y la barra de luces sigue parpadeando en amarillo, existe la posibilidad de que el Modo Exclusivo haya desactivado permanentemente su DS4 en Windows. La forma más fácil de comprobar si esto ha sucedido es que conectes el controlador en un puerto USB diferente y veas si funciona entonces. Aunque este problema afectaba principalmente a las versiones más antiguas de DS4Windows (textos escritos después de la versión 1.5.15) por diversas razones, otros programas de mapeo pueden provocar el mismo problema.
Si sospecha que su DS4 ha sido deshabilitado, abra el Administrador de Dispositivos (Panel de Control\NHardware y Sonido\NAdministrador de Dispositivos) y busque los dispositivos listados bajo la ruta "Human Interface Devices\HID-compliant game controller".
Ejemplo de dispositivo desactivado
Si el icono que se muestra para un dispositivo tiene un icono de flecha hacia abajo, debe comprobar la ruta de la instancia del dispositivo y ver si el dispositivo es un dispositivo DualShock 4. Haz clic con el botón derecho del ratón en el dispositivo y selecciona "Habilitar dispositivo" en el menú. Eso volverá a habilitar el dispositivo y será visto por las aplicaciones de nuevo.
Desactivar la compatibilidad con el mapeo del mando de Steam
Con las recientes actualizaciones del cliente de Steam en el momento de escribir esto (2018-12-13), Steam ha habilitado el soporte de configuración de Xbox en el cliente de Steam por defecto. Lo que esto significa es que Steam mapeará automáticamente un mando de Xbox 360 detectado a las vinculaciones KB+M inicialmente (Modo Escritorio) antes de lanzar el Modo Big Picture de Steam o lanzar un juego. Esto presenta un problema para DS4Windows, ya que el mando virtual Xbox 360 creado será mapeado a acciones KB+M para el modo escritorio y los juegos lanzados fuera del cliente Steam. Para utilizar DS4Windows correctamente, tienes que abrir el Modo Big Picture de Steam, navegar a Configuración > Mando> Configuración del Mando y desmarcar la opción de Soporte de Configuración de Xbox junto con la de Soporte de Configuración de PlayStation.
DS4Windows es una aplicación creada por Ryochan7.
-
mupen64
Emulador de Nintendo 64 para Windows desarrollado por Hacktarux.
-
RPCS3
RPCS3 es un emulador de Playstation 3 multiplataforma y de código abierto, escrito en C++, para Windows y Linux.
Requisitos de hardware
Los requisitos de hardware para ejecutar el emulador varían según su configuración actual. A continuación, enumeramos los requisitos de hardware mínimos y recomendados. Para obtener la mejor experiencia, los usuarios deben ejecutar dentro de los requisitos recomendados. No podemos garantizar el rendimiento de las especificaciones del sistema por debajo de los requisitos recomendados, pero siempre puede experimentar.
Requisitos recomendados
Para ejecutar todos los títulos jugables a un rendimiento decente para ser jugados:
CPU AMD - 6 cores y 12 hilos, 8 cores o más Arquitectura AMD Zen 2 o más nueva AMD Threadripper 1000 y 2000 series no recomendades Intel - 6 cores y 12 hilos, 8 cores o más Arquitectuira Intel Skylake o más nueva GPU AMD - Compatible con Vulkan con soporte para driver activo Arquitectura AMD Polaris, RX 400 series o superior NVIDIA - Compatible con Vulkan con soporte para driver activo Arquitectura NVIDIA Maxwell, GTX 900 series o más nuevas RAM 8 GB de RAM dual-channel o más Memoria dual-channel es altamente recomendable por encima de la de un solo canal. Almacenamiento Almacenamiento SSD para los datos del emulador, y SSD o HDD para almacenar los juegos 512 MB para los datos base del emulador, 5GB para la cache virtual 128 MB para la caché del emulador y los datos de consola del usuario por juego instalado *Recomendación habitual. Algunos juegos quizás requieran más, otros menos. Sistema operativo Windows Windows 10 21H2 o más nuevo, Windows 11 21H2 o más nuevo Linux Linux 5.17 o más nuevo macOS macOS Monterey 12.0 o más nuevo FreeBSD FreeBSD 13.0 o más nuevo
Instalación de archivos de firmware de PlayStation 3
Por motivos legales, no podemos distribuir archivos de firmware oficiales de PlayStation 3. Debes descargar el último archivo de actualización del firmware de PlayStation 3 de PlayStation.com para utilizarlo con RPCS3. Una vez descargado, debes instalar el firmware utilizando el instalador de firmware integrado de RPCS3 que se encuentra en Archivo > Instalar firmware.
Por defecto, los módulos de firmware se cargan automáticamente en función del título de PlayStation 3 cargado. Puedes anular la carga automática de módulos y elegir manualmente los módulos de firmware que deseas utilizar. Esto no es recomendable.
Los usuarios de Windows pueden gestionar los archivos de datos guardados en \dev_hdd0\home\00000001\savedata\
Los usuarios de Linux pueden administrar los archivos de datos guardados en ~/.config/rpcs3/.
Gestión de títulos de PlayStation 3
Por motivos legales, los títulos de PlayStation 3 no pueden distribuirse en línea y deben descargarse desde tu propia consola PlayStation 3 o desde tu ordenador utilizando una unidad Blu-ray compatible.
Tanto los títulos Blu-ray como los de PlayStation Network (PSN) deben colocarse en una única carpeta con sus respectivos archivos y el nombre de la carpeta debe corresponderse con el ID del título. Si no estás seguro de cuál es el ID de región de tu título volcado, puedes encontrarlo en el borde lateral inferior de la caja del juego. Si ya no tienes la caja del juego o sólo puedes acceder al título a través de PSN, puedes buscar en Internet "Nombre del juego + ID de región". Ten en cuenta que es muy importante que utilices el ID de región correcto.
Distribución típica del directorio de un título en disco Blu-ray: Carpeta PS3_GAME, PS3_DISC.sfb, carpeta PS3_UPDATE (no necesaria)
Disposición típica del directorio de un título de PSN: Carpeta TROPDIR, carpeta USRDIR, ICON0.png, PARAM.sfo, etc.
PlayStation 3 title formats
Title IDs that start with a B are Blu-Ray disc titles.
Title IDs that start with a N are PSN titles.
When working with actual title region IDs, the title's region ID will look something similar to this:
Example: BLUS30443 is a US Blu-Ray disc copy of Demon's Souls.
Example: NPEB01393 is a EU PSN copy of Hatsune Miku: Project DIVA F.
Installing PlayStation 3 titles
.pkg files must be extracted using RPCS3's built-in package installer found under File > Install .pkg (or simply drag and drop .pkg to the main emulator window)
.pkg files will be automatically installed to \dev_hdd0\game\
Blu-ray disc title data can be placed in \dev_hdd0\disc\ or anywhere else except for \dev_hdd0\game\ and can be booted from File > Boot Game if not present on the game list.
PSN title data must be placed in \dev_hdd0\game\
PSN .rap files must be placed in \dev_hdd0\home\00000001\exdata\ (or simply drag and drop them to the main emulator window)
Note: If you're on Linux, RPCS3 folders are located in ~/.config/rpcs3/
Installing PlayStation 3 title updates
Title updates are handled the same as PSN .pkg files. The. pkg update file must be installed using RPCS3's built-in package installer found under File > Install .pkg
The update will be placed in the title folder that corresponds to the correct region ID. Please note that title updates must be the same region in order to work. Cross-mixing title regions may create irreversible damage to the title.
Software Distribution laws in your country
When dumping video game software, users are subject to country-specific software distribution laws. RPCS3 is not designed to enable illegal activity. We do not promote piracy nor do we allow it under any circumstances. Please take the time to review copyright and video game software dumping laws and/or policies for your country before proceeding.
By following these instructions, you will do so at your own discretion. Should you follow these instructions against your local law, we shall not be held responsible for your actions.
Dumping with a PlayStation 3
We recommend that you dump your own PlayStation 3 titles from your own console. This is the most compatible way to migrate your disc-based titles and the only way to dump digital titles to your PC. To do this, you will need a PlayStation 3 system with custom firmware.
For dumping disc-based games, you need to use multiMAN homebrew software in order to dump your disc files. You can transfer those files over to a computer through an external drive or using a FTP connection between your PlayStation 3 and your computer.
Note: The PlayStation 3 has a maximum file size of 4GB. When dumping games which contain files bigger than 4GB, multiMAN will split those files. When you have your dump over on your computer, you must rejoin the split files back together with part merging software such as ps3merge, otherwise the dump won't work.
For dumping digital games, you must copy the game folder from dev_hdd0/game/GameID on your console over to the same path on your RPCS3 folder. You also need to get your console's IDPS, the game's RIF and ACT.DAT, in order to generate a .RAP license file to be used in the emulator.
It is also possible to dump digital content and licenses on any PS3 even without custom firmware, by the way of creating a system backup, and then extracting it with ps3xport software.
Dumping with a Blu-ray drive
You can dump titles using your computer by using select compatible Blu-ray drives. Please note that you can only use this method if a .ird file is available online for the decryption of the disc. Not every Blu-ray drive will recognize PlayStation 3 titles due to how PlayStation 3 format discs are designed. Requirements for a Blu-Ray drive to be able to fully read PlayStation 3 discs are: Mediatek chipset and a +6 read offset.
Compatible Blu-ray disc drives
Here's a compiled list of the known compatible Blu-ray drives that are capable of reading PlayStation format discs for use with your computer.
LG Drives BE16NU50 (External) BH14NS40 BH16NS40 BH16NS48 BH16NS55 BH26NS40 BP50NB40 (External) BU20N BU40N CH12NS30 UH12NS30 WH12LS30 WH14NS40 WH16NS40 WH16NS48 WH24LS30 WH24NS40 WH26NS40 BH16NS60 ASUS Drives BC-08B1LT BC-12B1ST (Some revisions) BC-12D2HT BC-16D1HT BW-12B1ST BW-16D1HT Samsung Drives SH-B083L SH-B123L SE-506 SE-406 LITE-ON Drives DH-4O1S IHBS112 Sony Drives Optiarc 5300S PS3 BDD with proprietary adapter BenQ Drives BR1000 One-click easy solution
This is an automated & user-friendly way of getting a decrypted copy of your PlayStation 3 discs. You must possess one of the aforementioned compatible disc drives to complete the disc dumping procedure. Again, this method will not work with standard Blu-ray drives.
PS3 Disc Dumper by 13xforever
Insert a PlayStation 3 format disc title of your choice into your compatible Blu-ray drive. Run the PS3 Disc Dumper. Step-by-step disc dumping
In case the easy way didn't work for you, here's a compiled list of the step-by-step instructions we used for dumping disc-based PlayStation 3 titles.
PS3 ISO Patcher by BlackDaemon 3K3Y ISO Tools by 3K3Y ImgBurn How to:
Insert a PlayStation 3 format disc title of your choice into your compatible Blu-ray drive. Create the .iso image using an .iso dumping program of your choosing, e.g. ImgBurn or IsoBuster. Use jonnysp.bplaced.net to download the appropriate .ird file that matches your title ID. If there isn't an .ird file that matches your title ID, you cannot use this method to dump your selected PlayStation 3 disc at this time. Be sure to check the title ID in case there is a different edition of that title. e.g. Uncharted 2 Game of the Year Edition. You must use the correct .ird with the same title ID, otherwise it won't work. (Example: .ird file for Demon's Souls US disc doesn't work with Demon's Souls EU disc). Using PS3 ISO Patcher, select the matching .iso and .ird files, then press Patch to apply the decryption keys to the .iso file. Using 3K3Y IsoTools press Decrypt button and select the .iso with patched-in decryption keys. This will produce decrypted .dec.iso file. Optionally, validate that you have successfully obtained the correct copy of your game. You will need to install PS3 ISO Rebuilder tool from jonnysp.bplaced.net Load your .dec.iso file and your .ird file in the program and let it verify the dump. All of your files must be either Valid or Not required. In 3K3Y ISO Tools, use the Tools drop-down menu to select ISO > Extract ISO and then select the decrypted .iso file to extract its files. Another option is to use 7-zip or any other software that is capable of extracting .iso images. You are now able to use the extracted .iso files with RPCS3. by Nekotekina & kd-11.
-
Dual Shock 3-4 SCP Bluetooth Driver
The Dual Shock 3 driver is a custom made driver for Windows, which adds support for Dual Shock 3 controllers on Windows providing USB, Bluetooth and Native XInput support. This way you can use your Dual Shock 3 controller with PCSX2, PC games or any other emulator/game under windows.
Requirements:
Microsoft .NET 4.0 Visual C 2010 Runtime. Latest DirectX Runtime. Latest Xbox 360 Controller Drivers available. Genuine Sony DualShock3 or DualShock4 or SixAxis Controller(s). Minimum of Bluetooth 2.0 + EDR Dongle (if using Bluetooth). [DualShock4 requires minimum of Bluetooth 2.1 + EDR Dongle] Administrator rights on your PC. -
Sims.2.No-CD.Mini-Image.SPiTFiRE
░░░░░░ ░░░░░░░ ░▒▒▒░░░░░░░░░░ ░░░░░░░░ ░▒▒░ ░░░░░░░ ░░░░░░░░ ▒█████▓░ ░▓██████▓░░▓███▓▓███████▓░ ▒███████▓▒▒████▒▓██████▓░ ░▓███████▒ ▒███████▒░▒████████▒░▓███▓▓████████░░▓████████▒▓████▓████████▓░▓████████▓ ░▓██▓▒▒▒██▒▒██▓▒▒▒▓█▓▒▒██▓▒░▓████▓▒▒ ░▓█▓▒▒▒▒▒▒░▒██▓▒▒██▓▒▒▒▒▓█▒▓██▒▒▒▒▒▒░ ░███▒ ▒█▒▒█▓░ ░▓█▒▒▓█▒ ░▓██▓░ ░▓█▒ ░▓█▒ ▒█▓░ ▒█▓▓█▓ ▒███▒ ░░░▒█▓ ▓█▒░▓█▒ ▓██▓░ ░▓█▒ ▓█▒ ▒█▓░ ▒█▓▓█▒ ░▓██▓░░░░ ▒█▓ ▓█▒░▓█▒ ▓███░ ░▓█▓░░░░░ ▓█▒ ▒█▓░ ▒█▓▓█▓▒░░░░ ▒██████▓░ ▒█▓░ ░▓█▒░▓█▒ ▓███▒ ░▓██████▓░ ▓█▒ ▒█▓░ ▒█▓▓██████▓▒ ░▓██████▒░▒██▒░░░▒▓█▒░▓█▒ ▓███▓░ ░▓███████░ ▓█▓░▒██▒░░░░▓█▒▓███████▒ ░▒▒▒▒▒█▓▒▒████████▒ ░▓█▓░ ▓████░ ░▓████▓▒▒ ▓██▒▒███▓▓▓██▓░▓████▓▒▒░ ░░░░░ ░▓█▒▒███████▓░ ░▓██▒ ▓████▒ ░▓███▓░ ▓██▓▒████████▒░▓███▓░ ░▓███▓▒░▓█▒▒████▓▒▒░ ░▓██▒ ▓████▒ ░▓███▓ ░▓██▓▒███████▓░ ▓███▓░ ░▓████▓▒▓█▒▒████▒ ▒███▓░ ▓████▒ ░▓███▓ ░▓██▓▒████▓▓█▒░░▓████▒ ▒███████▓░▒████▒ ░▓████▒░▓████░ ░▓███▓ ▒████▓████▒▒▓█▓▒▓████▓▓▓▓▒ ░▓█████▓░ ▒███▓░ ░▓████▒░▒███▓░ ░▓███▒ ▓████▓▓███▒░▒██▒▒████████▓ ░▒▒▒▒▒░ ▒▓▓▒ ▒▓▓▓▓░ ░▒▓▓░ ░▒▓▒░ ░▓▓▓▓░░▒▓▒░ ░▒▒░nfo> MuZZY ─ ─ ───────┤S P i T F i R E ─ P R O U D L Y ─ P R E S E N T S├───── - ─ ╠──────────────────────────────────────────────────────────╣ Sims 2 (c) EA Games *No-CD MINI-IMAGE* ╔──────────────────────────────────────────────────╗ │ RELEASE DATE : 17/09/04 SiZE: 1x17mb │ │ │ │ PROTECTION : SafeDisc GAMETYPE: Sim, duh! │ │ │ │ │ ╚──────────────────────────────────────────────────╝ ▄▄▄▄▄▄▄▄▄▄▄▄▄▄▄▄▄▄▄▄▄▄▄▄▄▄▄▄▄▄▄▄▄▄▄▄▄▄▄▄▄▄▄▄▄▄▄▄▄▄▄▄▄▄▄▄▄▄▄▄▄▄▄▄▄▄ ▄▄ ▄ ▄██▀ S E T U P i N F O 1. Install Sims2 do not replace the original "Sims2.exe". 2. Uninstall CloneCD if it is installed, EA have blacklisted it. 3. Mount the "Sims2_1.mir" mini-image with Daemon Tools or other. 4. Start the game as normal, you can play sims without the CD and for those unable to use build mode can now build. This will work with AlcoholClone & MONEY release but do not use the cracked non-working "Sims2.exe" that have been flying around. Use the one installed with the game and expansions shouldnt be a problem later. ▄▄▄▄▄▄▄▄▄▄▄▄▄▄▄▄▄▄▄▄▄▄▄▄▄▄▄▄▄▄▄▄▄▄▄▄▄▄▄▄▄▄▄▄▄▄▄▄▄▄▄▄▄▄▄▄▄▄▄▄▄▄▄▄▄▄ ▄▄ ▄ ▄██▀ C O N T A C T U S Are you ... a.) ... a programmer, can code your own tools or unpack custom made game file formats etc b.) ... a cracker, can crack software protections such as CD-Checks, Securom, SafeDisc, StarForce etc c.) ... both If the above applies to you, we need you to join our air-force! :) eMaiL: spitfiregroup[@]hushmail[.]com * WE DO NOT PROVIDE SUPPORT AND DON'T SEND FILES, SO DON'T ASK! * ▄▄▄▄▄▄▄▄▄▄▄▄▄▄▄▄▄▄▄▄▄▄▄▄▄▄▄▄▄▄▄▄▄▄▄▄▄▄▄▄▄▄▄▄▄▄▄▄▄▄▄▄▄▄▄▄▄▄▄▄▄▄▄▄▄▄ ▄▄ ▄ ▄██▀ G R E E T Z & R E S P E C T SPiTFiRE bow to old and new members of: RAZOR1911, FAiRLiGHT, DEViANCE, RELOADED, VENGEANCE, MONEY, iMMERSiON, HOODLUM, FASiSO, MYTH, CLASS, TECHNiC, DiViNE, VACE, SEvEN, FAS, P.O.D, iNSTiNCT, MKN ─ ─ ───────────────────────────────────────────────────────────────── ─ ─ We do this for fun only, we will try and fit SRR (Standard Rip Rules) whenever possible. If a game is reasonable from the size of the ISO we will release cos nobody else will. We use cracks made by the ISO groups generally and we apologize if this annoys you we are currently trying to learn & recruit our own crackers to do the job but until then ... sorry! ─ ─ ────────────────┬──────────────────────────┬───────────────────── ─ ─ │ SPiTFiRE - 28/08/04 │ └──────────────────────────┘ "If you like this game BUY it, good software companies should be supported!"
-
Yuzu
Yuzu es un emulador de código abierto de Nintendo Switch para Windows y Linux, de los creadores de Citra.
El emulador es capaz de mover la mayoría de juegos comerciales a toda velocidad.
Yuzu es un proyecto en el que participan una gran cantidad de desarrolladores, encabezados por bunnei.
-
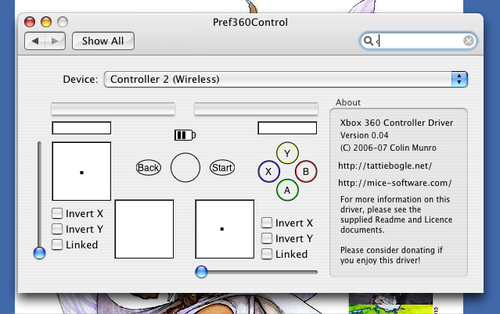
Xbox Controller Driver for macOS
This driver supports on mac OS X the Microsoft Xbox series of controllers including:
Original Xbox
Original Xbox controllers are supported by using a USB adapter. Xbox 360
Wired Xbox 360 controllers are supported directly. As of macOS 10.11, Wireless Xbox 360 controller support causes kernel panics. This issue cannot be resolved with minor changes to the driver, and requires that the driver be re-written from scratch to resolve the issue. Due to an excess of caution, we have disabled Wireless Xbox 360 controller support as of 0.16.6. If you want to use a wireless controller, download 0.16.15 or earlier and disable the driver before the computer enters a "sleep" state in order to prevent kernel panics. Alternatively, you can revert to a macOS version before 10.11 to avoid this issue. Wireless Xbox 360 controllers are supported with the Xbox 360 Wireless Gaming Receiver. Using a "Play and Charge" kit is not supported. Xbox One
Xbox One controllers are supported when connected with a micro USB cable. Using the controller with the Wireless Adapter is not currently supported. Bluetooth capable Xbox One controllers (released after August 2016) are natively supported by macOS without the use of this driver. However, installing this driver will enable force feedback (which is not natively supported) and allow you to plug the controller in via USB. The driver provides developers with access to both force feedback and the LEDs of the controllers. Additionally, a preference pane has been provided so that users can configure their controllers and ensure that the driver has been installed properly. Controller support includes ALL devices that work with an Xbox series piece of hardware. All wheels, fight sticks, and controllers should work. This includes things like the Xbox One Elite controller. If your hardware does not work with an Xbox console we cannot support it. Sorry. This project is a fork of the 360Controller project originally created by Colin Munro.
-
Citra
Citra es un emulador experimental de código abierto de Nintendo 3DS escrito en C++ para Windows, macOS y Linux. También cuenta con una versión para Android.
Citra emula un subconjunto de hardware 3DS y, por lo tanto, es útil para ejecutar/depurar aplicaciones caseras, ¡y también puede ejecutar muchos juegos comerciales!
Citra está creado por PabloMK7.
-
Cemuhook
A nearly complete h264 module for Cemu, with an implementation similar to what an official one would be (Cemu 1.15.4 or newer also provides its own alternative) GamePad input source override for cemu, including full motion sensing support (requires additional software, see the guide) Adds code/data patching to your games at load-time, which you can activate and share the same way you do graphic packs! Think of it like a pcsx2 plugin, implementing something not in the core Why did you do this?
Why not improve on an already great emulator by adding some extra features ? I like hacking on software that originally wasn't meant to be extended/changed The Cemu devs don't seem to mind, and in fact have been really supportive (Huge thanks to Exzap!) How to use
Extract contents of zip into Cemu folder Enjoy
by Rajkosto.
-
PCSX2 (PS2 Emulator)
PCSX2 es un emulador de la consola Sony Playstation 2 para Windows, macOS y Linux, que intenta replicar su funcionamiento para permitirnos jugar juegos de PS2 en nuestro ordenador.
Ventajas de usar PCSX2 sobre una PS2 original
Resoluciones personalizadas, hasta 4096x4096, suavizado y filtrado de texturas para que tus viejos juegos de PS2 se vean mejor que sus remakes de HD. Tarjetas de memoria ilimitadas Guardar estados, lo que le permite guardar y cargar rápidamente prácticamente en cualquier lugar de su juego Hacer trampas fácilmente usando nuestro sistema de parcheo pnach Use cualquier controlador (PS3, Xbox360, etc.) que funcione en Windows, teclados y ratones Aumente o disminuya la velocidad del juego usando el limitador de cuadros incorporado para pulir rápidamente o pasar puntos difíciles reduciéndolos Posibilidad de grabar en Full HD con la grabadora de video incorporada (F12 usando el complemento GSdx) -
melonDS
melonDS es un emulador de Nintendo DS, DSi y 3DS para Windows, macOS y Linux.
Características principales de melonDS
Núcleo casi completo (CPU, vídeo, audio, ...) Recompilador JIT para una emulación rápida Renderizador OpenGL, escalado 3D RTC, micrófono, cierre/apertura de la tapa Soporte de joystick Estados de guardado Varios modos de posición/tamaño/rotación de la pantalla (WIP) Wifi: multijugador local, conectividad online (WIP) Emulación de DSi DLDI (WIP) Complementos para la ranura GBA ¡y hay más planeados!
Cómo usar melonDS
melonDS requiere copias del firmware y de la bios de la Nintendo DS. Archivos requeridos:
bios7.bin, 16KB: ARM7 BIOS bios9.bin, 4KB: ARM9 BIOS firmware.bin, 128/256/512KB: firmware El arranque del firmware requiere un volcado del firmware de una DS o DS Lite original. Los firmwares de DS volcados desde una DSi o 3DS no son arrancables y sólo contienen datos de configuración, por lo que sólo son adecuados para arrancar juegos directamente.
Posibles tamaños del firmware:
128KB: DSi/3DS DS-mode firmware (reduced size due to lacking bootcode) 256KB: regular DS firmware 512KB: iQue DS firmware Los volcados de BIOS de DSi o 3DS pueden utilizarse sin problemas de compatibilidad. Los volcados de BIOS de DSi (en modo DSi) no son compatibles. O tal vez lo sean. No lo sé.
Por lo demás, la interfaz debería ser bastante sencilla. No obstante, si tienes alguna duda, no dudes en preguntar.
Créditos
Martin for GBAtek, a good piece of documentation Cydrak for the extra 3D GPU research All of you comrades who have been testing melonDS, reporting issues, suggesting shit, etc -
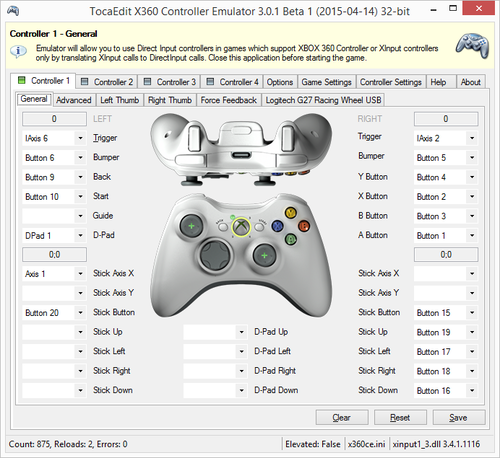
x360ce (Xbox 360 Controller Emulator)
"Xbox 360 Controller Emulator" allows your controller (gamepad, joystick, wheel, etc.) to function as an Xbox 360 controller. For example, it lets you play games such as "Grand Theft Auto" (GTA) or "Mafia II" using a Logitech Wheel.
nstallation
Run this program from the same directory as the game executable. XInput library files exist with several different names and some games require a change in its name. Known names:
xinput1_4.dll (Windows 8 / metro apps only) xinput1_3.dll xinput1_2.dll xinput1_1.dll xinput9_1_0.dll Game Database (GDB) and Configuration (INI) files can be copied to %ALLUSERSPROFILE%\X360CE on NT6 (Vista/7/8) or %ALLUSERSPROFILE%\Application Data\X360CE on NT5.1 (XP), or be left in the same directory as the game's executable (.EXE)
Note:
In most cases games based on the Source engine have the DLL placed inside the /Bin/ sub folder, as it is loaded by inputsystem.dll instead of the game executable. The DLL is not currently fully supported by the App, recent versions incorporate HookMasks and fully remove HookModes, and requires placing Version=1 under [options] in the x360ce.ini to quieten a warning about incorrect version. Uninstallation
Delete x360ce.exe, x360ce.ini and all XInput DLLs from the game's executable directory.
Troubleshooting
Some games have control issues when Dead Zone is reduced to 0%.
You may need to increase the Anti-Dead Zone value if there is gap between the moment when you start to push the axis-related button and the reaction in game.
Wheel doesn't work in the game, but it works inside x360ce Application.
Some controllers will only operate in game if they are set as "GamePad". Try to:
Run x360ce.exe Select the [Controller #] tab page corresponding to your controller. Open [Advanced] tab page. Set "Device Type" drop down list value to: GamePad. Click [Save] button. Close x360ce.exe. Run the game. Only one controller, mapped to PAD1, may work correctly in some games. Try to:
Run x360ce.exe Select the [Controller #] tab page corresponding to your controller. Open the [Direct Input Device] tab page (visible when the controller is connected). Set "Map To" drop down list value to: 1. Set "Map To" drop down list values (repeat steps 2. to 4.) for other controllers, if you have them, to: 2, 3 or 4. Click [Save] button. Close x360ce.exe. Run the game. To use more than one controller in game, you may need to combine them. Try to:
Run x360ce.exe Select the [Controller #] tab page corresponding to your additional controller. Open the [Advanced] tab page. Set "Combine Into" drop down list value to: One. Select [Options] tab page. Check "Enable Combining" check-box. (Note: Uncheck "Enable Combining" check-box when you want to configure the controller.) Click [Save] button. Close x360ce.exe. Run the game. Do I need to run x360ce Application during the game?
The x360ce.exe application can be closed before launching the game; the game doesn't need it and it uses your computer's resources. The x360ce.exe application is just a GUI for editing x360ce.ini and testing your controller.
Warning - Configuration file version does not match x360ce version.
This occurs because the current version of the application is not completely compatible with the DLL just yet. You can resolve this by adding Version=1 under the [Options] section in x360ce.ini
Controller tab won't turn green / Red light on Controller 1, 2 etc.
This can occur for a number of reasons:
The configuration utility DOES NOT work with the 64-bit library, it will only work with the 32-bit version, This is the case regardless of whether your Windows is 32-bit or 64-bit. The DInput state of the controller might be incorrect due to an application crashing previously and not unloading the controller or some other reason. Opening up Joy.cpl (Set Up USB Game Controllers) and clicking the Advanced button, and then Okaying out of the window that appears can fix it. The controller profile loaded may match the name of the controller but not actually be for the controller you own - in this case you might see button numbers or axes mapped that do not appear in the Joy.cpl test page. The controller profile might have PassThrough set. A growing number of profiles have been uploaded that do this, I have no idea why as it disables x360ce and just bloats the list of available profiles. There just might not be a profile for your control at all - The light should turn green at least once the 2 sticks, triggers and D-pad are assigned. Sometimes the application needs to be restarted after assigning these for the light to turn green. -
Driver Xbox 360 Controller for Windows
Drivers oficiales de Microsoft para utilizar el mando de Xbox 360 en Windows.
-
EmulatorX
Aplicación que integra emuladores para Windows de Super Nintendo, Megadrive, Gameboy Advance, Nintendo DS, PSP, Nintendo 64, Playstation, Playstation 2, Xbox, Gamecube y Wii.
Creado por Javier Santos.
-
No Mosaic / Censor Mod for The Sims 4
This mod removes the mosaic / censor grid that appears over your Sim when they:
Shower Use the toilet Breastfeed Streak Potty Train Diaper Change It works for all ages - INCLUDING TODDLERS! WOO!
What this mod does!
This mod is a simple edit of the DATA resource 0x545AC67A 0x00D6FA33 0xDEAD4915C9C6C0D8 file in the ClientDeltaBuild0.package. It should not conflict with anything, as the censor file is a standalone file within the package. The original mod, prior to toddlers, was a simple edit of the same DATA resource as above but in the ClientFullBuild0.package.
What this mod DOESN'T do!
This mod does not allow you to make your sims naked anywhere other than they normally would be. If you want your sims to be nudists, you will have to download nude clothes. This mod does not affect any sim behaviours. If your sim is showering/swimming in clothes, it may have something to do with their traits/other mods. At this point in time, it is not possible to have the censor appear for only certain events (The blur for showering and the blur for toilets is exactly the same. Disable one disables them all. There is nothing I can do about this. D: ) INSTALLATION
Simply unrar it into your Documents/Electronic Arts/The Sims 4/Mods folder and you're done! I would recommend 7-zip to unzip/unrar your packages!
CREDITS
This was creating using s4pe and Sims4Data tool. Thanks Kuree and velocitygrass!
-
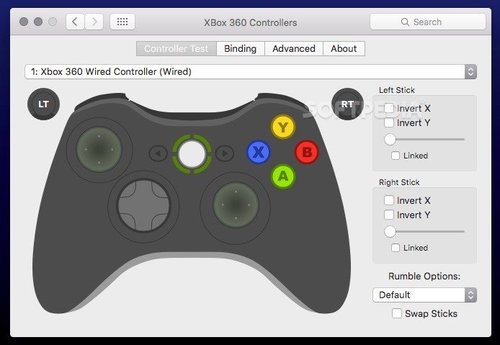
360Controller
This driver supports the Microsoft Xbox 360 controller, including access to rumble motors and LEDs, on the Mac OS X platform. It includes a plugin for the Apple Force Feedback Framework so some games will be able to activate them, along with a Preference Pane with which allows you to test everything is installed correctly. Both wired 360 controllers connected via USB, and wireless 360 controllers connected via the Wireless Gaming Receiver for Windows, are supported.
Installation
Simply complete the installer package to install the driver. The driver will recommend you restart - if you do not, the driver will only be usable if the controller is already connected or connected within a minute after the installer completes. If you are interested in installing as a developer please see below.\
Usage
The driver exposes a standard game pad with a number of standard controls, so any game that supports gaming devices should work. In some cases this may need an update from the manufacturer of the game or a patched version. The Preference Pane uses the standard Mac OS X Frameworks for accessing HID devices and accessing Force Feedback capabilities, so should be a good test that the installation is functional.\
by Colin Munro.
UPDATE: An improve version, with support for Xbox One Controller, can be found here: Xbox One Controller Driver for macOS.
-
Dolphin
Dolphin es un emulador de Nintendo GameCube y Nintendo Wii para Windows, macOS, Linux y Android.
El emulador nos permite disfrutar de los juegos de estas dos consolas en alta definición (1080p) con varias mejoras: compatibilidad con todos los mandos de PC, velocidad turbo, multijugador en red, ¡y mucho más!
-
Cinoop
A multiplatform Game Boy emulator written in C; currently available for: Windows, OS X, Linux based OSes, Nintendo DS, Nintendo 3DS, Nintendo GameCube, Sony PSP, and Sony PS4.
Progress
CPU: All instructions are implemented,
GPU: Can display tile maps, and sprites. Palette swapping is not implemented yet, so some colours may be displayed incorrectly.
Memory: Support for 32KB ROMs, without mappers, only (Tetris and Dr. Mario),
Input: Supported,
Sound: None,
Games: Tetris is most likely the only playable game,
The DS version does not run full speed, and the Linux port does not yet support input.
Building
Just run make on the directory to build all binaries. You can also run make windows for just Windows, make ds for just DS, make gamecube for just GameCube, make 3ds for just 3DS, make linux for just Linux, make psp for just PSP, or make ps4 for just PS4.
Building the Windows version requires LDFS, and has been tested with MinGW, using another compiler may require some tweaking.
Building the DS version requires devkitARM and libnds, from devkitPro.
Building the GameCube version requires devkitPPC and libogc, from devkitPro.
Building the 3DS version requires devkitARM and ctrulib from devkitPro.
Building the Linux version requires X11, and the OpenGL development files. It has been tested with Ubuntu.
Building the PSP version requires the Minimalist PSP SDK.
Building the PS4 version requires PS4-SDK.
Building and running the OS X version requires XQuartz.
Usage
For Windows, OS X, and Linux, pass the ROM you would like to run as the first argument. You can do this by either dragging the ROM onto Cinoop, or starting it from the command line:
cinoop tetris.gb To view the full debug log, you will need to redirect stdout to a file, like so:
cinoop tetris.gb 1>debug.txt For PS4, the ROM is read from a USB flash drive as a raw image. Use Win32 Disk Imager or dd to write it for example.
For other versions, the ROM name is hard coded as tetris.gb.
Windows Controls
B: Z
A: X
Start: Enter
Select: Backspace
DPad: Arrow keys
Debug: Space
Reset (not finished yet): *
Quit: Escape
DS Controls
B: B A: A Start: Start Select: Select DPad: DPad GameCube Controls
B: B A: A Start: Start Select: Z DPad: DPad 3DS Controls
B: B A: A Start: Start Select: Select DPad: DPad or Circle Pad Linux Controls
(not supported)
OS X Controls
(not supported)
PSP Controls
B: Square A: Cross Start: Start Select: Select DPad: DPad PS4 Controls
Use a DS as a wireless controller
-
Elden Ring - Seamless Co-op Mod
En pocas palabras, el mod permite jugar con amigos durante todo el juego sin restricciones. Con esto, es teóricamente posible jugar el juego desde el tutorial hasta el jefe final completamente en una sesión cooperativa.
Si un jugador muere, reaparecerá en el mismo mundo en la última hoguera en la que descansó. La sesión no se terminará. Derrotar a los jefes enemigos y despejar zonas ya no envía a los cooperantes a casa. Todos los muros/barreras de niebla que suelen restringir la zona multijugador (junto con sus respectivos teletransportes) han desaparecido. Todos los jugadores pueden utilizar el torrente (suponiendo que tengan el silbato) en una sesión conjunta. Todos los waypoints del mapa se sincronizarán, lo que permitirá navegar por el mundo en grupo más fácilmente. Cuando un jugador descansa en un Sitio de Gracia, el estado del mundo se reiniciará para todos los jugadores. Esto es necesario para evitar la desincronización de los enemigos. Los eventos de progresión del juego completados en el juego online también harán progresar el juego en tu propio mundo. Los jugadores son libres de explorar todo el mapa del juego (mundo exterior, subterráneo, mazmorras de legado, etc.) juntos, y pueden separarse si lo desean.
La estaca de Marika está desactivada en el juego online, ya que causa problemas de conexión.
Mejoras en la calidad de vida
Junto con la función principal de este mod, hay una serie de mejoras en la calidad de vida que podrían gustarte:
Como el mod ejecuta el juego con Easy Anti-Cheat deshabilitado. Eres libre de utilizar otros mods (por ejemplo, revisiones del juego) con tus amigos, siempre que todos los miembros del grupo los tengan instalados. Por favor, sé respetuoso con tus compañeros y abstente de usar mods si no son bienvenidos.
Las frecuentes desconexiones que provocaban la pérdida de paquetes y los fallos en la implementación de Easy Anti-Cheat de Elden Ring ya no son un problema.
Un sistema de conexión simplificado significa que los cooperantes pueden unirse al anfitrión desde cualquier parte del mundo. Por lo tanto, incluso si te desconectas, puedes volver a unirte rápidamente y continuar donde lo dejaste.
Equilibrio
Sin duda, este mod hace que el juego sea mucho más fácil. El principal inconveniente del juego cooperativo en el juego base, las invasiones, no es posible con el diseño de este mod y, por tanto, no se han implementado. Para intentar compensar esto y preservar el desafío del juego, se han introducido mecánicas adicionales a los aumentos de la reserva de salud de los enemigos del juego base, que normalmente se consiguen al aumentar los fantasmas:
Como se puede jugar con 3 fantasmas (frente al máximo de 2 en el juego base), se ha añadido un tercer nivel de escalado de enemigos.
Si un jugador se sienta en una hoguera mientras otros están en las salas de jefes, esos jugadores serán eliminados de las salas de jefes.
Si mueres durante una batalla contra un jefe, tu personaje entrará en el limbo, y podrá ver a otros jugadores hasta que todos los miembros del grupo hayan sido derrotados, o hasta que un jugador descanse en un lugar de gracia. Puedes utilizar las teclas de flecha del teclado para cambiar entre las diferentes vistas de los espectadores
Si mueres en una sesión cooperativa, tu jugador sufrirá putrefacción. La putrefacción es un debuff apilable que aumentará con las siguientes muertes. Sólo puedes eliminar la putrefacción sentándote en un Lugar de Gracia. Hay 5 tipos diferentes de putrefacción, que se elegirán al azar cuando un jugador muera. Esto se ha implementado específicamente para evitar que un jugador muera una y otra vez sin ninguna desventaja, mientras que otro jugador permanece vivo para evitar que los enemigos vuelvan a aparecer.
¿Puede esto banearme?
No, el mod impide que te conectes a los servidores de matchmaking de FromSoftware, y utiliza archivos de guardado diferentes a los del juego no modificado. La función Easy Anti-Cheat tampoco está activa cuando se utiliza este mod. No hay forma de ser baneado usando este mod a menos que lo modifiques con la intención de conectarte con jugadores vanilla.
Como este mod introduce nuevos objetos que no se encuentran en el juego base, utiliza un archivo de guardado diferente a la extensión normal '.sl2'. Esto significa que no puedes acceder a tus archivos de guardado de Seamless Coop en el juego base, y viceversa. No conviertas los archivos de guardado del mod en archivos de guardado de vainilla, ya que es probable que te baneen.
Instalación
La compatibilidad con otros mods no ha sido probada. Puedes utilizar otros mods, siempre y cuando no interfieran con el aspecto multijugador del juego, ni editen ninguno de los elementos que el mod utiliza para funcionar.
Descarga el mod Extrae el paquete que has descargado, y mueve los siguientes archivos a tu carpeta de Elden Ring (normalmente en "C:\N-Archivos de programa (x86)\N-Steam\N-Steamapps\N-Common\ELDENRING\N-Juego") Edite "cooppassword.ini" con la contraseña de cooperación que haya elegido. Lanza el mod usando "lauch_elden_ring_seamless_coop.exe" En realidad no tienes que desinstalar el mod. Puedes usar el lanzador cuando quieras jugarlo, si no, simplemente ejecuta el juego normalmente. Si quieres eliminarlo por completo, simplemente borra los archivos que descargaste desde aquí.
Uso
Recomiendo encarecidamente una contraseña de sesión segura, si un jugador conoce tu contraseña de sesión cooperativa, puede unirse inmediatamente. El mod utiliza únicamente la interfaz de matchmaking de Steam para participar en el modo multijugador con otros jugadores.
Un jugador debe ser el anfitrión y los otros jugadores deben unirse. Debes tener la misma contraseña que la(s) persona(s) con la(s) que quieres jugar (se encuentra en el archivo "cooppassword.ini").
El anfitrión debe utilizar el Tiny Great Pot para crear una sesión. En ese momento, los otros jugadores pueden unirse utilizando la Efigie de Meleina. Debes aparecer en un punto cercano al anfitrión. Cualquier jugador puede abandonar la sesión en cualquier momento utilizando la Niebla Separadora - Si el anfitrión utiliza este objeto, la sesión se disolverá y todos los jugadores se desconectarán.
PREGUNTAS FRECUENTES
P) ¿Funciona esto para juegos crackeados/pirateados?
R) No, tampoco voy a dar soporte a estas versiones, así que por favor no hagas informes de errores al respecto.
P) ¿No es sólo el modo fácil?
R) No necesariamente, aunque el juego cooperativo hace que el juego sea objetivamente más fácil, también es una forma completamente diferente de jugar. Hay un montón de mods de "modo fácil" que simplemente te dan mucha salud/daño. Este mod será más fácil pero está hecho pensando en aquellos que quieren jugar el juego hasta el final con amigos. Se ha diseñado pensando en la diversión y no en reducir el desafío.
P) ¿Qué pasa con las invasiones?
R) Las invasiones no son posibles en este mod. No estás conectado al servidor de matchmaking, así que no puedes ser invadido por nadie más. Esto no es una elección de diseño, es simplemente la forma en que tiene que ser para mantener a los jugadores modificados separados de la base de jugadores vainilla.
P) ¿Puedo modificar o redistribuir este mod?
R) No, lo siento. Por favor, no modifiques, reempaquetes o redistribuyas este mod en ningún sitio sin mi permiso.
P) ¿Puedo utilizar mi partida guardada del juego base?
R) Puedes, aunque requeriría más trabajo. Como se ha mencionado, el mod utiliza archivos de guardado separados, usando la extensión de archivo ".co2" en lugar de ".sl2". Haz una copia de tu archivo .sl2, y luego cambia la nueva copia a .co2. Una vez dentro del juego, utilizando el Cheat Engine, genera los nuevos objetos específicos del mod. No hagas esto a la inversa (moviendo tu save del mod al juego base) ya que puedes ser baneado.
P) Tengo una pregunta que no ha sido respondida aquí.
R) Si necesitas más información, o deseas informar de un error, tienes una sugerencia, etc., por favor, haz un post sobre ello, o envíame un mensaje directo.
Agradecimientos especiales
Probadores alfa: joby, inuNorii, Emilia, Remyzk, Amir, Gáté, IshLexi, Hobotam, ibby, HEKTIK, Purpurea, Adopt a Cat, Jouta Kujo, Alpaca
Un agradecimiento especial a Tremwil por sus consejos y su código, concretamente 🐴
Elden Ring - Seamless Co-op Mod ha sido creado por LukeYui.
-
FIFA 20 Revo Pitch Color Tweaker
Aplicación para el FIFA 20 de PC que permite cambiar el color del cesped.
by Fidel Gameplay & Rinaldo.
-
ePSXe
A Sony PlayStation Emulator for the PC.
Many of you sent us mails wondering how they can get the emu configured correctly. So, in order to help you configuring it for the first time, We added this section to the FAQ. 1) Getting all necessary files First off, you need the emulator, all plugins you want to use and the BIOS itself. You can get the first two combined in a nice Installer from PSXEmu.com (browse to http://www.psxemu.com/epsxe-download.shtml). We won't supply you with URL's for the BIOS as it is copyrighted by Sony. But you should find it easily by browsing the web. Now you need to get the plugins configured properly. 2) Choosing the best GPU plugin When going after compatibility, you should use Pete's Soft GPU plugin, it's the one with the highest compatibility. When that one doesn't work with a game others have gotten working, you've probably made a configuration error. You should also use this plugin when you've got troubles getting certain game situations to display properly (for example the FF8 battle menus). Now here's a list for the best plugins for the most popular graphic cards: 3dfx Voodoo 2 --> Lewpy's Glide plugin (could crash with certain drivers) 3dfx Voodoo 3 --> Pete's D3D (DirectX 7) or Lewpy's Glide plugin 3dfx Voodoo 4/5 --> Pete's D3D (DirectX 7) or Lewpy's Glide plugin ATI Radeon --> Pete's OpenGL plugin ATI Rage 128/Expert --> Pete's D3D (DirectX 7) plugin nVidia GeForce 1/2 --> Pete's OpenGL plugin nVidia TNT/TNT2 --> Pete's OpenGL plugin Matrox G200/G400 --> Pete's D3D (DirectX 6) plugin ... the rest --> Pete's D3D (DirectX 7) plugin 3) Choosing and configuring the CD-ROM plugin Windows 9x/ME + IDE CD-ROM --> ePSXe CDR ASPI Core 1.2.0 (Requires an ASPI layer, Win9x/ME comes with one.) Windows NT/2000 + IDE/SCSI CD-ROM --> ePSXe CDR WNT/W2K Core 1.2.0 (Does not require an ASPI layer.) Remember that you need an ASPI layer to get ePSXe reading CDs with OTHER plugins using Windows 2000. You can get more infos on this further on in this FAQ! When those settings aren't working for you, one thing you can do is to create an ISO from the original CD using a burning app like CDRWin or WinOnCD. Keep in mind that you should get better performance using an ISO, compared to running a game from a CD. 4) Selecting the best sound plugin ePSXe SPU Core 1.2.0 --> Good & fast sound, but still has some problems left. Pete's MIDAS SPU 1.7 --> A good sound plugin which uses the latest SPU API. Null2's SPU 1.35 --> Slowly became one of the best SPU plugins, recommended. 5) Choosing the correct BIOS ePSXe has been mainly tested with the SCPH-1001 and the SCPH-7502 BIOS files, which are therefor the BIOS files we mostly recommend. 6) Getting through the other settings Now that you've selected and configured the plugins of your choice, here's a list of the rest of the settings and how we recommend you to set them. Still, some game require different settings. Options --> SIO IRQ Always Enabled --> [DISABLED] - (F4 to toggle on/off) Config --> CD-ROM --> Enable Accurate CD-ROM Timing --> [DISABLED] - (See notes in the GUI) Config --> CD-ROM --> Disable CD-ROM Status --> [DISABLED] - (See notes in the GUI) Config --> CD-ROM --> Disable Real-Time CD-ROM Status --> [DISABLED] - (See notes in the GUI) Config --> MDEC --> Enable MDEC --> [ENABLED] Config --> MDEC --> Enable MDEC Timing --> [ENABLED] - (See notes further down) Config --> Sound --> Enable Sound --> [ENABLED] Config --> Sound --> Enable CDDA Sound --> [ENABLED] Config --> Sound --> Enable XA Sound --> [ENABLED] Config --> Sound --> Enable XA Read --> [ENABLED] - (Needs a fast system, F6) Config --> Sound --> Enable SPU IRQ hack --> [DISABLED] - (Needs a fast system) And now you should be able to enjoy one of the best free emulators out there. When you still have problems or suggestions for this FAQ, feel free to post them on our message board or mail us! +-+-+-+-+-+-+-+-+-+-+-+-+-+-+-+-+-+ |G|e|n|e|r|a|l| |Q|u|e|s|t|i|o|n|s| +-+-+-+-+-+-+-+-+-+-+-+-+-+-+-+-+-+ Q: Who are the developers of this great application? A: The programmers aren't new to the scene. The one you all have probably already heard of is _Demo_, one of the authors of the best SNES emulator out there: ZSNES! The other two are calb, experienced programmer from emulators like ESNES, and Galtor, who is new to the emu scene, but still is a skilled programmer. When you want to learn more about them, make sure to check out the interview with Galtor at http://www.psxemu.com! Q: Game X doesn't run. What can I do to get it running? A: There are certain things to do before giving up on a non-working game. First off, you could use another plugin, since not all plugins work with every game. We suggest you use Pete's plugins for GPU (OpenGL, D3D or Soft), since they provide the best compatibility ... see the plugins section for more plugin troubleshooting. Then, you could try to disable MDECs, since some games crash when they try to show the opening movie. In case you're running the game from an ISO file, try Daemon Tools, since some games only work properly with that tool. Some people also informed us that using a different BIOS version has helped them getting the emu working. Now, check if your CD-ROM drive at least TRIES to read the game CD ... when it does nothing on start, try another plugin (see plugins section for more help). If this isn't the problem, you can try to load the game patches using the "Cheat" option in ePSXe. Some games have special workarounds found in these patches with allow them to run, or fix some in-game bug. And last but not least, you should try to start the emulator with the option '-cdtiming' or activate the "Enable Accurate CD-ROM Timing" option in the CD-ROM configuration screen. If all this didn't help, you just need to wait for the next version, but hey, this emulator is free so please don't send any E-Mails to the authors asking for game X to work in the next release. Q: Which BIOS files are the best to use with ePSXe? A: After the testing stage, we found out that the SCPH-1000, SCPH-5000 and SCPH-5005 don't seem to work with ePSXe. We suggest you to use the SCPH-1001 and SCPH-7502 BIOS, since they've worked great during our tests! Q: Can I use those Region X patches for the Region Y versions of the games as well? A: Nope, sorry... each patch is designed for a certain region of the game, and will most likely not work with another region. Q: Does ePSXe support changing discs in multi-disc games? A: ePSXe (version 1.0.1 and on) includes a "Change Disc" option, which can be found by going to Load -> Change Disc! This function still has some bugs, but could work for several games. Another way to get past the disc changes is to check if the game creates a savegame at the beginning of the next disc (games like Parasite Eve and Final Fantasy usually do that). In that case, simply save, exit the current game, load ePSXe again with the next CD and continue playing with the created savegame. Q: How can I show the frames per second (FPS)? A: Just press the "Del" key, this should work with most (not all) GPU plugins. Q: Can you actually play audio CDs in the "Run BIOS" option? A: Nope, that isn't supported. Q: For VGS, I used Daemon Tools to play ISOs, What should I use for ePSXe? A: Nothing like that. ePSXe comes with a built in "Run ISO" function, which easily allows you to run a .bin (CDRWin format), or .iso file from your HDD! But, Daemon Tools can have a higher compatibility rate, so you may want to still try it. Q: Can I play backups with ePSXe? A: Well, it has been proved several times now: It's nearly impossible to provide 100% protection of backup's! And since Sony isn't even able to prevent the PSX console from being used to play backups themselves, why should emulators be any different? And, since ePSXe uses the PSEmu Pro plugin system, you're even able to play ISO's directly from your hard disc! Q: During certain games (for example Driver, Ridge Racer, X-Men Vs. Street Fighter etc.), I can press whatever I want to, the emulator doesn't react. Can this be fixed? A: Yes, to get the controller working again, you just need to enable "SIO IRQ always on" in the misc menu or simply press F4 during emulation! Q: ePSXe keeps crashing on me at different locations, what can I do? A: One thing that ePSXe seems to be really sensitive to is bus speeds which are out of spec. This means you most probably overclocked your PC. If you are experiencing problems with ePSXe crashing constantly, but never at the same location, then it could be pointing to this problem. The only way that your bus speeds would be out of spec would be if you are overclocking, so if you are then you might want to try setting your processor back to its default settings with the PCI bus being at 33mhz and the AGP bus being at 66mhz. During testing the bus speeds only seemed to effect Final Fantasy IX, but it might also effect other games as well, so if you are having random crashing problems with any game, this would be something to give a try. Q: I keep getting some strange errors in the command line box in ePSXe...something about MCI? A: If you're having troubles with errors related to mci, or an empty black screen, upgrade your ePSXe and use one of the internal CD-ROM plugins, depending on your OS. If you don't wish to upgrade, or want to use another external plugin, then disable CDDA under Config > Sound. Q: ePSXe just gives me a black screen! A: See the previous question relating to CDDA. Q: Yay! ePSXe 1.2.0 supports save states! But, how do I use them? A: In order to use save states, you must get used to the keys which allow you to take advantage of them. First, F1 is to save to the current slot, F2 to increase the slot number (You can see the current slot in most GPU's on-the-fly menus), but there is a max of five slots. And finally, press F3 to load the savestate in the current slot. Also, Save States are only supported with the following plugins, and their future revisions: GPU --- Kazzuya's Software GPU 1.6 Alpha Knack's Software GPU 0.84 Beta Lewpy's Glide GPU 1.31 Pete's Direct3D GPU 1.47 Pete's OpenGL GPU 1.47 Pete's Software GPU 1.47 SPU --- ePSXe SPU Core 1.2.0 Null2's SPU 1.35 Pete's MIDAS SPU 1.7 This list will be added to as authors update their plugins to support ePSXe's save state function. Q: I'm so excited about ePSXe 1.2.0 including Force Feedback support, but there's one problem, it won't work! What am I doing wrong? A: (Answer provided by Wormie, owner of PSXFanatics.com) "I have seen some people having troubles getting Force Feedback to work for them. I don't think it was ever mentioned before, but during testing I found this feature it only seems to work when the controller is set as analog/digital in the controller setup for ePSXe. Also when setting up the analog controlls, I personally didn't mess with the options at the very bottom of the controller ... I just setup the 4 way directional pad area (or whatever it's called) with the analog stick instead of the directional pad." Q: Are there any command-line switches I should know of that are not mentioned in ePSXe's docs? A: There are quite a bit of undocumented switches, even some that aren't mentioned when using the '-help' switch! For your reading pleasure, here is a list of all known command-line switches in ePSXe 1.2.0 and their function(s): -adsrtrick - Returns a random ADSR value. -analog - Enables Analog Pad Emulation. -anamous - Enables Analog Pad Emulation via Mouse. -bios <file> - Loads the specified PlayStation BIOS file. -c - Enables the Dynarec core.* -cddmairq3 - Enables CD-ROM IRQ3 in DMA.** -cdfast - Enables Fast CD-ROM Emulation. -cdrom <letter> - Selects a CD-ROM Drive Letter -cdslow - Enables Slow CD-ROM Emulation. -cdtiming - Enables Accurate CD-ROM Timing. -debug - Enables Debugging.*** -dmairqclear - Forces DMA IRQ to always be cleared. -f - Disables BIOS Logo. (Fast Boot) -ff9pal - Enables Final Fantasy IX PAL cheat. -fl - Enables the internal framelimiter.** -forcepad - Forces SIO IRQ to always be enabled. -forcespu - Forces SPU IRQ to always be enabled. -gun - Enables Namco Gun Emulation.** -h - Displays some (not all) command-line switches. -hdev - Displays a list of debug options. -help - Displays some (not all) command-line switches. -i - Loads the Interpreter core.* -legaia - Enables Legend of Legaia cheat. -lib - Loads libpsx.exe. -loadbin <file> - Loads a specified ISO image file. -loadcheat <file> - Loads a specified .cht file. -loadfake - Loads a fake file.**** -loadmemc0 <file> - Loads a specified memory card file in the first slot (0). -loadmemc1 <file> - Loads a specified memory card file in the second slot (1). -mouse - Enables Mouse Emulation. -noaudiocd - Disables CDDA. -noauto - Disables automatically applied patches. -nocd - Disables CD-ROM Emulation. -nocdcmd11 - Disables CD-ROM command 11. -nocdstatus - Changes some CD-ROM status outputs. -nocdrtstatus - Disables CD-ROM RT status -nogui - Runs ePSXe without the GUI. -nolog - Disables log files. -nomdec - Disables MDEC. -nomdectiming - Disables MDEC Timing. -nomemcard - Disables Memory Card Emulation. -noseekinxa - Disables seeking during XA playback. -nosound - Disables Sound Emulation. -p <num> - Adds penalty cycles to memory access.***** -paddual - Enables a pad workaround* -savefake <file> - Saves a fake file.**** -v - Shows the current version of ePSXe -xaread - Enables XA Read. -xasound - Enables XA Sound Emulation. [psx exe] - Runs the specified PSX Executable (can be a .pll, zipped) * - No longer functional in ePSXe 1.2.0 ** - Not functional in ePSXe 1.2.0 *** - Not functional in public releases. **** - Mostly used by developers/testers. ***** - You can try '-p 12' to increase speed in some games, but it will normally produce input problems. Q: After I upgrade ePSXe, my controller no longer works! A: First, make sure you are running DirectX 7.0a or 8.0a, as versions 7.0 and 8.0 have DInput problems which were fixed in their 'a' counterparts. You can get the lastest DirectX from http://www.microsoft.com/directx If that doesn't fix your problem, delete the ePSXe Configuration registry entry under 'HKEY_CURRENT_USER\Software\Epsxe\Config' using Microsoft RegEdit, if you find that too hard, I suggest a powerful, yet easy to use registry editor, RegCleaner (www.jv16.org). After deleting the entry, reconfigure your controller (and everything else =P) in ePSXe. Q: ePSXe doesn't work with my controller, but I've seen others with the same use it with no problems! What am I doing wrong? A: See the first part of the previous question pertaining to DirectInput problems experienced when upgrading ePSXe. Q: ePSXe is way too fast! How can I slow it down? A: If you're using Pete's GPU plugins, check off the 'Use FPS Limit' checkbox, and select 'FPS Limit (10-200)', and manually define your FPS limit, it is recommend you input 60fps for NTSC J and U/C games, and 50fps for PAL games. If you need a little speed boost, try incrementing the fps by a bit, maybe by 10 or so. If you're using Lewpy's Glide GPU plugin, select the 'FrameRate Limit' option, choose 'Custom', and put 60fps for NTSC J and U/C, and 50fps for PAL. If you feel it's a bit slow, try boosting the speed a bit by incrementing the fps a bit, I suggest 10fps or so, but your mileage may vary. If you're using Knack's Software GPU Plugin, select the 'fps limit only' option under the 'Framerate > Adjustment Type' menu. It's automatic, as far as I know, there's no way to customize it, yet ;) Q: When I save my game using the memory cards after loading a save state, it saves fine, but the save data is missing/older when I play it the next time, what gives? A: ***WARNING: This answer has yet to be confirmed by the authors, although our tests verify it*** (Answer provided by Lewpy, developer of Lewpy's Glide GPU plugin) Here's a step-by-step of what I believe happens: 1) You start the game in ePSXe and the memcards you have selected in the GUI are used. 2) You make a SaveState - this includes PSX RAM, GPU VRAM, SPU RAM, and memcards (<- important!) 3) You quit ePSXe, go do something really important in RealLife™, and then come back 4) You start the game in ePSXe and the memcards you have selected in the GUI are used. 5) You load the SaveState - here is the problem: what should happen to the memcards? They need to be restored from the SaveState, but should they overwrite the ones that you have selected in the GUI? That _could_ trash some important saves! So the safe route is taken: some memcards called temp.000 & temp.001 are created from the SaveState, and ePSXe then uses those for the rest of the game, until closed. What does this mean? 1) Your original memcards are not overwritten by the SaveState 2) Your saves _are_ being recorded after the SaveState load 3) You have to manually recover the memcards once you quit ePSXe, BEFORE you load another SaveState (as this will overwrite the previous temp.000 & temp.001 files) To recover the memcards, go to the memcards directory and rename temp.000 & temp.001 to whatever you like. Then, in the ePSXe GUI, point it at these memcards. There may be a more sensible way around this quandary, but at least at the moment ePSXe plays it the "safe" way: imagine the "knee-jerk" reaction that would happen if ePSXe started overwritting memcards with the ones from SaveStates ;) Q: Can I use ePSXe's 'Cheat' option to use GameShark/Pro Action Replay/etc. codes? A: With some outside tools, it is possible, but that's not what ePSXe's 'Cheat' engine was meant for. It is meant for the usage of loading memory addresses which can be used as workarounds for bugs, without having to update the ePSXe executable. If you wish to use GS Codes and the like with ePSXe, we suggest you use [pec]. You can learn more about and download [pec] at http://pec.emucheater.com. Q: Does [pec] work with ePSXe 1.2.0? A: As of this writing, the external version of [pec] (version 1.2) DOES NOT work with version 1.2.0 of ePSXe. If you want to use GameShark codes in ePSXe, you should use JNS's new creation, [pec] The Plugin. [pec] the plugin uses the PSEmu Pro Plugin interface, which allows for extended compatibility, faster execution, and more! The latest version is 1.3, and can be downloaded from http://pec.emucheater.com. Please consult the [pec] documentation if you have any trouble with the program. Q: I made a save state with a multi-disc game on one of the later discs, after switching discs during play. When I started off the disc I was currently on when I went back, the save state would not load, what gives? A: Each time you wish to load your state on another CD, you must insert the first CD you made a save state on (typically Disc One), switch to the current disc you're on, and load the save state. I know this seems tedious, but at the moment, it's the only workaround known to help with this issue. NOTE: This has only been tested on FF9, if the bug does/does not occur in other multi-disc games, please mail us. Also, some people think that renaming the save state file _may_ be another solution, but this is untested. If you test this solution, and find that it works/does not work, e-mail us ASAP. Q: Some games (only a few), are giving me trouble saving, what's up, I thought this was fixed? A: Just use the old F4 trick used for ePSXe 1.0.1, for more info, check out the 'Legacy Support' section of this FAQ below. I don't know exactly which games this effects, but if anyone can clue me in, please send an e-mail, you can find our contact e-mail in the 'Credits' section. +-+-+-+-+-+-+-+-+-+-+-+-+-+-+-+ |P|l|u|g|i|n| |P|r|o|b|l|e|m|s| +-+-+-+-+-+-+-+-+-+-+-+-+-+-+-+ Q: What's the best plugin to use for graphics (GPU)? A: Use Pete's OpenGL plugin for best graphics, if your card supports OpenGL, and use Pete's Software GPU plugin for highest compatibility. You can get both from our ePSXe plugins page. Q: I'm using Tratax's ASPI 1.2 plugin. When I start a game from CD-ROM, my computer just sits there and does nothing. What's wrong? A: Just wait around 30-60 seconds and let it load, the CD-ROM should boot afterwards. Q: I own a Voodoo 3, and I'm using Pete's GPU plugins. I configured the plugin,and selected "Nice" in order to get nice graphics. But then emulator crashes. Why? A: It's simple: Pete's plugin activated 32-bit color when you press "Nice", and the Voodoo 3 doesn't support anything more than 16-bit color. You need to lower the color depth in order to fix this problem! Q: I'm using Lewpy's Glide plugin for my 3dfx card. But every time I try to run a game, the emulator crashes. A: Download the latest version of Lewpy's plugin from our plugins section, it should be fixed in the latest version now! Also make sure you're using the latest ePSXe! Q: I'm using Win2k and can't get the CD-ROM working, no matter which plugin I try! A: In the latest version, two new CD-ROM plugins have been added. For more details about those changes, take a look at the "Getting Started" part included above in this FAQ! Q: I've downloaded and extracted Null2's SPU to my Plugins directory, but it's not showing up as a choice under SPU Plugins in ePSXe, please help! A: Null2's popular SPU plugin requires the Visual Basic 6 runtimes in order to function properly, and won't even be listed unless they are installed. Win2K, WinMe, and Win98SE(?) already come with them, but Win95 and Win98 do not. You can grab yourself a copy of the runtimes at: http://download.microsoft.com/download/vb60pro/Redist/sp4/win98/EN-US/VBRun60sp4.exe +-+-+-+-+-+-+-+-+-+-+-+-+-+-+ |S|p|e|c|i|f|i|c| |G|a|m|e|s| +-+-+-+-+-+-+-+-+-+-+-+-+-+-+ Q: How can I get Resident Evil 3 PAL working? A: You need to use a patched backup version, the original one is not working. Q: How can get Final Fantasy 8 PAL working? A: You need to use a patched backup version, the original one is not working. Q: Chrono Cross locks up when I use the teleporter, is there a way to fix this? A: Both 1.0.0, 1.0.1, and 1.2.0 freeze when you use the teleporter in the game, but you can unfreeze it and get past this point by hitting F3 in ePSXe 1.0.0/1.0.1, and F7 in ePSXe 1.2.0. Q: How can I get Final Fantasy 9 US/JAP working? A: It isn't playable in ePSXe 1.0.0 due to an emulation bug. Anyway, this bug has been fixed in 1.0.1 and higher :). When using Pete's hardware (D3D/OGL> plugins, remember to set Offscreen Drawing to standard in order see the battle menus, and set Framebuffer Textures to Gfx Card Buffer (If your video card supports it, check Pete's docs) or Full VRam Primitives (Note: Full VRAM Primitives WILL slow down ePSXe immensely), so you can see the effect which occurs every time you enter a battle. Q: I saw screenshots of ePSXe running Spiderman/THPS1/THPS2, but I can't seem to get them to work without messed up graphics. A: In order to play these three games on ePSXe, you must have Pete's (D3D/OGL/Soft) 1.41 (or higher) plugin revision(s). Q: What's this?!?! The ePSXe docs say FFIX PAL is supported, but my version does not work!? A: Final Fantasy IX PAL needs a patch to be applied to an ISO image of an original CD before it can work with ePSXe 1.2.0. Many people from the UK aren't able to locate a patch for their region yet, simply because there one doesn't exist yet! As of this writing, there are only patches for the german, the french and the spanish versions released. You can grab the PPF patches, and the engine to apply them with at PSXEmu.com Q: Help!! The '-legaia' switch doesn't seem to fix the problems in Legend of Legaia in ePSXe 1.2.0! A: This was an error on the authors' part, the correct switch to use via command line is '-cdtiming -legaia'. NOTE: Enabling Accurate CD-ROM Timing in options may produce the same effect, but to be safe, it's best to use the switch. Q: I can't seem to get Saga Frontier 2 PAL working, is there anything I can do? A: In order to play Sage Frontier 2 PAL in ePSXe, you must remove it's protection by patching an ISO image, you can find the patch by surfing the web. Also, you must run ePSXe with the '-auto' command-line switch. Q: ARGH! FF7 worked fine in ePSXe 1.0.0 and 1.0.1, but in 1.2.0, it crashes when I choose 'New Game', what's going on? A: The authors are aware of this bug, and it's going to be looked into. Until then, a quick fix is to either use an earlier version of ePSXe, or get a save file for FF7 at the beginning of the game, since the 'Continue' option is still working fine ;) Q: How can I get Soul Reaver functioning in ePSXe 1.2.0? A: The answer is quite simple really, simply check off the option 'Disable Real-Time CD-ROM Status' under Config > CD-ROM in ePSXe. Q: How can I get Cool Boarders 2001 working properly? A: This bug popped up somewhere in ePSXe 1.0.1, and remains in 1.2.0, to get Cool Boarders 2001 working, start ePSXe with the '-nogui' command-line switch. Q: How can I get Front Mission 3 going? A: Use the same method as the one for Cool Boarders 2001, start ePSXe with the '-nogui' command-line switch. Q: How can I get Breath of Fire 3 PAL started? A: Use the same method as the one for Cool Boarders 2001, start ePSXe with the '-nogui' command-line switch. Q: Gran Turismo 2 locks up after the intro screens, is there any way to fix this? A: Sure, simple enable 'Accurate CD-ROM Timing' under Config > CD-ROM, or start ePSXe with the '-cdtiming' command-line switch. Q: Dino Crisis locks up after a few screens, how can I get it to work? A: Well, the US (NTSC U/C) version has anti-mod protection, which needs to be removed in order for it to work with ePSXe. This can be done via a PPF patch for the game, which you can obtain by searching the web. Q: Dino Crisis 2 locks up after a few screens, similiar to Dino Crisis, what's up? A: As with Dino Crisis 1, the US (NTSC U/C) version of this game has anti-mod protection, which needs to be removed inorder for it to work with ePSXe. This can be done via a PPF patch for the game, which you can obtain by searching the web. Q: When a character joins my party in Chrono Cross, ePSXe locks up, is there a workaround for this? A: When this happens, simply press F7 on your keyboard, and ePSXe should return to normal, and you may continue your game of Chrono Cross ;) Q: How can I stop Breath of Fire 4 NTSC U/C from crashing when I enter the town of Kyria? A: Load the breath_of_fire_4_usa.cht cheat file in ePSXe's /cheats directory. You can do so under Cheats > Edit Cheat Codes. Load the cheat by selecting it after pressing the 'Load' button. Q: How can I stop the backround music from looping in Megaman X4/Rockman X4, like it does in MMX5/RMX5? A: In order to have the music playback properly, start ePSXe with the command-line switch, '-noseekinxa'. Q: How can I stop the backround music from looping in Megaman X5/Rockman X5? A: As with MMX4/RMX4, in order to have the music playback properly, start ePSXe with the command-line switch, '-noseekinxa'. +-+-+-+-+-+-+-+-+-+-+-+-+-+-+-+-+-+-+-+ |T|e|c|h|n|i|c|a|l| |Q|u|e|s|t|i|o|n|s| +-+-+-+-+-+-+-+-+-+-+-+-+-+-+-+-+-+-+-+ Q: Which 3D API's does ePSXe take advantage of? A: Since ePSXe uses the PSEmu Pro plugin system, it provides support for all important APIs: OpenGL, Direct3D, 3Dfx's Glide and pure software mode. For more info about the plugins and downloads, refer to our ePSXe plugins page! Q: Can ePSXe use VGS/Bleem memory cards? A: Yes, from ePSXe 1.0.1 on, you can use memory cards in VGS' or bleem!'s format. Simply select the memory card what you want to use in the specific slot using config -> memcards, start the game and play :) Q: Does ePSXe support hardware anti-aliasing? A: (Answer provided by Lewpy, PSEmu Pro plugin developer) "Since ePSXe uses PSEmu Pro GPU plugins, then you have full access to the hardware anti-aliasing that your hardware/drivers combo provides, as long as you use a hardware accelerated GPU plugin. Smoothing (i.e. bilinear filtering) is possible, but not without glitches, since the PSX games were not designed to allow for filtering. Increased screen resolution is also possible, but it doesn't allow for increased model accuracy within the PSX game. You can notice this within racing games as distant cars draw closer, there resolution is still very low. Only some kind of HLE could improve that (extracting the game data away from the actual PSX hardware .... funky stuff!)." Q: How do I dump a PlayStation BIOS? A: To dump a PlayStation BIOS, you need a GameShark or Action replay and a PC comms link. To start, you need either a real Caetla module or go to altavista and search for "Caetla" (it's a BIOS replacement for your module, so properly read the included documentation before installing it!!). Now upload "Caetla", and use use the caetla commands for downloading a binary memory image from the region 0x0bfc00000 - 0x0bfc7ffff! Now save the image as SCPHxxxx.bin, where xxxx is your PSX's model number, and ePSXe will recognise it and use it from now on. Q: How do I find out what version of the PlayStation BIOS I have? A: Open the PlayStation Bios file in WordPad or any other text editor, go down to the bottom and you will see System ROM Version X.X YY/YY/YY (Z). X is the number of the BIOS, e.g. 2.2 Y is the date of the BIOS, e.g. 12/04/95 Z is what region the BIOS is from, e.g. J for Japan, +-+-+-+-+-+-+-+-+-+-+-+-+-+-+-+-+-+-+ |A|n|n|o|y|i|n|g| |Q|u|e|s|t|i|o|n|s| +-+-+-+-+-+-+-+-+-+-+-+-+-+-+-+-+-+-+ Q: Why doesn't my favorite game, X run with ePSXe? A: Well, this emulator is done in the authors FREE time, so they don't have to get any game running just for you. Certain emu authors like to have poll's on their page to see which game you'd like to work the most. If they do not, please don't mail them, they'll probably just ignore you. Same goes with us, we didn't code the emu, we can't change anything about that. Q: Can you get game X working in the next version? And when will you release it? A: See the previous answer above! Q: Where can I find the PSX BIOS? The emu asks me for it every time. A: Please neither ask us nor the emu authors for the PSX BIOS file, we simply won't give it to you since we're legally not allowed to. Search the web (I recommend www.metacrawler.com), and you should find it quite easily. +-+-+-+-+-+-+-+-+-+-+-+-+-+-+ |L|e|g|a|c|y| |S|u|p|p|o|r|t| +-+-+-+-+-+-+-+-+-+-+-+-+-+-+ ePSXe 1.0.1 ----------- Q: With ePSXe 1.0.1, my MDECs are actually running slower than 1.0.0! What can I do to fix this? A: A simple solution to this is to just locate the ePSXe Configuration registry entry found in KEY_CURRENT_USER\Software\epsxe in your windows registry, and delete it. Restart ePSXe, reconfigure, and play! Q: Help! Some of my memcards have gotten deleted for no apparent reason! What's wrong? A: The ePSXe team recommends to backup your memory cards before using them with ePSXe. This is because some NTSC games have problems with the current NTSC timing which can result in the deletion of memcards. One suggestion is to try enabling PAL timing by setting the timing to PAL with Options > Country > PAL. As usual, the best solution is to upgrade to ePSXe 1.2.0 and higher, the problem has pretty much been resolved. Q: Ok, I got FF9 working, but I get some weird sound bugs before entering a battle and during the battle itself, is there a way to fix this? A: This is a known bug in the SPU core in ePSXe 1.0.1, to rectify this problem, upgrade to version 1.2.0 or higher. ePSXe 1.0.0 ----------- Q: The ISO function doesn't run some games my friend can play from his CDs ... Why? A: Upgrade your copy of ePSXe! In 1.0.0 the ISO function didn't apply patches yet to ISOs, this has been fixed in 1.0.1 and future versions, and should work well now! +-+-+-+-+-+-+-+ |C|r|e|d|i|t|s| +-+-+-+-+-+-+-+ Authors: Bobbi - Bobbi@psxemu.com CDBuRnOuT - CD@psxemu.com Contributors: calb Galtor _Demo_ Lewpy Pete Bernert Wormie Aldo Vargas Ryos Phuzzi dabods yazoo EmuForums' Users (If you think you should be on this list, mail us.) +-+-+-+-+-+-+ |T|h|a|n|k|s| +-+-+-+-+-+-+ CDBuRnOuT: Wormie - Thanks for being such a good friend, and for several bits of Info. Sandie - Thanks listening when I needed someone to listen, and for being a good friend, of course :) Bgnome - For being insightful, and actually giving a damn. Phuzzi - comic relief =P mathew2 - What can I say, it's m2 :D calb, Galtor, & _Demo_ - For coding such a great emu, and being really cool, down to earth devs ;) Bobbi: The PSXEmu Crew - For making this all so much fun! CDBuRnOuT - For staying with us no matter what shit we went through :) Wormie & Sandie - For always being around when I needed someone to talk to Thorgal - Being one of the biggest helpers in PSXEmu's creation! calb, Galtor, & _Demo_ - For spending so much time on this wonderous project -
PPSSPP for Windows
PPSSPP puede ejecutar y reproducir juegos de PSP en Windows en resolución Full HD. Incluso puede mejorar las texturas que de otro modo serían demasiado borrosas, ya que fueron creadas para la pequeña pantalla de la PSP original.
Incluso en PCs modernos, a menudo se puede ejecutar al doble de la resolución original.
PPSSPP es un proyecto fundado por Henrik.
-
FIFA 20 Live Editor
FIFA Live Editor (previously known as Career Mode Cheat Table) is a tool created in cheat engine which allows you to edit players, managers, transfer budget, scouts, job offers and many other things in your FIFA Career Mode.
Current Features available in the latest version of FIFA 20 Live Editor
Non-CM Related Dont Pause Game on AltTab Free Fly Camera Game Settings Camera Play As Player Positive decision on transfer request Create Transfer Offer Accomplishments FIFA Database Tables Players Table (Allowing you to edit players) TeamPlayerLinks Table Teams Table Manager Table Teamkits Table LeagueTeamLinks Table TeamStadiumLinks Table Career_ManagerPref Table Career_PresignedContract Table Career_ManagerInfo Table Career_Users Table Career_PlayerContract Table Career_Calendar Table Career_Scouts Table Career_ScoutMission Table Unique Player Movement Unique Run Style Sterling Robben Messi Fernando Torres Yaya Toure Jordi Alba Luis Suarez Kante Salah De Bruyne Lukaku Dybala Pogba Unique Sprint Style Messi Cristiano Ronaldo Robben Yaya Toure Bale Pogba Mbappe Neymar Lukaku Aubameyang Aguero A.Sanchez Dybala De Bruyne Salah Jordi Alba Alphonso Davies Editing Player Unlock "Edit Player" in career menu Player Data First Name Last Name Known As Kit Name Birth Year Birth Month Birth Day Kit Number Players Training Unlimited Training Sessions More efficient training Training Everyday Training sim - A Manager Manager Rating - 99 seasoncount = 1 Club Finances Transfer Budget pointer Hire Scouts Free 5/5 Scouts Detailed Info Job Offers Club Team National Team Global Transfer Network Reveal player data (scouting players not needed) Morale Disable Morale Happier Players Form Disable players form (May not work at all this year) Side Changer CPU vs CPU Control Home Team Control Away Team Youth Academy Generate new report Generate players with custom ID Send scout to any country Set up multiple scouting networks in the same country 15 Players per scout report Reveal ovr and pot (of players found by your scout) PRIMARY_ATTRIBUTES_RANGE SECONDARY_ATTRIBUTES_RANGE Min player age for promotion = 12 YOUTH_PLAYER_AGE_RANGE = [12, 16] Youth Player Retire At Age = 30 95 Potential 100% chance for 5* weak foot 100% chance for 5* skill moves Match Settings Change Stadium Time Of Day Half Length Weather Sim Match Settings Max_cards = 0 Max_injuries = 0 Don't lose stamina Transfer HUB Change Release Clause value to 1$ Allow Transfer approach Allow Loan approach Player Contract Contract Negotiation Disable negotiation status checks Free & Unlimited Releasing Players Gameplay Unlimited SUBS (USER) Home/Away Unlimited subs (CPU) Home/Away Disable subs (CPU) Match Timer Home & Away team score Injured players 5 stars skill moves Never Tired players Tired players by xAranaktu.